In this page
If screen recording is enabled for both your Vonage Contact Center (VCC) account and your individual account, you can record the screen or screens during calls for enabled agents. For more information about Screen Recording, see ContactPad with Screen Recording.
We support using screen recording when using the Vonage CC Screen Recording desktop application in Windows or macOS. The Screen Recording for Vonage CC extension in Google Chrome™ is now deprecated and will be retired in April 2022. Screen recording must be enabled for individual agents. If you are not sure screen recording is enabled for you, contact your supervisor. For information about enabling screen recording for individual users, see How do I enable an agent user to record their screen? in Configuring individual users. |
In this page |
|---|
To use Screen Recording with the desktop application, you must install and configure the Vonage CC Screen Recording app. Make sure you install the correct app for your operating system. When you have installed the app and logged in correctly, the application automatically records all screens during a call.
For screen recordings to work, you need to check the time settings on your computer. Check that your computer's clock is exactly the same as that on the World Clock, and not more than one second fast or slow. If it is fast or slow, you or your system administrator must turn on automatic time synchronization on your computer.
| If the time on your clock and the World Clock are not synchronized, the screen recording will not start at the start of the call. |
To install Vonage CC Screen Recording app on Windows, perform the following steps:
To install Vonage CC Screen Recording app on macOS, perform the following steps:
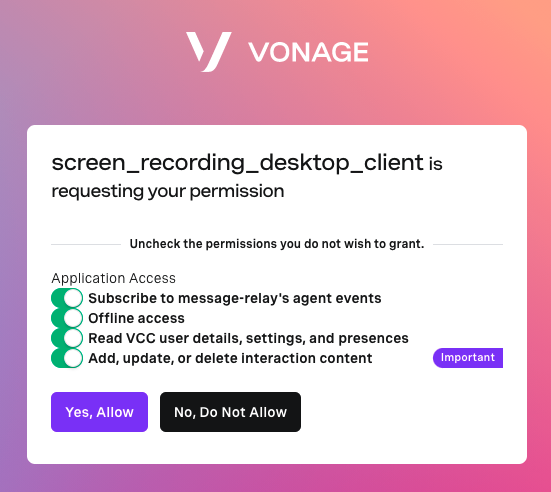
In the Vonage Screen Recording login screen, perform the following steps:
In Region, select the name of the region you are in.

Installation is complete. The Vonage CC Screen Recording app will work in the background and your screens will be recorded during your calls. You do not need to log in again after restarting the computer.
We support the extension in only the most recent version of Chrome for Windows and macOS. |
To use Screen Recording with the Screen Recording for Vonage CC extension, you must add the extension to your Chrome browser. The extension can automatically record up to two screens for each agent during a call.
To add the extension to your browser, go to the Chrome Web Store.
Click to add the extension to Chrome. If prompted, click to confirm that you want to add the extension.
To use the Screen Recording extension, you must firstly log in to ContactPad. Before you log in to ContactPad, or if you close the ContactPad window, the extension is unavailable to record.
To enable the extension to record your screen during a call, you must share up to two screens. To share one or more screens, perform the following steps:
1. Click the extension’s icon in Chrome’s address bar. The extension appears. If you are not logged in to ContactPad, the extension requests that you log in.
Optional settingsAuto-prompt One or two screens? |
2. Click Share Screen.
| If the Share Screen button is shaded, you are either already sharing or the extension is already prompting you to choose which screen or screens to share. Check your open Chrome windows for either Share your entire screen dialog boxes or Screen recording for Vonage CC is sharing your screen notifications. |
A Share your entire screen dialog box appears.
| Share your entire screen may appear on a different screen to the screen that ContactPad appears in. |
3. In Share your entire screen, click the first screen you want to share and click Share Screen.
A Screen recording for Vonage CC is sharing your screen notification appears.
Optionally, click Hide to hide the notification.
4. If you selected to share two screens, the dialog box remains visible. Repeat step 3, clicking the second screen you want to share. A second notification appears.
Now, whenever you make or receive a call, the extension will record your screen or screens. A red dot will appear on the extension’s icon while the extension is recording.
At the end of a call, recording finishes when your status changes to Ready. The recording is uploaded and appears in Interaction Content after a few minutes. For information about accessing and viewing screen recordings, see Interaction Content.
If you no longer want the extension to record your screen during calls or if you want to change which screen or screens to share, you must stop sharing; while sharing, the Share Screen button and the one screen or two screen list are shaded.
To stop sharing, click Stop sharing in the Screen recording for Vonage CC is sharing your screen notification.
| If you have hidden the notification or notifications, you can find it in its own Chrome window. If you have inadvertently closed that window, you must remove the extension from Chrome and re-add it. |