Setting up personal queues
How can I ensure that Vonage Contact Center routes an interaction to a specific agent?
If you want to ensure that a specific agent handles an interaction, configure your interaction plan to route the interaction to the agent's personal queue. For more information about personal queues, see Personal queues.
You set up personal queues in a Skill Tagger applet. For information about Skill Tagger applets, see Skill Tagger applet.
If you configure a personal queue, while that personal queue is active for an interaction—that is, not timed-out—the personal queue settings override any skills or service groups configured for the same interaction.
Before you can set up the personal queues, you must create three data sources. These data sources are placeholders for actual values collected during the call. Each data source contains one of the following values:
- The ID of the target agent. This ID is the agent's Vonage Contact Center account ID. Or the ID is the Salesforce ID that corresponds to the agent's Vonage Contact Center account if using Vonage Contact Center in Salesforce.
- The logged in timeout. The time in seconds for which Vonage Contact Center will try to route the interaction to the specified agent when the agent is logged in to Vonage Contact Center. After this time, Vonage Contact Center will route the interaction as configured in the interaction plan.
- The logged out timeout. The time in seconds for which Vonage Contact Center will try to route the interaction to the specified agent when the agent is logged out of Vonage Contact Center. After this time, Vonage Contact Center will route the interaction as configured in the interaction plan. This timeout is less relevant for calls than other types of interactions. If an agent is not logged in, a caller does not want to wait for long for an agent to answer their call.
You can use any applet that stores data in a data source to create the data sources. The following applets create data sources:
- Data Connector applet. For information about the Data Connector applet, see Data Connector applet.
- IVR Collect Digit applet. For information about the IVR Collect Digit applet, see IVR Collect Digit applet.
- IVR Collect Digit String applet. For information about the IVR Collect Digit String applet, see IVR Collect Digit String applet.
- IVR Set Menu Digit applet. For information about the IVR Set Menu Digit applet, see IVR Set Menu Digit applet.
- IVR Set Menu String applet. For information about the Set Menu String applet, see IVR Set Menu String applet.
- Set Data Source applet. For information about the Set Data Source applet, see Set Data Source applet.
You can also use an existing data source; by default, all calls have the following data sources available:
- Call Guid
- CLID
Dialled Number
The Dialled Number (
$(DialledNumber)) data source contains the ID of the interaction plan rather than its phone number. The ID and the phone number will often be the same, but this is not guaranteed. Therefore you should not use$(DialledNumber)to indicate the number dialed by the caller.- Language
First Agent ID
First Agent ID is only populated after Vonage Contact Center has routed the call through an ACD applet to an agent.
- DisplayName. By default, DisplayName contains the CLID of the inbound caller. For information about using a custom value in the DisplayName data source, see Setting a display name for an inbound call.
- InteractionOutcome. By default, InteractionOutcome contains the outcome of the interaction. For information about interaction outcomes, see Interaction outcomes.
- Interaction Start Time. The time, in UTC, that the interaction starts. For callbacks, InteractionStartTime will be the start of the original interaction.
If you use a post-call named route for post-interaction processing, all data sources configured at the time the interaction finishes (including InteractionOutcome) are available to the target named route.
The Skill Tagger applet will use data in these data sources to determine which agent to route an interaction to, during the call.
After you have created the three data sources, to configure a personal queue, perform the following steps:
- Create a Skill Tagger applet. For information about creating an applet, see Creating an applet. A new Skill Tagger applet appears.
- In the Personal Queue Data Sources section, provide the following information:
- In the Agent Id list, select the data source that will contain the ID of the target agent collected during the call.
- In the Logged In Timeout list, select the data source that will contain the value of the logged-in timeout collected during the call.
- In the Logged Out Timeout list, select the data source that will contain the value of the logged-out timeout collected during the call.
- If you want Vonage Contact Center to route personal queue interactions to agents if they are in an 'Away' or 'Extended Away' state, select the Interrupt Agent in 'Away' state check box.
- Optionally configure skill requirements in the Skill Requirements section. For information about setting up skill requirements, see Tagging interactions with a skill or skills.
- In the Next Applet list click the applet that Vonage Contact Center routes the interaction to next.
- To save your changes, click Update.
You can now continue to configure your interaction plan.
Your Skill Tagger must be part of a complete interaction plan that ends with an Automatic Call Distributor (ACD) applet. This ACD applet must behave as a skills based router, that is, a Universal Contact Distributor (UCD) applet. For information on UCD applets, see Automatic Call Distributor (ACD) or Universal Contact Distributor (UCD) applet.
Example interaction plan
The following visualization shows an interaction plan that routes calls to the specified agent's personal queue:
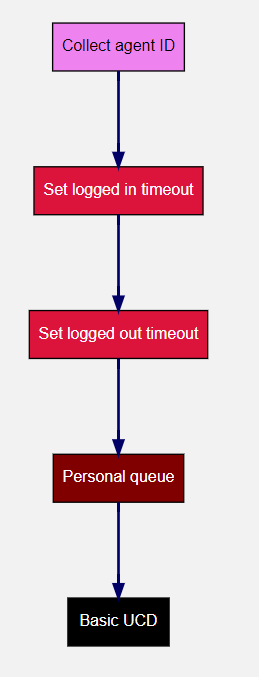
The plan includes the following applets:
1. Collect agent ID (IVR Collect Digit String)
This applet is configured to prompt the caller to type the ID of the agent they want to speak to on their telephone keypad and store the value the caller provides in an IVR slot.
'Set logged in timeout (IVR Set Menu String)' is set as the next applet and Vonage Contact Center routes the call to this specified applet.
2. Set logged in timeout (IVR Set Menu String)
This applet is configured to set the logged in timeout value in an IVR slot to the default value of 30. 'Set logged out timeout (IVR Set Menu String)' is set as the next applet and Vonage Contact Center routes the call to this specified applet.
3. Set logged out timeout (IVR Set Menu String)
This applet is configured to set the logged out timeout value in an IVR slot to the default value of 10. 'Personal Queue (Skill Tagger)' is set as the next applet and Vonage Contact Center routes the call to this specified applet.
4. Personal queue (Skill Tagger)
This applet is configured to set the values of Agent Id, Logged In Timeout, and Logged Out Timeout to the values in the corresponding IVR slots (collected and set in the previous applets) and to enable Vonage Contact Center to route personal queue interactions to agents in an 'Away' state. 'Basic UCD (ACD)' is set as the next applet and Vonage Contact Center routes the call to this specified applet.
5. Basic UCD (ACD)
This applet is an ACD applet that behaves as a skills based router, or a Universal Contact Distributor (UCD) applet. The applet has and needs no other configuration settings. Vonage Contact Center routes the call to the agent's personal queue, timing out according to the timeout settings.
How do I enable agents to decline calls in their personal queues?
To enable an agent to decline a call that is waiting in the agent's personal queue, you must configure an Agent Decline Breakout.
To configure an Agent Decline Breakout, perform the following steps:
Create an Automatic Call Distributor (ACD) or Universal Contact Distributor (UCD) applet, or edit an existing ACD or UCD applet. For information about creating or editing an applet, see Creating an applet or Editing an applet. A new or existing ACD or UCD applet appears.
- Ensure that Behaviour Type in the Routing section is Skills Based. UCD only sections are available.
In the Agent Decline Breakout section, specify the applet that Vonage Contact Center must route the call to if an agent clicks to decline the call. In the Agent Decline Breakout Applet list, click the name of the target applet.
- Continue to configure the applet as required. For information about the fields in the applet, see Automatic Call Distributor (ACD) or Universal Contact Distributor (UCD) applet.
- To save your changes, click Update.
Now, if an agent declines a call in their personal queue, Vonage Contact Center routes call to the applet in the Agent Decline Breakout Applet list. For information about personal queues, see Personal queues.
For general assistance, please contact Customer Support.
For help using this documentation, please send an email to docs_feedback@vonage.com. We're happy to hear from you. Your contribution helps everyone at Vonage! Please include the name of the page in your email.