Creating a call plan for the IVR Secure Payments solution
Use the IVR Secure Payments solution to enable callers to pay for goods and services over the phone (self service) or using a payment link (digital) without interacting with an agent. For an overview of the payment facility, see IVR Secure Payments solution.
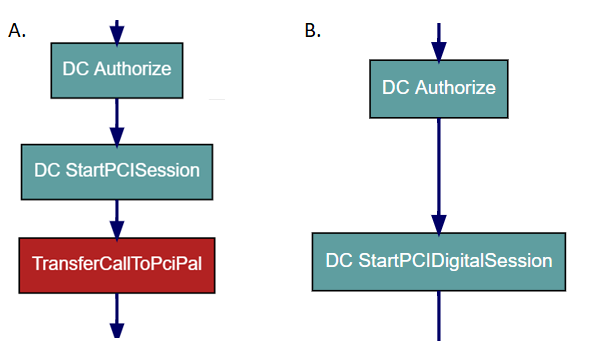
High-level call plan
The following visualization shows the key stages of an example call plan for the IVR payment solution for both self service over the phone (A) and digital payments (B).
A more detailed description of an example IVR-based call plan is as follows:
1. VCC IVR collects non-PCI payment data
Before Vonage Contact Center (VCC) starts the payment process in the platform's automated payment system, VCC must retrieve some data about the caller. Such data might include the balance of the payment to be taken and basic caller details such as name and address. The data required to start a payment session depends on the payment provider. Use one or more of the following applets to retrieve the required data:
- Data Connector applet. Use a Data Connector applet or applets to retrieve data from either a web service, Salesforce, or a third-party interface. For information about using the Data Connector applet to retrieve data from Salesforce or a web service, see Retrieving data from Salesforce, Retrieving data from Salesforce using Salesforce Object Query Language (SOQL), and Retrieving data from and sending data to a Web Service.
- IVR Collect Digit applet. Use an IVR Collect Digit applet or applets to request the caller to provide a single digit value.
- IVR Collect Digit String applet. Use an IVR Collect Digit String applet or applets to request the caller to provide a digit string value. For example, a string value might equate to their account number.
- IVR Set Menu Digit applet. Use an IVR Set Menu Digit applet or applets to set a single digit value in an IVR slot for use later in the call plan.
- IVR Set Menu String applet. Use an IVR Set Menu String applet or applets to set a string value in an IVR slot for use later in the call plan.
The data that you retrieve using these applets is available at run time in appropriately named data sources.
In the case of digital payments, the data needed to be collected before starting the payment session is a phone number that will be used to send SMS with the payment link to. You can also use a caller phone number that is available as a data resource called CLID.
Configure the last applet you create at this stage to route to the Data Connector applet you create in step 2.
2. VCC IVR starts a payment session
Before Vonage Contact Center starts the payment process in the automated system, VCC must route the data retrieved in step 1 to the automated payment system. Configure a Data Connector applet to use a Web Service interface. Authorize the user and send the data in the request as a header or in the body using two Data Connector applets:
Authorize—to authorize the user to start the session. In the below example, a call is made to the VCC Authentication API. For more information on the Authentication API, see Authentication API.
Example Interaction Definition<ApiInteraction> <Request> <Url>~~~REPLACE~~~/auth/connect/token</Url> <Method>POST</Method> <Headers> </Headers> <Body><![CDATA[grant_type=client_credentials&scope=globalpci&client_id=~~~REPLACE~~~&client_secret=~~~REPLACE~~~]]></Body> </Request> <Response> <Type>JSON</Type> <ResponseCodeDestination>AuthorizeResponseCode</ResponseCodeDestination> <Fields> <Field> <Locator>access_token</Locator> <Destination>AccessToken</Destination> <DataType>String</DataType> </Field> <Field> <Locator>token_type</Locator> <Destination>TokenType</Destination> <DataType>String</DataType> </Field> </Fields> </Response> </ApiInteraction>Start Session—to start the payment session. The fields that this Data Connector uses in the Payment Data section—for example first name, surname, city, amount, currency and so on—vary depending on the payment provider. The account configuration ID is supplied by Vonage.
For the request to be processed successfully, you must include all fields mandatory to the payment provider in the Data Connector body. In the case of a digital session, the customer’s phone number is a mandatory field in the Payment Data section.
Example Interaction Definition for self service over the phone payments<ApiInteraction> <Request> <Url>~~~REPLACE~~~/globalpci/v1/selfservicesession/</Url> <Method>POST</Method> <Headers> <Header> <Key>Authorization</Key> <Value>Bearer $(AccessToken)</Value> </Header> <Header> <Key>Content-Type</Key> <Value>application/json</Value> </Header> </Headers> <Body>{"AccountConfigurationId":"~~~REPLACE~~~", "CallGuid": "$(CallGuid)", "PaymentData": { "cardholderName":"$(~~~REPLACE~~~)","cardholderPostCode":"$(~~~REPLACE~~~)", "cardholder Address": "$(~~~REPLACE~~~)","merchantTxnRef":"$(~~~REPLACE~~~)", "amount":"$(~~~REPLACE~~~)" } }</Body> </Request> <Response> <Type>JSON</Type> <ResponseCodeDestination>GlobalPCIResponseCode</ResponseCodeDestination> <Fields> <Field> <Locator>dtmfFallbackNumber</Locator> <Destination>PCIPal|DtmfFallbackNumber</Destination> <DataType>String</DataType> </Field> <Field> <Locator>dtmfLinkId</Locator> <Destination>PCIPal|DtmfLinkId</Destination> <DataType>String</DataType> </Field> <Field> <Locator>sessionId</Locator> <Destination>GlobalPCI|SessionId</Destination> <DataType>String</DataType> </Field> <Field> <Locator>Message</Locator> <Destination>GlobalPCI|Message</Destination> <DataType>String</DataType> </Field> </Fields> </Response> </ApiInteraction>Example Interaction Definition for digital payments<ApiInteraction> <Request> <Url>~~~REPLACE~~~/globalpci/v1/digitalselfservicesession/</Url> <Method>POST</Method> <Headers> <Header> <Key>Authorization</Key> <Value>Bearer $(AccessToken)</Value> </Header> <Header> <Key>Content-Type</Key> <Value>application/json</Value> </Header> </Headers> <Body>{"AccountConfigurationId":"~~~REPLACE~~~", "PaymentData": { "CustomerPhoneNumber":"$(~~~REPLACE~~~)","cardholderName":"$(~~~REPLACE~~~)","cardholderPostCode":"$(~~~REPLACE~~~)", "cardholder Address": "$(~~~REPLACE~~~)","merchantTxnRef":"$(~~~REPLACE~~~)", "amount":"$(~~~REPLACE~~~)" } }</Body> </Request> <Response> <Type>JSON</Type> <ResponseCodeDestination>GlobalPCIResponseCode</ResponseCodeDestination> <Fields> <Field> <Locator>sessionId</Locator> <Destination>GlobalPCI|SessionId</Destination> <DataType>String</DataType> </Field> <Field> <Locator>Message</Locator> <Destination>GlobalPCI|Message</Destination> <DataType>String</DataType> </Field> </Fields> </Response> </ApiInteraction>
3. VCC IVR transfers the caller to the PCIPal-IVR for self service over the phone payments (not needed for digital payments)
To transfer the call to the automated payment system, configure a Self Service Transfer to PCI applet. For information about the Self Service Transfer to PCI applet, see Self Service Transfer to PCI applet.
Select the data sources that contain the values retrieved in step 2.2 in the appropriate fields in the Transfer To PCI Self Service Settings section:
- Select PCIPal|DtmfFallbackNumber in Transfer destination number Data Source
- Select PCIPal|DtmfLinkId in Transfer PCIPal LinkId Data Source
4. PCIPal IVR securely collects payment details from the caller
This part of the call is based on terms agreed between the customer and PCI-Pal—a PCI DSS compliant payment solutions provider. The PCIPal IVR normally requires the following data:
- Card number
- Expiry date
- 3-digit card verification code
5. PCIPal IVR transfers the caller back to the VCC IVR solution for self service over the phone payments (not needed for digital payments)
The PCIPal IVR informs the caller whether the payment was successful and transfers them back to VCC. You can optionally transfer the payment results to the VCC IVR Data Connector applet as defined in the next step.
Optional steps for self service over the phone payments
6. VCC IVR retrieves the results of the payment
If you want to route a customer differently based on a successful or failed payment, configure a Data Connector applet to retrieve the payment result from the automated payment system. VCC stores these values in data sources.
A session can have one of the following statuses:
- Initial—session created, PCI data has not yet been collected
- InProgress—session in progress, PCI data collection in progress
- Finished—session processing finished
- Error, TimeOut, ExpiredOnProviderSide—error states
Sometimes the session status is delayed for a few seconds after the payment session ends.
In the example below, a call is made to the VCC Payment API to query the session status. For more information on the Payment API, see Payment API.
<ApiInteraction>
  <Request>
    <Url>~~~REPLACE~~~/globalpci/v1/session/$(GlobalPCI|SessionId)</Url>
    <Method>GET</Method>
    <Headers>
      <Header>
        <Key>Authorization</Key>
        <Value>Bearer $(AccessToken)</Value>
      </Header>
    </Headers>
    <Body></Body>
  </Request>
  <Response>
    <Type>JSON</Type>
    <ResponseCodeDestination>GlobalPCI|ResponseCode</ResponseCodeDestination>
    <Fields>
      <Field>
        <Locator>sessionState</Locator>
        <Destination>GlobalPCI|SessionState</Destination>
        <DataType>String</DataType>
      </Field>
    </Fields>
  </Response>
</ApiInteraction>
Use the result for routing purposes only. The actual result of the payment might change, for example, due to the call being interrupted before returning to the VCC IVR.
7. VCC IVR processes the payment results and continues as required
Configure a Data Router applet to route the call based on the payment result retrieved. You can configure, for example, the following scenarios:
- Payment success. Use an Announcement applet to inform the caller that the payment was successful. End the call.
- Payment failed. Use an Announcement applet to inform the caller that the payment failed. Use an IVR Collect Digit applet to ask the caller if they would like to try again.
- Any other result. Transfer to agent to handle the call.
Optional step for digital payments
8. VCC IVR Ends the call after starting the digital session
Configure a Data Router applet to route the call after the digital session is started. You can configure, for example, the following scenarios:
- Session started. Use a Menu applet to ask the caller if the link was delivered.
- Link delivered. Use an Announcement applet to inform the caller that the link is active within 72 hours. End the call.
- Link not delivered: Use an Announcement applet to inform the caller that the link will be delivered within an hour after a call is finished and if not, advise to call again and connect to an agent. End the call.
For general assistance, please contact Customer Support.
For help using this documentation, please send an email to docs_feedback@vonage.com. We're happy to hear from you. Your contribution helps everyone at Vonage! Please include the name of the page in your email.