Taking payments in ContactPad using the payment button
How do I handle payments in ContactPad using the payment button?
If enabled for your account, you can securely handle payments using the Payment button. Starting a payment during a call consists of three stages:
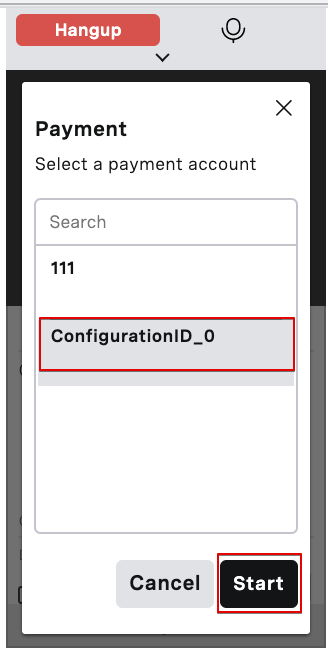
- You click the Payment button and then select a PCI Pal configuration to use for the payment. The configuration settings are pre-configured by Vonage. Vonage sets up the configuration settings for you, based on the data received from PCI Pal.
- You start the payment session and send the payment data to Vonage Payment API. An online form appears for you to fill in.
- The payment flow differs for agent assist and digital payments:
- Agent assist payment: The call is transferred to a secure platform. The caller types their card details using their telephone keypad. You will see the progress and then result of this payment in the online form.
- Digital payment: A link to a payment page is sent to the caller in an SMS message. The caller types their card details into a form on the payment page. You will see the progress and then result of this payment in the online form. The caller can pay using the payment link you sent for up to 72 hours after the call is finished.
You can take multiple payments during a call using either agent assist or digital payment sessions. The platform for payments is provided by PCI Pal, a PCI DSS compliant provider.
To take payments during a call, perform the following steps:
Click Payment in ContactPad.

If more than one payment type is available for your account, the Payment dialog appears. Click the payment type to use. Currently there are two types of payment:- Agent assist. The caller uses their telephone keypad to provide their card details and payment is taken during the call.
- Digital. A link to a payment page is sent to the caller. The caller visits the page, provides their card details in the form on the page, and payment is taken during the call. Alternatively, the caller can visit the payment page up to 72 hours after the call is finished.
Click Start. If you are starting an agent assist session, your state in ContactPad changes to Busy Payment IVR.
An online payment form appears. The available fields and the layout of the payment form are customized for your implementation. A red asterisk appears alongside mandatory fields.
The following instructions refer to an example form. Your implementation may contain different buttons and fields.
Agent assist secure payment

Type information into the mandatory fields, identified by a red asterisk. When you have finished, click Next.
If you do not provide all the required information or you provide incorrect information, the payment is declined.
Click in each required field and ask the caller to provide their card details—for example card number, security code, end date—using their telephone keypad.
Dots appear in the fields as the caller presses keys so you can see their progress. You also hear tones as the caller presses keys, but the tones are all the same so you cannot identify the numbers pressed.
If the caller makes a mistake at any point, you can erase the entered data using a dedicated refresh button in each field.

- When the caller has entered all the required data, click Process Transaction. The result of the payment appears.
- End the payment session. If required, you can start a new payment session on the same call. Your status changes to Busy Out Return or Busy In Return, depending on whether the original call was outbound or inbound.
- Complete the call as normal.
You can take multiple payments during a call, however none of the sessions can exceed a 5-minute timeout. If any session exceeds the timeout, close the payment form. You can then reinitiate the payment session. Do not close the popup window; closing the popup window will leave you in Busy payment IVR state.
During the payment session you can click the Protected by PCI Pal logo to access additional information about the session, such as time, web session ID, primary and secondary call IDs, caller number and called number. The logo should always appear with a link image and the phone icon in green. If a broken-link image appears and the logo is greyed out, the session is not secure.
Digital secure payment

- Type information into the mandatory fields, identified by a red asterisk. If you do not provide all the required information or you provide incorrect information, the payment is declined. When you have finished, click Next.
- A payment link (digital URL) is generated; send this to the caller. The caller’s phone number is prefilled, you can change this if the caller requests you to send to a different number. When you have confirmed the number to use, click Send Link via SMS.
- Depending on whether the caller wants to continue their payment during the call, one of the following happens:
- If the caller is happy to continue, ask the caller to click the link and go to the payment page and enter their card details.

While the caller provides card details, dots appear in the fields so you can see their progress.
When the caller has entered all the required data and clicked Pay, the result page appears.
You can close this window.
If required, you can now start a new payment session on the same call using the Payment button. - If the caller does not want to continue, you can close the window. The link to the payment page will be active for 72 hours, so the caller can use it to pay after the call.
- If the caller is happy to continue, ask the caller to click the link and go to the payment page and enter their card details.
- Complete the call as normal.
During the digital payment session, the digital logo on the form turns green when the caller is on the payment page, indicating that the page is secure.
For general assistance, please contact Customer Support.
For help using this documentation, please send an email to docs_feedback@vonage.com. We're happy to hear from you. Your contribution helps everyone at Vonage! Please include the name of the page in your email.