Creating a single Dial List (record ownership)
How do I create a single Dial List in which calls are assigned to the agents who own the records that the calls represent?
A single Dial List contains one or more calls that are assigned to one or more agents. By default, you can create a single Dial List in which Connect assigns calls on a first-come, first-served basis. For information about creating a Dial List in which calls are assigned on a first-come first-served basis, see Creating a single Dial List (first-come, first-served). If enabled for your account, you can alternatively create a single Dial List in which Connect assigns calls to agents who own the records to which the calls relate.
To create a single Dial Lists in which calls are assigned to agents who own the records to which the calls relate, perform the following steps:
- Open a Create New Dial List page. You can open a new Create New Dial List page in the following ways:
- From the Dial Lists tab. Click the Dial Lists tab and click New or New Dial List depending on which view is open. Create New Dial List appears.
From the Create New... menu. On the left side of the Salesforce window, click Create New... and then click Dial List. Create New Dial List appears.
On the Create New Dial List page, provide the following values:
Field Description List Name Type a suitable name for the Dial List that will make the list identifiable later. The value is not unique. List type Select one of the types in the list, such as Contacts or Leads. The list type determines the type of customers you can select for your Dial List.
Create To create a single Dial List in which calls are assigned to agents who own the records to which the calls relate, click . For information about creating alternative types of Dial Lists, see Creating Dial Lists from a filter. The following fields are only available if the features are enabled for your account.For information about permissible call times, see Permissible call times for Dial Lists.
Provide values in the following fields to specify permissible call times:
Field Description Time Zone
The time zone which both Start Time and End Time are expressed in.
Start Time The start of the Dial List's permissible call time, that is, the time from which the Dial List is active. Type the start time in Coordinated Universal Time (UTC).
If both Start Time and End Time are 00:00, when the Dial List is activated the list is always active.End Time The end of the Dial List's permissible call time, that is, the time at which the Dial List is no longer active. Type the end time in Coordinated Universal Time (UTC).
If both Start Time and End Time are 00:00, when the Dial List is activated the list is always active.For information about cross-list prioritization, see Cross-list prioritization.
To change the priority, modify the value in the Priority field:
Field Description Priority The priority of the Dial List. Provide a value from 0 to 999. The lower the value, the greater the priority of the list. Lists with no value have the lowest priority.
Click Next. The next page appears.
- If enabled for your account, the Popped Record section appears.
In Record to pop, optionally select an alternative record to pop.
If Task Dial List Type lookup appears, select the ID field on the task record that will store the ID of the Dial List (focus) record.
For information about popping related records and next contact time, see Popping related records. - Select the users that you want to assign calls in the dial list to.
- In the Users View list, select the user list view that contains the users (agents) to whom the Dial List will be assigned.

You must already have a user list view—either standard or custom—containing the appropriate users.
In the Ownership Field list, select the field that Connect uses to determine record ownership and subsequently assign calls.
The Ownership Field contains all standard and custom user lookup fields on the object you selected in List type.
- In the Users View list, select the user list view that contains the users (agents) to whom the Dial List will be assigned.
- Select phone number fields in the order that Connect will dial them.
In the Select phone number fields section, define at least one phone field for Connect to use when agents dial customers.
After you select one phone field, select additional fields until you have selected all of the phone fields that you want Connect to dial for the record type. Standard fax phone fields are excluded.
Connect will dial the fields in the order you provide. To the left of each selection is a number indicating the priority of the phone field.
To remove a phone field, deselect it.
You may only chose each phone field once.
Define the filtering and ordering settings for your Dial List.
If you are creating a Dial List of Campaign Member type, see the Creating a Dial List of Campaign Member type section later in this page.In the Filter By Fields section, you must define at least one filter that is used to select records.
You can filter by fields on the object you're using or used to create the Dial List and on related objects. The steps here describe using fields on the object used or being used to create the Dial List. For information about using related objects in filtering Dial Lists, see the Using related object types in filtering and ordering Dial Lists section later in this page.
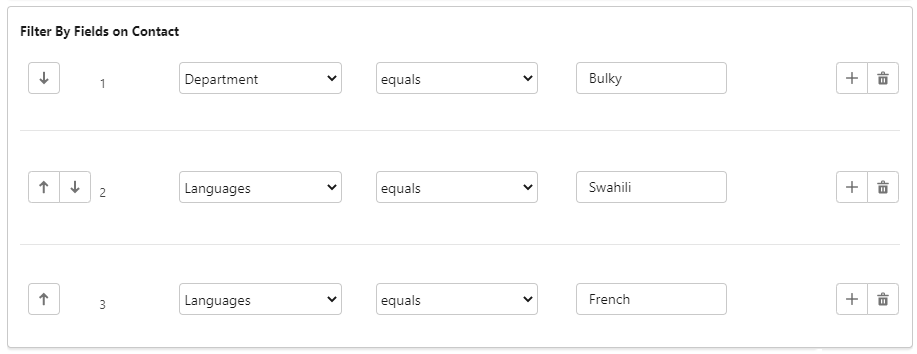
- In the first field, select the record detail used for the first filter — the available details include fields on the object you're using or used to create the Dial List.
- In the second field, select the comparison operator used.
- In the third field, type the value to which the customer value is compared.
If you want to include additional filters, click the plus (+) icon alongside one of the filters you have added. Another row of fields appears below that filter. Repeat this step for all filters you want to define. You can add up to 20 filters but best practice is to keep the number of filters to a minimum. You can reorder the filters as required using the up (↑) and down (↓) arrow icons to the left of the filters.
Optional. In the Filter Logic section, you can override the filter logic used.

The default logic operator is AND—the filters you define in the Create New Filter section are joined. To override the default logic, refer to the filters by their numbers, for example, ((1 AND 3) OR (2 AND 5)) OR (4 AND 2).The NOT operator is not supported.
If you want to filter record detail records by date — for example, the date the records were created, birth date of customers, date of last contact with customers — you must specify the date as an exact date or using a date literal. For further information about specifying dates, see Date Formats and Date Literals in Salesforce help.
Using the following example:
Filter 1 Last Name equals Jones Filter 2 Last Activity less than 2014-06-19 Filter 3 Department equals Sales the default filter logic returns customers whose details match all of the criteria.
A filter logic of '((1 OR 2) AND 3)' returns the following customers:
Customers whose last name is Jones OR whose record was last modified before 19th June 2014
AND
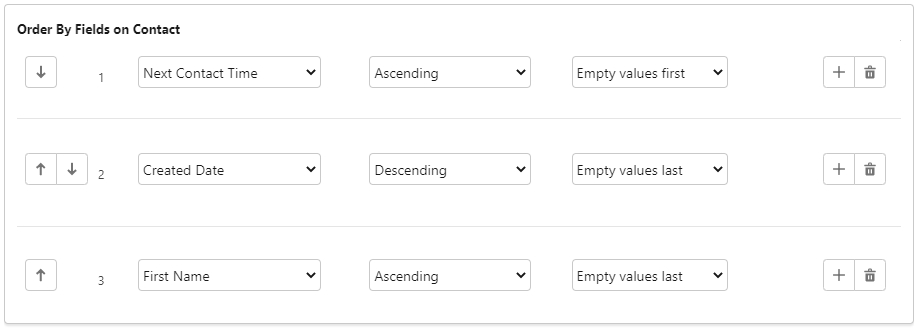
who are in the Sales departmentOptional. In the Order By Fields section, define the order in which you want filter results to appear in the Dial List. We recommend that you do this. Defining the order determines the priority in which the records are contacted, with the first field in the list having the highest priority.
You can order by fields on the object you're using or used to create the Dial List and on related objects. The steps here describe using fields on the object used or being used to create the Dial List. For information about using related objects in ordering Dial Lists, see the Using related object types in filtering and ordering Dial Lists section later in this page.
- In the first field, select the customer detail used for the first sort option — the available details include fields on the object you're using or used to create the Dial List.
- In the second field, select the sort order.
- In the third field, select whether empty values should appear first or last in the Dial List.
Click Generate List.

Your new Dial List is created and displayed in the Dial Lists list view that appears.
Before you or any assigned agents can use your Dial List, you must complete the following tasks:
- Assign Dial Lists to agents. By default, Connect assigns all call records in static lists to you.
- Activate the Dial List.
You can also edit filters (where applicable), change the priority of a Dial List, set permissible call times, and edit custom fields.
For information about these tasks, see Editing a Dial List.
Creating a Dial List of Campaign Member type
If you are creating a Dial List of Campaign Member type, you will most likely want to add all campaign members for a single campaign to the Dial List. To do this, in the filtering section:
- In the first field, select Campaign ID.
- In the second field, select Equals.
- In the third field, type or search for the campaign for which you are creating your Dial List.
Optionally add additional filters, perhaps to include only campaign members who have not already responded.
Using related object types in filtering and ordering Dial Lists
When you are configuring filter and sort options you can filter or order by fields in objects of the type of Dial List you are creating or by fields on related records.
Related records (identified by the object type and the key that relates the two object types) appear at the bottom of the first fields in the Filter By Fields and Order By Fields sections.

When you select a related record, a second list appears below the first. In this second list, select the customer detail from the related record type to filter or sort by. In the remaining fields, select the comparison operator, sort order and as normal.
For example, you can filter a Dial List based on contacts with related accounts in which the Industry field is 'Banking'. To do this select 'Related Account - Account ID' in the first list, 'Industry' in the second list, and 'equals' in the third. Finally select 'Banking' in the final list.

Defining filter settings when the dial list object has more than 1000 custom fields
In the case where the dial list object has more than 1000 custom fields, the first field will be rendered as an text input field. In this situation, using the account object as an example, you would specify the fields' names as follows:
| Dial list object | Location of field to filter by | Field labels | Field name |
|---|---|---|---|
| Account | Account object | Employees | NumberOfEmployees |
| Account | Related user object | Account Owner (on account object) and Role (on user object) | Owner.UserRoleId |
To find field names, go to Object Manager within Setup. Open the required object and go to Fields & Relationships. You will find the field name in two places:
- In the Field Name column alongside the field

- In the Field Name field when you click to view the field

The values may be different in these two places.
If you are filtering by a field on a related object, the field name used for the lookup (before the dot) must be the value that appears when you view the field. For all other field names, including the related field name (after the dot), use the value in the column.
Related object fields are only supported to one level deep; you can only use a single dot.
Using encrypted fields in filtering and ordering dial lists
When you are configuring filter and sort options you can filter by fields encrypted with deterministic encryption using a limited set of operators.
You cannot sort by fields encrypted with deterministic encryption.
Fields encrypted with probabilistic encryption cannot be used to filter or sort records.
In the following example, a Salesforce administrator has encrypted the Mailing Address field using probabilistic encryption and the Email field using deterministic encryption.

Mailing Address is shown in the field list with the suffix - Encrypted and is disabled.

Email is shown in the field list with the suffix - Encrypted and can be selected. However, only the operators equals and is not are available for use; other operators are not available.

Popping related records
When you are creating a new Dial List, if enabled for your account, you may select an alternative (related) record to pop. You may want to pop a related record if the agent using the Dial List will need information on the related record when handling the call.
Related records appear at the bottom of the Record to pop field.
Popped records and tasks
When you choose to pop a related record, Connect relates the task relating to the call to the popped record rather than the focus record. For more information, see Dial Lists and related records.
Next contact time
Connect always sets the next contact time on the focus record AND always relates the task to the popped record. When you configure your Dial Lists to pop related records, the focus record and the popped record are not the same and the task record has no link to the focus record. This link is required if you want to update the value of next contact time on the focus record at a later time.
To provide that link, you must specify a lookup field on the task record. This field will lookup and save the focus record's ID; the focus record's ID provides a link from the task record to the focus record. This link ensures that next contact time will work as intended.

How do I see the agents who are assigned to the Dial List and how many calls are assigned to them?
When you create a single Dial List in which calls are assigned to the agents who own the records that the calls represent, you can see the assignment in the Assigned Agents related list. This information is in addition to the statistics that appear on all Dial Lists. For information about the statistics that appear in Dial Lists, see Dial Lists.

The totals of outstanding, completed, and skipped calls match the values in the Statistics section.

If you cannot see the Assigned Agents related list, you must add the list to your Dial List page layout, and add the required columns to the list. For information about adding related lists to a page layout, see Making Connect information visible on page layouts and list views.
For general assistance, please contact Customer Support.
For help using this documentation, please send an email to docs_feedback@vonage.com. We're happy to hear from you. Your contribution helps everyone at Vonage! Please include the name of the page in your email.