Configuring Vonage Contact Center to use Salesforce Omni-Channel flows
When using Service Cloud Voice (SCV) with Vonage Contact Center (VCC) and if enabled for your account, you can delegate routing decisions for calls into VCC to Salesforce's Omni-Channel flows. The flows then update VCC to indicate where the calls should go to next—to either an interaction plan or an agent.
To configure this, you must perform some configuration tasks in both VCC and Salesforce. Depending on whether you are configuring the flow to return the name of an interaction plan only or interaction plan and agent, you will need to perform these steps:
| Location | Task | Interaction plan only | Interaction plan and agent |
|---|---|---|---|
| VCC | |||
Make interaction plans available for use in Salesforce Omni-Channel flows. | |||
| Create a Data Connector applet that sends inbound calls to an Omni-Channel flow in Salesforce. For information, see Create a Data Connector applet later in this page. | |||
Create a Data Router applet that routes the inbound calls to either a personal queue or a Shim Calling applet depending on whether the Omni-Channel flow returned an agent ID. | |||
| Create a Shim Calling applet that routes the inbound calls to the chosen interaction plans. For information, see Create a Shim Calling applet later in this page. | |||
Set up a personal queue. | |||
| Salesforce | |||
| Configure the Omni-Channel flow that decides which VCC interaction plans, agents, or both the inbound calls should be routed to. For information, see Configure an Omni-Channel flow later in this page. | |||
| Create call center channels that connect your call center numbers to an Omni-Channel flow and fallback queue. For information, see Create call center channels later in this page. | |||
| Give your Omni-Channel flow permission to access required settings in your VCC account. For information, see Give your Omni-Channel flow access to VCC later in this page. | |||
| Map Salesforce queues to VCC interaction plans. For information, see Create queue mappings later in this page. | |||
Link Salesforce users to their corresponding agents in VCC. | |||
Minimum version
When you have completed the configuration, the Data Connector applet will notify Salesforce about applicable inbound calls. Salesforce will use the specified Omni-Channel flow to determine the target queue, user, or both. Salesforce returns the name of the VCC interaction plan mapped to the target queue, or the ID of the VCC agent who is linked to the target user, or both. Where an agent ID is returned, the call is routed to the personal queue of the target agent. Where only an interaction plan is returned, the Shim Calling applet routes the inbound calls to the interaction plan.
In detail:
- An inbound call arrives at VCC. VCC routes the call to a Data Connector applet.
- The Data Connector applet notifies Salesforce about the call, providing in the dialed number and, optionally, the name of an Omni-Channel flow.
- Salesforce launches the Omni-Channel flow provided by the Data Connector applet, or mapped to the dialed number in the call center channel.
- The Omni-Channel flow returns the name of a Salesforce queue, a Salesforce user, or both.
- Salesforce returns the name of the interaction plan mapped to the queue and, if selected, the ID of the agent linked to the user to the Data Connector applet.
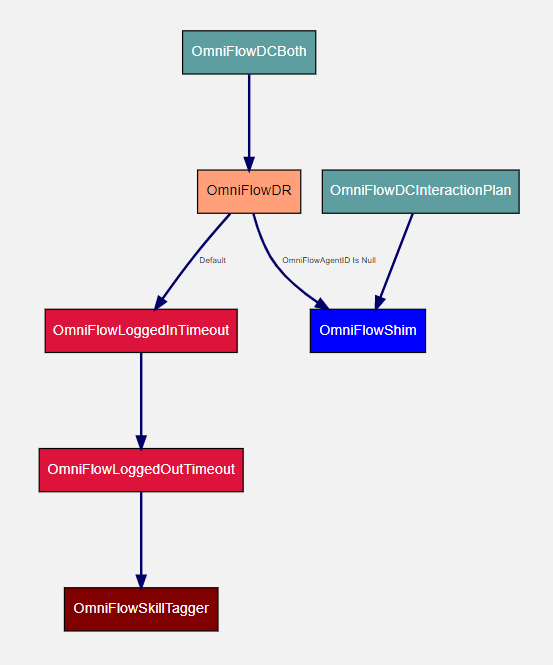
- The Data Connector applet saves the name of the interaction plan and, if requested, the agent ID in data sources. If an agent ID was requested, the call is then routed to a Data Router applet, otherwise the call is routed directly to a Shim Calling applet.
- The Data Router applet determines whether to route the call to a Shim Calling applet or to a personal queue depending on whether an agent ID is available in the agent ID data source.
- If an agent ID is available: the call is routed to a personal queue. The applets route the call to the target agent whose ID is in the data source.
- If an agent ID is not available: the call is routed to a Shim Calling applet. The applet routes the call to the target interaction plan named in the data source.
| In this page |
|---|
Configuring VCC
Make interaction plans available for use in Salesforce Omni-Channel flows
Required for
- Interaction plan only
- Interaction plan and agent
In Interaction Plan Manager, make required interaction plans available for use in Omni-Channel flows. Create a new or edit an existing interaction plan and click Show in Salesforce Omni-Channel flows. For information about using Interaction Plan Manager, see Using Interaction Plans Manager.
If you don't enable interaction plans to show in Omni-Channel flows, you will not see them when you create queue mappings. Queue mappings map Salesforce queues to VCC interaction plans. For information about creating queue mappings, see the Create mappings section later in this page.
Create a Data Connector applet
Required for
- Interaction plan only
- Interaction plan and agent
To...
- Notify Salesforce about an inbound call
- Provide the name of the Omni-Channel flow that Salesforce should launch
- Tell Salesforce what values the flow should return
...perform the following steps:
- Create a Data Connector applet. For information about creating an applet and Data Connector applets, see Creating an applet and Data Connector applet. A new Data Connector applet appears.
- In Interface in the Interface section, click Omni-Channel flows for SCV. If Omni-Channel flows for SCV doesn't appear in the list, contact your administrator for help. Several new sections appear.
Optionally, in Interface Failure, select the applet that the call is routed to if the interface fails. - In Action in the Action section, select from one of the following values:
- To route the call to an interaction plan, select Get interaction plan name from Omni-Channel flow. The Data source section appears below containing the Interaction plan name field.
- To route the call to an agent, select Get agent ID from Omni-Channel flow. The Data source section appears below containing the Interaction plan name and Agent ID fields.
- In the Data sources section, depending on which fields appear, type the names of the new or existing data sources.
These data sources will contain the interaction plan name, agent ID, or both, that the Salesforce Omni-Channel flow returns.- When configuring the flow to route to an interaction plan, the Interaction plan name field is required.
- When configuring the flow to route to an agent, the Interaction plan name and Agent ID fields are required. The interaction plan is used as a backup if the flow does not return an agent ID.
In the Omni-Channel flow settings section, provide the following information:
Field Description Dialed number The original number that the caller dialed. Salesforce will use this to determine the Omni-Channel flow to use and the fallback queue if you do not specify them in Flow and Fallback queue. Flow Optional. The developer name in Salesforce of an existing Omni-Channel flow that you want to route the inbound call to. If you don't already have a flow that you want to use, provide the name when you have created it.
You need to provide a Flow if you have not created a channel in your call center, or if you want to override the Omni-Channel flow used for the dialed number. For information about call center channels, see the Create call center channels section later in this page.
Fallback queue Optional. The developer name or ID in Salesforce of the queue to use in case the Omni-Channel flow fails.
You need to provide a Fallback queue if you have not created a channel in your call center, or if you want to override the Omni-Channel flow used for the dialed number. For information about call center channels, see the Create call center channels section later in this page.
- Optionally, in the Omni-Channel flow properties section, provide additional properties that the Omni-Channel flow can use in determining the target interaction plan.
- Later, in Successful Action in the Routing section, you will come back to select the applet to route the inbound call to.
- Click Update to save the applet.
Create a Data Router applet
Required for
- Interaction plan and agent
When you have configured both of the Interaction plan name and Agent ID data sources in the Data Connector applet, you will need a Data Router applet to determine where the call should go next. If Agent ID is available, the call should be routed to the agent's personal queue. If Agent ID is not available, the call should be routed to the interaction plan.
To route the inbound call according to whether the Agent ID is available, perform the following steps:
- Create a Data Router applet. For information about creating an applet and about Data Router applets, see Creating an applet and Data Router applet applet. A new Data Router applet appears.
- In Data Source, select the name of the Agent ID data source.
- In Operator, select Is Null.
- In Route To Applet, select your Shim Calling and personal queue applets for matching and not matching the rule respectively.
- Click Update to save the applet.
When you have created your Data Router applet, you will need to go back to your Data Connector applet. Select your Data Router applet in Successful Action and click Update to save the change.
Create a Shim Calling applet
Required for
- Interaction plan only
- Interaction plan and agent
To route the inbound call to the returned interaction plan, perform the following steps:
- Create a Shim Calling applet. For information about creating an applet and about Shim Calling applets, see Creating an applet and Shim Calling applet. A new Shim Calling applet appears.
- In Shim type in the Shim Routing Options section, click Data source. If Shim type doesn't appear, contact your administrator for help.
- In Data source name, type the name of the interaction plan data source you created in your Data Connector applet. Specify the data source using the format $(DataSourceName). This data source will contain the name of the interaction plan returned by the Omni-Channel flow.
- Optionally, in Next Applet on Failure, select the applet that the call is routed to if the Shim Calling applet fails.
- Click Update to save the applet.
When you have created your Shim applet, if you are configuring flows to return an interaction plan only, you will need to go back to your Data Connector applet. Select the Shim applet in Successful Action and click Update to save the change.
Set up a personal queue
Required for
- Interaction plan and agent
To route the inbound call to the returned agent, you will need to set up a person queue, the configuration for which requires multiple applets, most importantly the Skill Tagger applet. For information about setting up personal queues, see Setting up personal queues. Use the agent ID data source that you created in the Data Connector applet where required in the Skill Tagger applet.
When you have set up your personal queue, if you are configuring flows to return an agent ID only, you will need to go back to your Data Connector applet. Select the first applet in your personal queue in Successful Action and click Update to save the change.
Example configurations
Configuring Salesforce
Configure an Omni-Channel flow
Required for
- Interaction plan only
- Interaction plan and agent
Create a new or update an existing Omni-Channel flow in Salesforce. This will be the flow specified in the Data Connector applet or in the call center channel.
Flow template
We recommend using the Omni-Channel Flow template to help create the flow.
The flow can use properties that the Data Connector applet provides to help with routing decisions. Your flow must return the name of the target Salesforce queue or user, or both. For information about creating Omni-Channel flows, see Advanced Routing with Omni-Channel Flows (Salesforce help).
You can optionally configure the flow to pop multiple records when routing inbound VCC calls. For information about configuring the flow to pop multiple records, see Using Multiple Add Screen Pop Actions in an Omni-Channel Flow (Salesforce help).
Create call center channels
Required for
- Interaction plan only
- Interaction plan and agent
If you do not provide values for Flow dev name and Fallback queue in your Data Connector applet, you must create call center channels that map your call center numbers to an Omni-Channel flow and fallback queue. For information call center channels, see Assign an Omni-Channel Flow to a Phone Channel (Salesforce help).
Give your Omni-Channel flow access to VCC
Required for
- Interaction plan only
- Interaction plan and agent
To give your Omni-Channel flow permission to access required settings in your VCC account, you must firstly authenticate the named credentials you'll be using and then connect your contact center in Salesforce to those named credentials.
Authenticate named credentials
To give your named credentials permission to access VCC, you must authenticate your named credentials. To do so, perform the following steps:
- Go to Setup in Salesforce.
- On the left-hand side of the Salesforce window, in the search box, type 'named credentials'. Named Credentials appears below the search box.
- Click Named Credentials. The named credentials for your account appear.
- Alongside the named credential you are using with Omni-Channel flows, click Edit. The credential appears.
- Make no changes, but click Save. You are redirected to a Vonage Contact Center page.
- To give your named credentials permission to access VCC, make sure that all the required settings are switched on. Click Yes, Allow. You are returned to your named credential in Salesforce.
- Verify that Authentication Status in your named credential is 'Authenticated'. If this is not the case, contact Vonage support for help.
Connect contact center to named credentials
To connect your contact center in Salesforce to your authenticated named credentials, perform the following steps:
- Go to Setup in Salesforce.
- On the left-hand side of the Salesforce window, in the search box, type 'partner telephony contact centers'. Partner Telephony Named Credentials appears below the search box.
- Click Partner Telephony Contact Centers. The contact centers for your account appear.
- Alongside the contact center you are using with Omni-Channel flows, click Edit. The contact center appears.
- Click Connect Account. You are prompted to select a named credential.
- Select the named credential you authenticated, and click Finish. Your contact center is connected to and authenticated with your VCC account.
Create queue mappings
Required for
- Interaction plan only
- Interaction plan and agent
Create queue mappings in Salesforce. Map the Salesforce queues returned by the Omni-Channel flows to VCC interaction plans.
Salesforce error
When you click Finish to map a Salesforce queue to a VCC interaction plan, a Salesforce error appears. Click Cancel and then refresh the page. Your new queue mapping appears in the list.
For information about creating queue mappings, see Map Your Salesforce Queues to Telephony Provider Queues (Salesforce help). The Omni-Channel flow can then return the name of the interaction plan to the Data Connector applet.
Link Salesforce users and VCC agents
Required for
- Interaction plan and agent
Link Salesforce users returned by the Omni-Channel flows to VCC agents. For information about linking users to agents, see Setting up Vonage Contact Center agents in Salesforce.
Your Salesforce users must also be configured to use Service Cloud Voice. For information, see Setting up agents in Vonage Premier for Service Cloud Voice in Salesforce.
Upgrading to 22.101 of Vonage for Service Cloud Voice package
If you added Salesforce users to your Vonage for Service Cloud Voice contact center in Salesforce before upgrading to version 22.101, you may get an error when routing to a VCC agent. To fix this error, you need to remove the previously added Salesforce users from the contact center and then readd them. For information about adding and removing Salesforce users to the contact center, see the Add users to contact center section in Setting up agents in Vonage Premier for Service Cloud Voice in Salesforce.
For general assistance, please contact Customer Support.
For help using this documentation, please send an email to docs_feedback@vonage.com. We're happy to hear from you. Your contribution helps everyone at Vonage! Please include the name of the page in your email.