Making and receiving calls in ContactPad
How do I make an outbound call?
Making an outbound call using ContactPad occurs in two stages:
- Vonage Contact Center dials your phone, and your state changes to Busy Outbound. You must answer this call.
- When you answer the call, Vonage Contact Center dials the number you provide.
To make an outbound call, perform the following steps:
- In ContactPad, click Make Call. Your state changes automatically to Ready for Outbound. In this state you are temporarily removed from any of the inbound queues you serve, giving you time to look up the contact number you wish to dial or read through your notes to prepare for your outbound call.
A new dialog box with the address book appears. For information about the address book and what it contains, see ContactPad address book.
You can only make a call to or consult with an agent who is in Available now or Interruptible status. For more information, see Extended agent presence (calls) in ContactPad.
Perform one of the following steps to find third party you want to call or consult:- Scroll down the list of agent, short code, queue, and interaction plan names using the arrow keys or mouse. Click to select the appropriate name.
- In the Search field, to filter the list, type part or all of the name of the agent, short code, queue, and interaction plan you want to call or consult. Click to select the appropriate name.
In the Search field, type the telephone number of the person you want to call or consult.
A No matches found message appears when you type a telephone number. Ignore this message when making a call to or consulting a telephone number.
Press Return or click Dial.
Your telephone rings, and when you answer you hear ringing until you are connected to the target number.
Outbound call failures
When you make an outbound call, you might see receive error messages in the ContactPad message panel. These messages help you understand why calls have failed, so you can try another number, or arrange a later callback.
You can receive one of these three error messages:
Unable to place call to agent. Please try again This error occurs if your line is already in use, your line has a fault, or your telephone number is incorrect.
Important
Your supervisor should be able to identify any causes. If the above error messages persist you may have a problem with your phone and you should contact your supervisor to diagnose.
- Unable to place call to dialled number. Please try again This error occurs if you have provided an invalid number. Check the number you want to dial, ensuring that you provide the correct national or international code.
- Unable to place call - dialled number did not answer This error occurs if no one answers the phone after a configurable length of time—between 15 seconds and 3 minutes.
If messages persist, report a fault on your phone line to your Supervisor.
How do I answer an inbound call?
When you receive a call through the ContactPad you can make use of Vonage Contact Center's call control features; you can put the call on hold, consult with someone else, transfer the caller elsewhere or even control the call recordings.
When you receive an inbound call, the following things happen:
- Your state automatically changes to Busy Inbound
- The call control buttons—Release, Hold, and Consult—become active
- The Pause button becomes available (if this feature is enabled for your account)
Details of the inbound call appear in the information panel
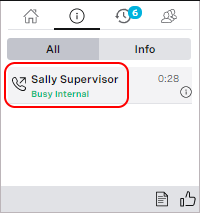
Internal call
By default, if the inbound call is an internal call from another agent in your account, the agent's name will appear in the information panel.
- Your phone starts to ring
If enabled for your account and in your browser, a web notification also appears. For more information, see Call notifications in ContactPad.
If you answer your phone, you are connected to the caller. If you cannot accept the call right now, you can reject it. For information about rejecting a call, see the How do I reject an incoming call? section later in this page.
You can now perform one of the following tasks:
- End the call. For information about ending a call, see How do I end an inbound call? later in this page.
- Put the caller on hold. Click Hold to put the caller on hold. The caller hears on-hold music or beeps and the Hold button changes to a Retrieve button. Click Retrieve to speak with the caller again.
- Consult with a third party—another agent, number, short code, queue or interaction plan—about this call, and, optionally, transfer the call to that third party. For information about consulting with a third party, see How do I consult with and, optionally, transfer to a third party? later in this page.
How do I reject an inbound call?
Before you are connected to a call, you can reject it. To reject a call when you receive an inbound call, click Release in ContactPad. The inbound call is then returned to the queue and routed to the next available agent.
After rejecting an inbound call your state automatically goes into No Answer.
How do I consult with and, optionally, transfer to a third party?
While on a call, you can consult with another agent, short code, external number, interaction plan, or queue about the call.
Warm and cold transfers
A transfer can be one of two types:
- Cold transfer: you transfer a call directly to a third party without connecting to the third party yourself first.
- Warm transfers: you initially connects to a third party before transferring the call. Generally, you will communicate with the third party while connected to them and then perform the transfer. For example, you may pass on information about the caller to the person you're transferring them to.
The type of a transfer used depends on which features are enabled for your account.
For more information, see Warm and cold transfers in ContactPad.
To consult with a third party about your current call, start by clicking Consult. A new dialog box with the address book appears. For information about the address book and what it contains, see ContactPad address book.
You can only make a call to or consult with an agent who is in Available now or Interruptible status. For more information, see Extended agent presence (calls) in ContactPad. In the Search field, type the telephone number of the person you want to call or consult. A No matches found message appears when you type a telephone number. Ignore this message when making a call to or consulting a telephone number.
Perform one of the following steps to find third party you want to call or consult:
What happens next depends on which features are available for your account:
If you are connected to the third party, the active call control buttons change.
Release, Alternate, and Transfer—become active.
- To end the consult connection, click Release. The active call control buttons change again. Retrieve and Consult—become active.
- To reconnect with the caller, click Retrieve. You are connected to the caller.
- To consult another agent or number, or to transfer the call to a queue or interaction plan, click Consult.
To alternate between the caller and the consulted agent or number, click Alternate. You can alternate as many times as you require.
If you hang up your telephone without releasing the consult connection, your caller is transferred to the consulted number.
- To transfer the caller to the consulted agent or number, click Transfer or hang up your telephone. The call is transferred. When you complete a Transfer, your state automatically changes to the Wrap Up state of Call Transferred.
Information
The default timeout for the Call Transferred state is five seconds. Contact Vonage if you need to change this timeout.
How do I add another party to an existing call (conference call)?
While on a call, if enabled for your account, you can add another participant to the call, for example another agent.
To add a third party to an existing call, perform the following steps:
Click Consult to call the person you want to add to the conference (the consulted agent).
For information about consulting with a third party, see How do I consult with and, optionally, transfer to a third party? earlier in this page. When you are connected to the target number or agent, in addition to the usual buttons, the Conference button appears in ContactPad.

- Click Conference. All three parties can now hear each other.
- You can now perform one of the following tasks:
Disconnect the consulted agent and return to a two-way call with your customer. Click Release.
The same occurs if the consulted agent clicks Release in their ContactPad or hangs up their phone.Connect the consulted agent and the customer, and leave the call. Click Transfer or hang up your phone. The consulted agent now controls the call as described.
If the customer hangs up, you and the consulted agent remain in a two-way call.
When you are in a conference call, DTMF call control is unavailable. If enabled for your account, you and your customer can, however, use DTMF tones while in a conference call. The tones will play to all parties on the call. If you need to use DTMF tones in conference calls, contact your account manager.
How do I end a call?
At the end of a call, you can end the call in one of three ways:
- You, the agent, can click Release in ContactPad
- You, the agent, can hang up
- The caller can hang up
Following each call, your state is automatically changed to the Wrap up (Auto) state. This state takes you offline allowing you time to complete any activities for the call before your next call arrives.
The amount of time you have in the Wrap Up (Auto) state is automatically set by your supervisor, but, for inbound calls, the wrap time can be different for each call type you receive. In all cases, ContactPad shows the wrap time counting down.
Following Wrap up (Auto) — when the timer has counted down to 0 seconds — your state changes to Ready, Ready for Outbound, or the state configured in State after wrap in an Automatic Call Distributor (ACD) applet, automatically. Whether you change to Ready or Ready for Outbound is determined by your supervisor. If your call center generally receives more inbound calls than makes outbound calls, the default ready state is likely to be Ready. If your call center makes more outbound calls than receives inbound calls, the default ready state is likely to be Ready for Outbound.
Click Ready at any time while in the Wrap Up state, ideally as soon as you are ready to take another call. Changing your state back to Ready as soon as possible helps your call center to answer more calls, and helps you to reduce your overall wrap up statistics.
Extending wrap time
Sometimes you may need more time at the end of the interaction to complete related tasks. If enabled for your account, while in automatic wrap, you can click to extend the wrap time.
If you are using ContactPad for single interactions, click Extend Wrap near the top of ContactPad.
")
Each time you click to extend wrap time, the remaining time is extended to the maximum wrap time. This time may vary between interactions.
For more information about extending wrap time, see Extended automatic wrap in ContactPad.
Abandoning calls
Occasionally, when you end a call, ContactPad becomes unresponsive. You might not be able to use the call control buttons or change your state—you might remain in a Busy state. You cannot receive any new calls.
In case of such problems, you should abandon the call.
To abandon a call, click the no entry icon on the information tab. A message appears to inform you that you must only abandon the call if releasing it has not worked. To proceed, click Abandon.
After abandoning a call in ContactPad, sometimes the call will continue at a telephony level. This is to ensure that you are not suddenly disconnected from the customer even if your intention was to end the call. You can continue to communicate with your customer, but, because the call will be disconnected from ContactPad so you can no longer use it to control the call. You, the caller, or both, must hang up to end the call at a telephony level.
For general assistance, please contact Customer Support.
For help using this documentation, please send an email to docs_feedback@vonage.com. We're happy to hear from you. Your contribution helps everyone at Vonage! Please include the name of the page in your email.