Creating Vonage Contact Center user accounts for existing Salesforce users
If you use Vonage Contact Center in Salesforce, to enable existing Salesforce users to use Vonage Contact Center, you must create Vonage Contact Center user accounts (VCC users) for those Salesforce users. Creating a large number of VCC users can be time-consuming. Creating users takes an especially long time if you need to assign many skills and complex permissions, and add the users to several groups. When you have created the VCC users, you must then link them to your Salesforce users. For information about linking VCC users to their Salesforce user, see Setting up Vonage Contact Center agents in Salesforce.
If enabled for your account, you can create many VCC users at the same time from within Salesforce. Creating the users from Salesforce automatically links these new VCC users to your existing users; you do not need to manually link them. The process creates the new VCC users using an existing user as a template. The new users share the template user's settings (skills, groups, permissions, and so on). You no longer need to manually assign permissions or skills, or add the users to groups when you create the users.
How do I create VCC user accounts for my existing Salesforce users?
If enabled for your account, you can create VCC user accounts for your existing Salesforce users from within Salesforce. Before you can create VCC users, you must perform the following tasks:
- Check your Salesforce users and create any additional users.
To use Vonage Contact Center in Salesforce, your Salesforce users require values in the following fields:- Phone. If your users do not have a telephone number, type a valid number in the Phone field.
- NVM Agent Id (optional). An NVM agent ID links the VCC user with their Salesforce user record. The agent ID is added to the VCC user when created. For more information, see Setting up Vonage Contact Center agents in Salesforce.
- If you are creating VCC users that are either agents or voice-enabled supervisors, your Salesforce users must have an NVM agent ID. If any of your Salesforce users do not have values in the NVM Agent Id field, you can automatically generate them later. Automatically generating the IDs avoids accidentally duplicating existing IDs. Or you can manually add them now.
- If you are creating supervisors who are not voice-enabled, your Salesforce users do not need an NVM agent ID.
- Call Center. For information about defining the call center for a Salesforce user, see Setting up Vonage Contact Center agents in Salesforce.
- Create a view or views of Salesforce users.
You must have one or more views that contain the Salesforce users for whom you want to create VCC users. For example, you might have a view for users in each of your different teams or locations.
To create VCC users, perform the following steps:
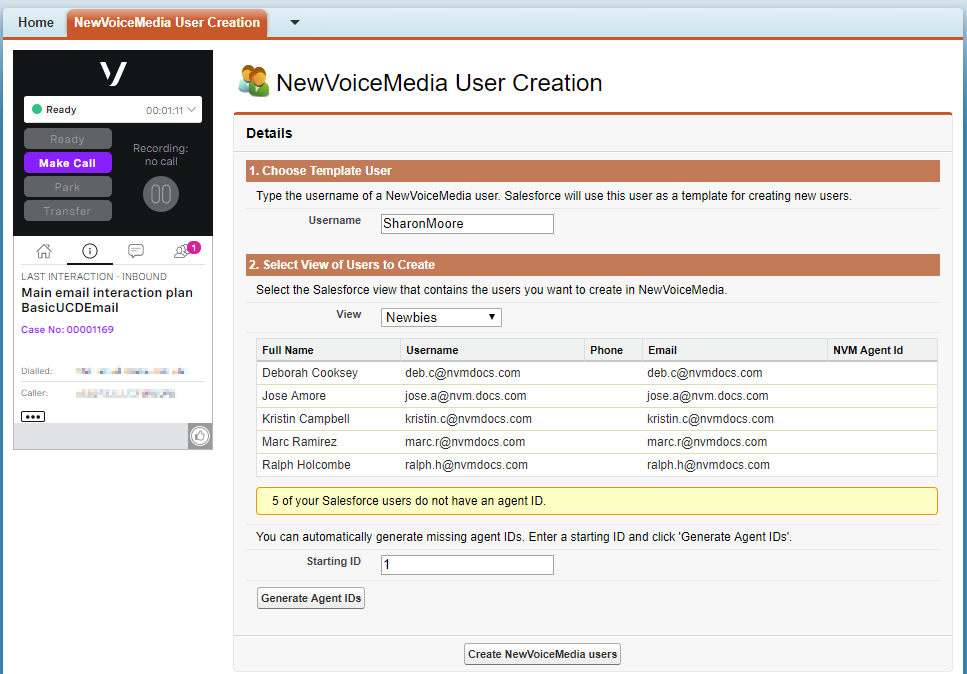
- Go to the Vonage Contact Center User Creation tab. Vonage Contact Center User Creation appears.
In Username, type username of an existing VCC user to use as template for the new VCC users.
The new users will have same skills, groups, country, type, telephony region, license, and so on, as the template user.
If you provide the username of an agent or a voice-enabled supervisor, your new VCC users will be able to make and receive interactions.
If you provide the username of a supervisor, your new VCC users will have the same user role, and the same group, queue, and line permissions as appear for the template user in the User Admin area of the VCC Admin Portal. For information about the User Admin area, see User Admin.
- In View, select the Salesforce view that contains the existing Salesforce users you are creating VCC user accounts for.
The Salesforce users in the selected view appear along with any potential issues.
In this example, none of the Salesforce users have a value in NVM Agent Id.
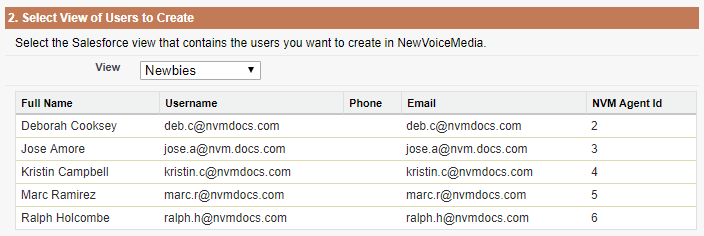
If you are creating VCC users who are either agents or voice-enabled supervisors, you must provide values before proceeding. You can automatically generate the IDs which adds a value to the NVM Agent Id field for all the users in the view. The generated IDs start at the value you set in Starting ID and miss out any agent IDs already in use. Optionally type a number other than 1 in Starting ID and click Generate Agent IDs to generate IDs. - Click Create Vonage Contact Center users. Results appears.
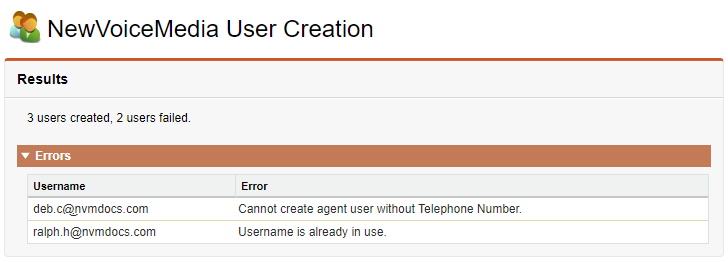
In this example, three users were created and two failed:- One user failed due to having no telephone number. Add a telephone number to the Salesforce user and try again.
The other user failed because an VCC user already exists with that username. A similar error appears if the Salesforce user contains an agent ID that is already in use by an VCC user—Agent ID 'agentID' is already in use. The existing VCC users may already be linked with the Salesforce users. In this case you can ignore these errors unless you want to update the VCC users.
You cannot currently update VCC users from within Salesforce. To update the VCC users, you must edit the users in the VCC Admin Portal.The username or ID might otherwise belong to VCC users that you do not want to link to your Salesforce users. In this case you need to change the Salesforce user's Username or NVM Agent ID values and try again.
VCC users that you create using an VCC user with either an agent or a supervisor license appear in User Admin and Real Time. The VCC users you create based on a supervisor also appear in User Access.
Limitations
When you create Vonage Contact Center users from Salesforce, the new users do not receive a welcome email.
Newly created users do not have values in their SSO External Id fields. If single sign-on is enabled for your account and your account is configured to use an External ID as the identifier for single sign-on, you must manually add these values to enable the users to log in using single sign-on. For more information about single sign-on, see Configuring single sign-on.
For general assistance, please contact Customer Support.
For help using this documentation, please send an email to docs_feedback@vonage.com. We're happy to hear from you. Your contribution helps everyone at Vonage! Please include the name of the page in your email.


