Configuring progressive dialing
If the Progressive Dialler feature is available for your account then you can configure progressive dialing. Progressive dialing enhances the functionality of Connect by automating agent tasks.
If progressive dialing is enabled and configured for your account:
When an agent ends a Connect call, Connect automatically sets the disposition code for the call based on the outcome of the call.
- The disposition code determines what Connect does next. Disposition codes indicate which of the following tasks Connect will perform:
- Continue to next record.
- Continue to next call.
- Stay on current record.
If the agent's last call does not have an applicable disposition code Connect stays on the current record.
For more information about progressive dialing, see Progressive dialing.
How do I configure progressive dialing features?
To configure progressive dialing, perform the following tasks:
Select the Progressive Dialler check box in custom settings. For information about editing custom settings, see Creating or editing custom settings for Connect.
- Enable and configure the enforced disposition codes feature. For information about configuring enforced disposition codes for Connect, see Configuring disposition codes for Vonage Contact Center in Salesforce.
- Map call outcomes to disposition codes so that Connect can automatically set the disposition code for a call based on the call's outcome. For information about mapping call outcomes to disposition codes, see How do I configure Connect to automatically set the disposition code for a call based on the call's outcome?.
- Flag whether Connect should automatically progress to the next record for the agent to handle based on their current call's disposition code. For information about flagging whether Connect should automatically progress to the next record based on a call's disposition code, see How do I configure Connect to progress to the next record for the agent to handle based on the call's disposition code?.
How do I configure Connect to automatically set the disposition code for a call based on the call's outcome?
If enabled and configured for your account, when an agent ends a Connect call, Connect automatically sets the disposition code for the call based on the outcome of the call. To do so, Connect uses call-outcome to disposition-code mappings that exist in your org. If Connect cannot find a mapping for the call outcome, agents must manually set the disposition code as normal.
For information about voice interaction outcomes, see Call outcomes.
To map voice interaction outcomes to disposition codes, perform the following steps:
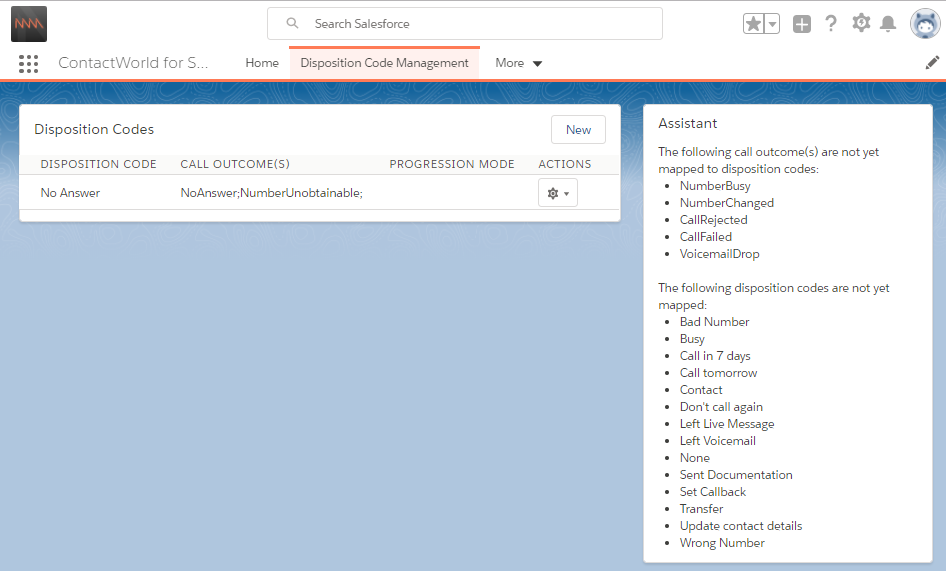
Go to the Disposition Code Management tab in your NewVoiceMedia for Salesforce app. The Disposition Codes section contains any existing mappings, and the Assistant section contains the unmapped interaction outcomes and disposition codes.
The Assistant section gets the list of disposition codes from the Log A Call Disposition Code Field field in custom settings.
- If a mapping for the disposition code already exists, click the cog icon in the ACTIONS column alongside disposition code. Click Edit.
If a mapping for the disposition code does not already exist, click New.
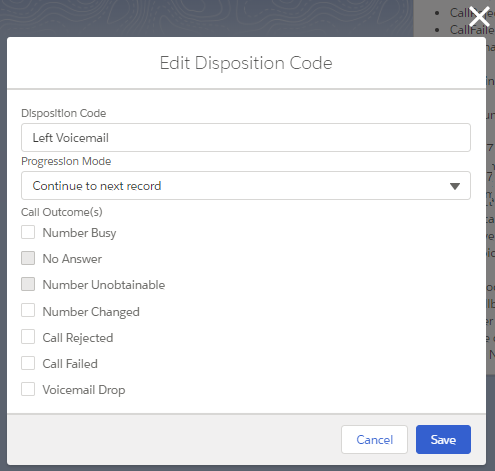
An Edit Disposition Code dialog box appears. - If you are creating a new disposition-code mapping, type the name of the disposition code you want to map in the Disposition Code field, for example, No Answer.
Select the check box alongside the name or names of the interaction outcome or outcomes you want to map to the disposition code, for example, No Answer and NumberUnobtainable. If the check box is unavailable, the interaction outcome has already been mapped to a disposition code. - Click Save.
The mapping appears in the Disposition Codes section; the mapped disposition code and interaction outcomes no longer appear in the Assistant section.
If a voice interaction ends with either of the selected outcomes, the disposition code for the interaction is automatically set to No Answer.
To make changes to or delete an existing mapping, click the cog icon in the ACTIONS column alongside the mapping. Click Edit or Delete as required.
Deleting a call-outcome to disposition-code mapping also deletes the flag that indicates whether Connect should progress to the next record for an agent to handle.
How do I configure Connect to progress to the next call or record for the agent to handle based on the call's disposition code?
If enabled and configured for your account, when an agent ends a Connect call, Connect can progress to the next call or record for the agent to handle, or to remain on the current record. Connect determines what to do next based on the call's disposition code. To do so, Connect uses disposition code mappings in your org. A disposition code mapping contains a progression mode. The progression mode tells Connect what to do next if that disposition code is set for an agent's call.
To create disposition-code flags, perform the following steps:
Go to the Disposition Code Management tab in your ContactWorld for Salesforce app. The Disposition Codes section contains any existing mappings, and the Assistant section contains the unmapped call outcomes and disposition codes.
The Assistant section gets the list of disposition codes from the Log A Call Disposition Code Field field in custom settings.
- If a mapping for the disposition code exists, click the cog icon in the ACTIONS column alongside disposition code. Click Edit.
If a mapping for the disposition code does not exist, click New.
An Edit Disposition Code dialog box appears.
If you are setting a progression mode for a new disposition-code mapping, type the name of the disposition code you want to map in the Disposition Code field, for example, No Answer.
Maximum length of disposition codes
Disposition codes should be no longer than the character limit for custom settings. The limit depends on whether the custom settings are encoded or whether the disposition code contains extended characters, such as é.
We recommend that your disposition codes contain 25 characters or fewer.
In the Progression Mode list, select which of the following tasks Connect will perform if the agent's current call contains this disposition code:
- Continue to next record
- Continue to next call
- Stay on current record
- Click Save.
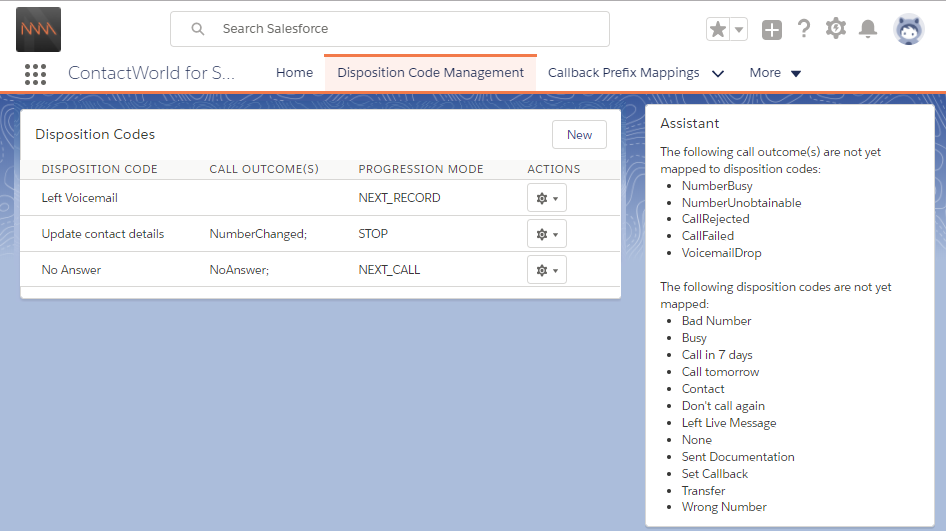
The mapping appears in the Disposition Codes section; the mapped disposition code and any mapped call outcomes no longer appear in the Assistant section.
Now, when an agent ends a call, Connect determines what to do next based on the progression mode of the call's disposition code (set by either Connect or the agent).
For general assistance, please contact Customer Support.
For help using this documentation, please send an email to docs_feedback@vonage.com. We're happy to hear from you. Your contribution helps everyone at Vonage! Please include the name of the page in your email.