Users of Vonage Contact Center (VCC) must have a Vonage Contact Center account before setting up an integration with Salesforce.
If you are yet to sign up for an VCC account, please visit our website newvoicemedia.com to contact our Sales department.
Salesforce is a powerful tool for managing relationships with your customers. On its own, however, Salesforce relies on agents to keep track of inbound and outbound interactions.
Log into your Salesforce org and go to Service Setup in Lightning Experience.
In Recommended Setup, click View All and click Voice Support Setup. Click Start. Voice Setup appears.
In the list of providers, click Vonage Contact Center. Click Next then read and agree to the AppExchange terms and conditions. Click Install Package. This installs the latest version of Vonage Contact Center into Salesforce directly from the Salesforce App Exchange.
In Add Voice Services Provider Details, select your region for both CallCenter node and your Vonage Contact Center endpoint (the values for both of these settings will be the same unless instructed by your Vonage Contact Center account manager). In Account Key, type your account key. Click Next.
How do I get my account key?
To make use of the Vonage Contact Center APIs, and various other Vonage Contact Center features, you need to have your account key and API authentication token.
You will only be able to generate an API authentication token if your account has the API functionality enabled.
Log in to the VCC Admin Portal and go to Configuration within Account Settings.
In the API Authentication Token section, click Generate new authentication API token. If you already have an API token assigned this command will re-issue that key, rendering the previous token defunct.
Your account key and API token appear. Take note of these details—when you leave this page the details are no longer available. You will have to generate a new token.
If you generate a new API authentication token, any previous tokens you have generated will no longer work. You must, therefore, update previous tokens with the new token. For example, if used, update tokens in custom settings for Vonage Contact Center in Salesforce and settings for Advanced Reporting and Statistics.
In Who's Answering the Phone, select the Salesforce users who will be handling calls using Vonage Contact Center in Salesforce. Click Next.
Link your Vonage Contact Center account to your Salesforce org.
How do I link Vonage Contact Center to a Salesforce account?
To make and receive calls using Vonage Contact Center in Salesforce, you link Vonage Contact Center (VCC) to a Salesforce user account. The Salesforce user account must be an API user account. VCC uses the linked account to log in to Salesforce and perform automated actions. These automated actions include looking for a Salesforce record and creating a task at the end of a call.
The API user must have enough privileges to allow the automated actions. For information about permissions that the API user needs, see ContactWorld API user permissions.
API only user and multi-factor authentication
From February 1, 2022, Salesforce will require users—other than API only users—to have multi-factor authentication enabled. We recommend that you make the API user an API Only user and do not enable multi-factor authentication for that user. The API Only user will not be able to access the Salesforce user interface.
You can connect an API user account to a maximum of five VCC accounts. If you have more than five accounts, you must create more than one Salesforce API user account.
You only need to perform this task once for your account. When you link VCCto a Salesforce account, VCC and Salesforce create unique keys to form the link. VCC does not store any Salesforce credentials.
How do I link VCC to a Salesforce account?
To link VCCto your Salesforce account, perform the following steps:
Go to Salesforceor CRM Admin (within Business Apps), depending on which appears. If you cannot see either and think you should be able to, contact support. Salesforce or CRM Admin appears.
The Salesforce account credentials area displays one of three statuses:
Unlinked. You have not linked VCC to a Salesforce account.
Linked. You have already linked Vonage Contact Centerto a Salesforce account. You can relink Vonage Contact Centerto a different Salesforce org or use a different API user. You do not need to relink.
Legacy. You have already linked your account to VCC using a legacy method. We recommend that you relink VCC using this new method.
Click Link or Relink and, in the drop-down list that appears, click Production or Sandbox depending on whether you want to link to a production org or a sandbox org. A Salesforce login page opens in a new browser window.
Log in to your Salesforce org as your API user. In the same browser window, a Salesforce Allow Access? page appears.
You must log in to Salesforce directly as the API user.
When you are logged in to Salesforce as an administrator, you are able to log in as another user. You must not use this method to log in as your API user due to Salesforce security. For information about logging in as another user and the related security measure, see Salesforce help.
Click Allow to enable VCC to access your Salesforce org using the API user's credentials. The Salesforce browser window closes.
In VCC, the Salesforce page updates, and your Salesforce account credentials appear. Your status is Linked.
To unlink your account, click Unlink. A message appears to inform you that your Salesforce integration will no longer work. The Salesforce Administration page updates and the status of your Salesforce account credentials is Unlinked.
In Service Setup, go to Remote Site Settings. Three new remote site settings will be available: NewVoiceMedia_APAC, NewVoiceMedia_EMEA and NewVoiceMedia_NAM. Activate the remote site for your region.
Go to the Secrets Management Tab within Salesforce (Classic or Lightning). Here you will find the Account Key, provided earlier within the Setup Flow. Update your Token from the VCC Admin Portal.
How do I generate my authentication token?
To make use of the Vonage Contact Center APIs, and various other Vonage Contact Center features, you need to have your account key and API authentication token.
You will only be able to generate an API authentication token if your account has the API functionality enabled.
Log in to the VCC Admin Portal and go to Configuration within Account Settings.
In the API Authentication Token section, click Generate new authentication API token. If you already have an API token assigned this command will re-issue that key, rendering the previous token defunct.
Your account key and API token appear. Take note of these details—when you leave this page the details are no longer available. You will have to generate a new token.
If you generate a new API authentication token, any previous tokens you have generated will no longer work. You must, therefore, update previous tokens with the new token. For example, if used, update tokens in custom settings for Vonage Contact Center in Salesforce and settings for Advanced Reporting and Statistics.
Before your users can start making calls using Vonage Contact Center in Salesforce, you need to create Vonage Contact Center users in your Vonage Contact Center account.
How do I create individual users?
A Vonage Contact Center (VCC) user is someone who interacts with VCC. A user's license determines the tasks they can perform. For more information about users, see User Admin.
In the User Admin area of the VCC Admin Portal, you can configure your users in the account you are logged in to.
Admin users always have access to edit all users in the account they are logged in to.
Supervisor users have access to edit supervisor, wallboard and agent users who are:
assigned to the group or groups that the supervisor has Write permission to
not assigned to any group if the supervisor has theView Unassigned Userspermission
Supervisor users also have access to edit other supervisor or wallboard users who are their managees, and themselves.
All users that you create in User Admin, including those with Supervisor and Admin licenses, will be able to access the account you are logged in to and only that account. If you want users with Supervisor or Admin licenses to access other accounts, you must add the account as a linked account using User Access. For information about adding linked accounts to users in User Access, see Editing a user.
Open Users tab. To add a new user, click Create user in the top-right corner. If the button is unavailable, you don't have enough permissions to create new user.
A new user appears. Provide the following information:
A username for the user. The username must be unique within VCC. The user uses this username to log in to the VCC Admin Portal and ContactPad.
Type the username you want your user to use. Username can only contain alphanumeric characters and underscores (_). For example, Demo_Agent. Username cannot contain spaces.
We recommend using an email address to ensure uniqueness and to simplify integration with single sign-on.
You cannot edit a username after you have saved the user.
Name
The user's name for display purposes throughout the VCC Admin Portal. For example, this name appears when the user is logged in to ContactPad or in the users list.
Type the name you want to appear in the user interface in relation to this user.
Email
The user's email address. When you save the user, Vonage Contact Center sends an email to the provided address. The user must follow the link in the email to set the password to use when they log in to VCC Admin Portal or ContactPad. The link is valid for two weeks, after which the user must reset their password. For information about how a user resets their password, see Logging in to ContactPad or Logging in to the Vonage Contact Center Admin Portal.
SSO External Id
Optional. The value that you want Vonage Contact Center to use to match VCC users with their Salesforce or Microsoft users when using single sign-on.
If single sign-on is enabled for your account and your account is configured to use an External ID as the identifier for single sign-on, type the value that will match the logged in Salesforce user's identifier value.
The user's license. The license determines what tasks the user can perform in Vonage Contact Center and ContactPad. For information about licenses, see User Admin.
Click Admin, Supervisor, Wallboard, or Agent in the License list.
You can a change a user's license to one at or below your license level.
For example, as a user with a supervisor license you can change the user's license to Supervisor, Wallboard or Agent. You cannot change the license to Admin.
Analytics access (beta)
If enabled for your account, Analytics access (beta) appears. For information about configuring Analytics licenses, see Configuring Historical Analytics access.
Agent access granted
If License is Agent or if agent access is already granted, Agent access granted does not appear.
Determines whether the user is granted the possibility of acting as agent.
Click Yes or No to allow or disallow the user to access ContactPad. If you click Yes, you cannot later revoke access for the user.
Determines whether the user can currently act as an agent and work with inbound or outbound interactions.
Click Yes or No to allow or disallow the ability to act as agent.
The country code for the agent's physical location. Vonage Contact Center uses Physical Location primarily for routing.
Click the agent's physical location in the Physical Location list.
Phone Number
The agent's phone number in national format. Vonage Contact Center routes calls to this number.
Type the agent's phone number in national format.
Virtual Location
The country code for the agent's virtual location.
Using the VCC Admin Portal, an agent can make and receive calls from anywhere. For example, an agent could be in France but making and receiving calls from the United Kingdom. In this case, you should set Virtual Location to United Kingdom +44. The virtual location determines the format of the telephone numbers that appear in ContactPad. In this example:
Telephone numbers appear in UK format
When the agent makes an outbound call:
The number that appears on the handset of the target is in UK format
The agent can dial a UK number as if from the UK without using the international prefix
Click the agent's virtual location in the VirtualLocation list.
In Country Display
In ContactPad various telephone numbers appear when an agent receives or makes a call. You can present these numbers in national or international format.
We recommend that you use international format throughout Vonage Contact Center.
Telephony Region
Vonage Contact Center uses an agent's telephony region to determine the telephony server to use when the agent makes an outbound call.
Telephony Region is available only for the Global Voice Assurance feature. For information about Global Voice Assurance, see Global Voice Assurance.
If Global Voice Assurance is enabled for your account, provide the most appropriate location for the agent. For more information about setting the telephony region, see the How do I set telephony regions for agents? section in this page.
Enforced Disposition Codes Enabled
Determines whether this agent must provide a disposition code for an interaction. For information about disposition codes, see Disposition codes.
Transcribe Call Enabled
Determines whether Conversation Analyzer will transcribe the agent's inbound and outbound calls. Conversation Analyzer must be enabled for this to take effect. For information about Conversation Analyzer, see Conversation Analyzer.
Determines whether this agent can use ContactPad with WebRTC. For information about enabling ContactPad with WebRTC, see How do I enable an agent user to use ContactPad with WebRTC and, optionally enable auto-answer? later in this page.
Agent can enable WebRTC in ContactPad
Determines whether Use Softphone appears in ContactPad for the agent. For information about enabling ContactPad with WebRTC, see How do I enable an agent user to use ContactPad with WebRTC and, optionally enable auto-answer? later in this page.
Determines whether the agent can park calls. Appears if priority call handling is enabled for your account. For information about priority call handling, see Priority call handling in ContactPad.
Agent can toggle call recordings in ContactPad
Determines whether this agent can control call recordings in ContactPad. For information about call recordings, see Call recording.
Automatically answer outbound calls
Automatically answer outbound calls is available only if your Vonage Contact Center account is either linked to a Vonage Business Communications account or configured to use WebRTC.
Automatically answer inbound calls is available only if your Vonage Contact Center account is either linked to a Vonage Business Communications account or configured to use WebRTC.
The maximum number of seconds an agent can remain in a Wrap Up (Auto) state after an outbound call ends.The agent can use this time to make notes about the previous call, for example. After the maximum time, the user's state is changed to Ready.
The overall default is 180 seconds. The default for your account is in the Outbound Wrap-Up Time field in System Settings. For information about setting the default timeout for your account, see Editing Configuration (Account Settings).
To set Outbound Wrap Timeout to the default for your account, click Default. To override the account default, click Custom. A new field appears. Type the maximum number of seconds that an agent can be in the Wrap Up (Auto) state after an outbound call. The value must be a number between 1 and 7200 seconds.
Agent No Answer Timeout (Unexpected)
The maximum time, in seconds, that an agent can be in an unexpected state due to the agent not answering their phone (No Answer state appears in ContactPad). After the maximum time, the user's state is changed to Ready or as configured in State after unexpected or fault in an Automatic Call Distributor (ACD) or Universal Contact Distributor (UCD) applet.
The overall default is 180 seconds. The default for individual groups is in the Max Unexpected (s) field in the group's record. For information about setting the timeout for a group, see Configuring groups.
To set Agent No Answer Timeout to the default for the group, click Default. To override the group's default, click Custom. A new field appears. Type the maximum number of seconds that an agent can be in the No Answer state. The value must be a number between 1 and 7200 seconds.
The No answer timeout in an Automatic Call Distributor (ACD) applet defines how long Vonage Contact Center tries to call an agent after routing a call to the applet. The Agent No Answer Timeout here defines how long the agent remains in the resulting No Answer state in ContactPad.
Agent No Answer Timeout only appears if enabled for your account.
Agent Line Busy Timeout (Unexpected)
The maximum time, in seconds, that an agent can be in an unexpected state due to the agent's line being busy (Line busy state appears in ContactPad). After the maximum time, the user's state is changed to Ready or as configured in State after unexpected or fault in an Automatic Call Distributor (ACD) or Universal Contact Distributor (UCD) applet.
The overall default is 180 seconds. The default for individual groups is in the Max Unexpected (s) field in the group's record. For information about setting the timeout for a group, see Configuring groups.
To set Agent Line Busy Timeout to the default for the group, click Default. To override the group's default, click Custom. A new field appears. Type the maximum number of seconds that an agent can be in the Line busy state. The value must be a number between 1 and 7200 seconds.
Agent Line Busy Timeout only appears if enabled for your account.
Agent Invalid Number Timeout (Fault)
The maximum time, in seconds, that an agent can be in a fault state due to the agent having an invalid number in their settings (Network Congestion state appears in ContactPad). After the maximum time, the user's state is changed to Ready or as configured in State after unexpected or fault in an Automatic Call Distributor (ACD) or Universal Contact Distributor (UCD) applet.
The overall default is 10 seconds. The default for individual groups is in the Max Unexpected (s) field in the group's record. For information about setting the timeout for a group, see Configuring groups.
To set Agent Invalid Number Timeout to the default for the group, click Default. To override the group's default, click Custom. A new field appears. Type the maximum number of seconds that an agent can be in the Network Congestion state. The value must be a number between 1 and 7200 seconds.
Agent Invalid Number Timeout only appears if enabled for your account.
Agent Network Issue Timeout (Fault)
The maximum time, in seconds, that an agent can be in a fault state due to a network issue (Fault on Line state appears in ContactPad). At the end of the maximum time, the user's state is changed to Ready or as configured in State after unexpected or fault in an Automatic Call Distributor (ACD) or Universal Contact Distributor (UCD) applet.
The overall default is 10 seconds. The default for individual groups is in the Max Unexpected (s) field in the group's record. For information about setting the timeout for a group, see Configuring groups.
To set Agent Network Issue Timeout to the default for the group, click Default. To override the group's default, click Custom. A new field appears. Type the maximum number of seconds that an agent can be in the Network Congestion state. The value must be a number between 1 and 7200 seconds.
Agent Network Issue Timeout only appears if enabled for your account.
Mandatory Call Rating Frequency
Determines the percentage of calls that this agent has to rate:
Default—the value set in System Settings determines the call rating frequency for this agent
Custom—set a custom percentage value for call rating frequency for this agent. Type a value within the range of 1-100. The value must be a whole number.
Appears only if mandatory call quality rating is enabled for your account. For information about mandatory call quality rating, see
Callback Numbers
The outbound CLIDs, or callback numbers, available for the agent. For information about callback numbers, see Callback numbers.
When you create an agent, all callback numbers in the account are available for the agent to use.
Click the x alongside a callback number to remove it. Click Clear to remove all the callback numbers. Click All to add all the callback numbers.
Scheduled Logout Settings
The schedules that this agent is assigned to. For information about schedules, see User Admin.
To add an agent to a schedule, click Add to schedules. Type the name of the schedule you want to assign the user to. To remove the agent from a schedule, click the – (minus) icon alongside the schedule.
The skills that are assigned to this agent. For information about skills, see User Admin.
To view or change the skills assigned to an agent, click Skills. A text field and a list of currently assigned skills appear.
To assign a skill to the agent, click in the text field and, optionally, start typing the name of the skill you wish to assign. A list of available skills, filtered by any text you have typed, appears. Click the skill or skills you want to assign.
The skill or skills appear in the list along with a skill level; the default skill level for newly added skills is 5.
The list remains visible so you can assign multiple skills. To assign all available skills to the agent, click Add All. To remove all currently assigned skills from the agent, click Clear All. To remove an existing skill, click the – (minus) icon alongside the skill.
If enabled for your account, the list of skills includes the Level column. The level indicates how proficient the user is in a skill.
To set the skill level for the user for a skill, click the appropriate number on the slider. For an existing skill, a description of the change you make appears alongside the slider, for example 'Level 7 to 6'.
Groups
The groups that this agent is in. For information about groups, see User Admin.
To view the groups an agent is in, or add or remove the agent to or from groups, click Groups. A text field and a list of groups that the agent is currently in appear.
To add the agent to a group, click in the text field and, optionally, start typing the name of the group. A list of available groups, filtered by any text you have typed, appears. Click the group you want to add the agent to. The list remains visible so you can add the agent to multiple groups.
As an admin user you have Write access to all groups available in the VCC account you are logged in to. When editing an agent, you will be able to add this agent to any group.
As a supervisor user you have access to the set of groups for which you have Read or Write permissions. When editing an agent, you will be able to add this agent only to the groups for which you have Write permission.
To add the agent to all available groups, click Add All. To remove the agent from all groups they are currently in, click Clear All. To remove the agent from a group, click the – (minus) icon alongside the group. If the icon is not available, you do not have Write permissions for this group and cannot remove the agent from the group.
Interaction Capacity
The capacity percentage assigned to different types of interaction for this agent.
To change the interaction capacity settings for the agent and override the account settings in System Settings, click Interaction Capacity. A field for each interaction type appears.
Type the percentage capacity value for each interaction type and update your agent settings.
For more information, see How do I set interaction capacity for an agent? later in this page.
Feature permissions
Only for users with a Supervisor or Admin license. Feature permissions define the access a supervisor or admin user has to features within the VCC Admin Portal.
Only for users with a Supervisor or Wallboard license. Permission settings define which groups, queues and lines a supervisor or wallboard user can view or manage in the VCC Admin Portal.
The groups that the user can read or edit within Real Time, Team Monitoring, and User Admin.
To view, add or remove groups that the user can read or edit, click Group Permissions. A text field and current group permissions appear.
To add a group permission, click in the text field and, optionally, start typing the name of the group. A list of available groups, filtered by any text you have typed, appears. Click the group you want to add the agent to. The list remains visible so you can add the agent to multiple groups.
As an admin user you have Write access to all groups available in the VCC account you are logged in to. When editing a Supervisor or Wallboard user, you will be able to add this user to any group.
As a supervisor user you have access to the set of groups for which you have Read or Write permissions. When editing a supervisor or wallboard user, you will be able to add this user only to the groups for which you have Write permission.
To add all groups, click Add All. When you have finished adding a group or groups, click Read or Write alongside each group to assign read or write permission respectively. To give read permission to all groups, click All Read; to give write permission to all groups, click All Write. To change a user's existing group permission, click Read or Write as appropriate. To remove a user's existing group permission, click the – (minus) icon alongside the group. To remove all group permissions, click Clear All. If the icon is disabled, do not have Write permissions for this group and cannot remove the user from this group.
Queue Permissions
The queues that the user can read or edit within Real Time.
To view, add or remove queue that the user can read or edit, click Queue Permissions. A text field and current queue permissions appear.
To add a queue permission, click in the text field and, optionally, start typing the name of the queue. A list of available queues, filtered by any text you have typed, appears. Click the queue you want to add the agent to. The list remains visible so you can add the agent to multiple queues.
As an admin user you have Write access to all queues available in the VCC account you are logged in to. When editing a Supervisor or Wallboard user, you will be able to add this user to any queue.
As a supervisor user you have access to the set of queues for which you have Read or Write permissions. When editing a supervisor or wallboard user, you will be able to add this user only to the queues for which you have Write permission.
To add all queues, click Add All. When you have finished adding a queue or queues, click Read or Write alongside each queue to assign read or write permission respectively. To give read permission to all queues, click All Read; to give write permission to all queues, click All Write. To change a user's existing queue permission, click Read or Write as appropriate. To remove a user's existing queue permission, click the – (minus) icon alongside the queue. To remove all queue permissions, click Clear All. If the icon is disabled, it means that you do not have Write permissions for this queue and cannot remove user from this queue.
Line Permissions
The lines that the user can view data related to within Call Recordings (inbound call recordings only) and IVR Data Collector.
Outbound call recordings
Line Permissions affect only inbound call recordings; outbound call recordings are not associated with a line. If a user has access to view outbound call recordings, they can view all outbound call recordings, not just those associated with their permitted lines. For information about controlling user's access to outbound call recordings, see View outbound interaction content in Configuring Interaction Content.
To view, add or remove line that the user can read or edit, click Line Permissions. A text field and current line permissions appear.
To add a line permission, click in the text field and, optionally, start typing the name of the line. A list of available lines, filtered by any text you have typed, appears. Click the line you want to add the agent to. The list remains visible so you can add the agent to multiple lines.
As an admin user you have Write access to all lines available in the VCC account you are logged in to. When editing a supervisor or wallboard user, you will be able to add this user to any line.
As a supervisor user you have access to the set of lines for which you have Read or Write permissions. When editing a supervisor or wallboard user, you will be able to add this user only to the line for which you have Write permission.
To add all lines, click Add All. When you have finished adding a line or lines, click Read or Write alongside each line to assign read or write permission respectively. To give read permission to all lines, click All Read; to give write permission to all lines, click All Write. To change a user's existing line permission, click Read or Write as appropriate. To remove a user's existing line permission, click the – (minus) icon alongside the line. To remove all line permissions, click Clear All. If the icon is disabled, you do not have Write permissions to this line and cannot remove user from this line.
If you leave a mandatory field empty or enter a value that is not valid, an error message appears. The number of errors appears alongside Create. You cannot click Create until you have corrected all the errors.
When you have provided valid information in all mandatory fields, click Create. Your new user is created. Alternatively click Cancel to cancel creating this new user.
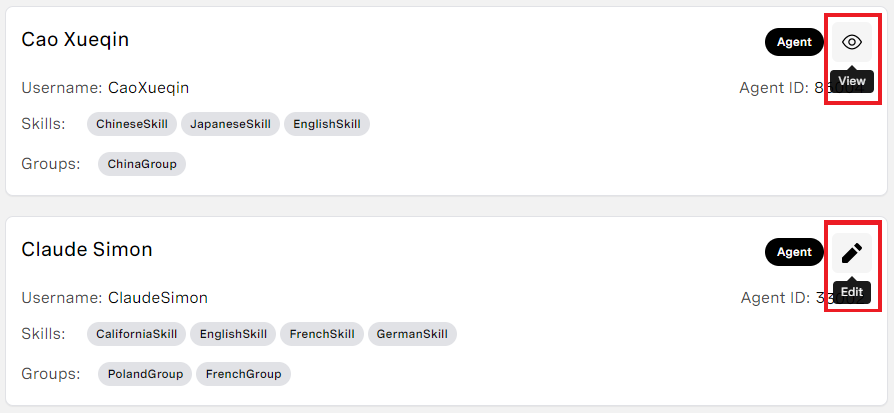
How do I view an existing user's details?
When you first access User Admin, a list of users you can access in the account you are logged in to appears. From this list you can see each user's name, username and license. If the user has agent access granted, the user's ID, assigned skills, and groups to which they belong also appear.
To see additional details—the user's email address, phone number, location, and so on—click Edit or View. The user's details appear either in view or edit mode.
Admin users always have access to edit all users in the account they are logged in to.
Supervisor users have access to edit supervisor, wallboard and agent users who are:
assigned to the group or groups that the supervisor has Write permission to
not assigned to any group if the supervisor has theView Unassigned Userspermission
Supervisor users also have access to edit other supervisor or wallboard users who are their managees, and themselves.
Locate the user you want to edit using search or by scrolling or filtering list. If you do not see the user, you do not have permission to view or edit this user. For information about supervisor user permissions, see Configuring admin and supervisor feature permissions.
When you find the user you want to edit, click Edit. The user's details appear.
A username for the user. The username must be unique within VCC. The user uses this username to log in to the VCC Admin Portal and ContactPad.
Type the username you want your user to use. Username can only contain alphanumeric characters and underscores (_). For example, Demo_Agent. Username cannot contain spaces.
We recommend using an email address to ensure uniqueness and to simplify integration with single sign-on.
You cannot edit a username after you have saved the user.
Name
The user's name for display purposes throughout the VCC Admin Portal. For example, this name appears when the user is logged in to ContactPad or in the users list.
Type the name you want to appear in the user interface in relation to this user.
Email
The user's email address. When you save the user, Vonage Contact Center sends an email to the provided address. The user must follow the link in the email to set the password to use when they log in to VCC Admin Portal or ContactPad. The link is valid for two weeks, after which the user must reset their password. For information about how a user resets their password, see Logging in to ContactPad or Logging in to the Vonage Contact Center Admin Portal.
SSO External Id
Optional. The value that you want Vonage Contact Center to use to match VCC users with their Salesforce or Microsoft users when using single sign-on.
If single sign-on is enabled for your account and your account is configured to use an External ID as the identifier for single sign-on, type the value that will match the logged in Salesforce user's identifier value.
The user's license. The license determines what tasks the user can perform in Vonage Contact Center and ContactPad. For information about licenses, see User Admin.
Click Admin, Supervisor, Wallboard, or Agent in the License list.
You can a change a user's license to one at or below your license level.
For example, as a user with a supervisor license you can change the user's license to Supervisor, Wallboard or Agent. You cannot change the license to Admin.
Analytics access (beta)
If enabled for your account, Analytics access (beta) appears. For information about configuring Analytics licenses, see Configuring Historical Analytics access.
Agent access granted
If License is Agent or if agent access is already granted, Agent access granted does not appear.
Determines whether the user is granted the possibility of acting as agent.
Click Yes or No to allow or disallow the user to access ContactPad. If you click Yes, you cannot later revoke access for the user.
Determines whether the user can currently act as an agent and work with inbound or outbound interactions.
Click Yes or No to allow or disallow the ability to act as agent.
The country code for the agent's physical location. Vonage Contact Center uses Physical Location primarily for routing.
Click the agent's physical location in the Physical Location list.
Phone Number
The agent's phone number in national format. Vonage Contact Center routes calls to this number.
Type the agent's phone number in national format.
Virtual Location
The country code for the agent's virtual location.
Using the VCC Admin Portal, an agent can make and receive calls from anywhere. For example, an agent could be in France but making and receiving calls from the United Kingdom. In this case, you should set Virtual Location to United Kingdom +44. The virtual location determines the format of the telephone numbers that appear in ContactPad. In this example:
Telephone numbers appear in UK format
When the agent makes an outbound call:
The number that appears on the handset of the target is in UK format
The agent can dial a UK number as if from the UK without using the international prefix
Click the agent's virtual location in the VirtualLocation list.
In Country Display
In ContactPad various telephone numbers appear when an agent receives or makes a call. You can present these numbers in national or international format.
We recommend that you use international format throughout Vonage Contact Center.
Telephony Region
Vonage Contact Center uses an agent's telephony region to determine the telephony server to use when the agent makes an outbound call.
Telephony Region is available only for the Global Voice Assurance feature. For information about Global Voice Assurance, see Global Voice Assurance.
If Global Voice Assurance is enabled for your account, provide the most appropriate location for the agent. For more information about setting the telephony region, see the How do I set telephony regions for agents? section in this page.
Enforced Disposition Codes Enabled
Determines whether this agent must provide a disposition code for an interaction. For information about disposition codes, see Disposition codes.
Transcribe Call Enabled
Determines whether Conversation Analyzer will transcribe the agent's inbound and outbound calls. Conversation Analyzer must be enabled for this to take effect. For information about Conversation Analyzer, see Conversation Analyzer.
Determines whether this agent can use ContactPad with WebRTC. For information about enabling ContactPad with WebRTC, see How do I enable an agent user to use ContactPad with WebRTC and, optionally enable auto-answer? later in this page.
Agent can enable WebRTC in ContactPad
Determines whether Use Softphone appears in ContactPad for the agent. For information about enabling ContactPad with WebRTC, see How do I enable an agent user to use ContactPad with WebRTC and, optionally enable auto-answer? later in this page.
Determines whether the agent can park calls. Appears if priority call handling is enabled for your account. For information about priority call handling, see Priority call handling in ContactPad.
Agent can toggle call recordings in ContactPad
Determines whether this agent can control call recordings in ContactPad. For information about call recordings, see Call recording.
Automatically answer outbound calls
Automatically answer outbound calls is available only if your Vonage Contact Center account is either linked to a Vonage Business Communications account or configured to use WebRTC.
Automatically answer inbound calls is available only if your Vonage Contact Center account is either linked to a Vonage Business Communications account or configured to use WebRTC.
The maximum number of seconds an agent can remain in a Wrap Up (Auto) state after an outbound call ends.The agent can use this time to make notes about the previous call, for example. After the maximum time, the user's state is changed to Ready.
The overall default is 180 seconds. The default for your account is in the Outbound Wrap-Up Time field in System Settings. For information about setting the default timeout for your account, see Editing Configuration (Account Settings).
To set Outbound Wrap Timeout to the default for your account, click Default. To override the account default, click Custom. A new field appears. Type the maximum number of seconds that an agent can be in the Wrap Up (Auto) state after an outbound call. The value must be a number between 1 and 7200 seconds.
Agent No Answer Timeout (Unexpected)
The maximum time, in seconds, that an agent can be in an unexpected state due to the agent not answering their phone (No Answer state appears in ContactPad). After the maximum time, the user's state is changed to Ready or as configured in State after unexpected or fault in an Automatic Call Distributor (ACD) or Universal Contact Distributor (UCD) applet.
The overall default is 180 seconds. The default for individual groups is in the Max Unexpected (s) field in the group's record. For information about setting the timeout for a group, see Configuring groups.
To set Agent No Answer Timeout to the default for the group, click Default. To override the group's default, click Custom. A new field appears. Type the maximum number of seconds that an agent can be in the No Answer state. The value must be a number between 1 and 7200 seconds.
The No answer timeout in an Automatic Call Distributor (ACD) applet defines how long Vonage Contact Center tries to call an agent after routing a call to the applet. The Agent No Answer Timeout here defines how long the agent remains in the resulting No Answer state in ContactPad.
Agent No Answer Timeout only appears if enabled for your account.
Agent Line Busy Timeout (Unexpected)
The maximum time, in seconds, that an agent can be in an unexpected state due to the agent's line being busy (Line busy state appears in ContactPad). After the maximum time, the user's state is changed to Ready or as configured in State after unexpected or fault in an Automatic Call Distributor (ACD) or Universal Contact Distributor (UCD) applet.
The overall default is 180 seconds. The default for individual groups is in the Max Unexpected (s) field in the group's record. For information about setting the timeout for a group, see Configuring groups.
To set Agent Line Busy Timeout to the default for the group, click Default. To override the group's default, click Custom. A new field appears. Type the maximum number of seconds that an agent can be in the Line busy state. The value must be a number between 1 and 7200 seconds.
Agent Line Busy Timeout only appears if enabled for your account.
Agent Invalid Number Timeout (Fault)
The maximum time, in seconds, that an agent can be in a fault state due to the agent having an invalid number in their settings (Network Congestion state appears in ContactPad). After the maximum time, the user's state is changed to Ready or as configured in State after unexpected or fault in an Automatic Call Distributor (ACD) or Universal Contact Distributor (UCD) applet.
The overall default is 10 seconds. The default for individual groups is in the Max Unexpected (s) field in the group's record. For information about setting the timeout for a group, see Configuring groups.
To set Agent Invalid Number Timeout to the default for the group, click Default. To override the group's default, click Custom. A new field appears. Type the maximum number of seconds that an agent can be in the Network Congestion state. The value must be a number between 1 and 7200 seconds.
Agent Invalid Number Timeout only appears if enabled for your account.
Agent Network Issue Timeout (Fault)
The maximum time, in seconds, that an agent can be in a fault state due to a network issue (Fault on Line state appears in ContactPad). At the end of the maximum time, the user's state is changed to Ready or as configured in State after unexpected or fault in an Automatic Call Distributor (ACD) or Universal Contact Distributor (UCD) applet.
The overall default is 10 seconds. The default for individual groups is in the Max Unexpected (s) field in the group's record. For information about setting the timeout for a group, see Configuring groups.
To set Agent Network Issue Timeout to the default for the group, click Default. To override the group's default, click Custom. A new field appears. Type the maximum number of seconds that an agent can be in the Network Congestion state. The value must be a number between 1 and 7200 seconds.
Agent Network Issue Timeout only appears if enabled for your account.
Mandatory Call Rating Frequency
Determines the percentage of calls that this agent has to rate:
Default—the value set in System Settings determines the call rating frequency for this agent
Custom—set a custom percentage value for call rating frequency for this agent. Type a value within the range of 1-100. The value must be a whole number.
Appears only if mandatory call quality rating is enabled for your account. For information about mandatory call quality rating, see
Callback Numbers
The outbound CLIDs, or callback numbers, available for the agent. For information about callback numbers, see Callback numbers.
When you create an agent, all callback numbers in the account are available for the agent to use.
Click the x alongside a callback number to remove it. Click Clear to remove all the callback numbers. Click All to add all the callback numbers.
Scheduled Logout Settings
The schedules that this agent is assigned to. For information about schedules, see User Admin.
To add an agent to a schedule, click Add to schedules. Type the name of the schedule you want to assign the user to. To remove the agent from a schedule, click the – (minus) icon alongside the schedule.
The skills that are assigned to this agent. For information about skills, see User Admin.
To view or change the skills assigned to an agent, click Skills. A text field and a list of currently assigned skills appear.
To assign a skill to the agent, click in the text field and, optionally, start typing the name of the skill you wish to assign. A list of available skills, filtered by any text you have typed, appears. Click the skill or skills you want to assign.
The skill or skills appear in the list along with a skill level; the default skill level for newly added skills is 5.
The list remains visible so you can assign multiple skills. To assign all available skills to the agent, click Add All. To remove all currently assigned skills from the agent, click Clear All. To remove an existing skill, click the – (minus) icon alongside the skill.
If enabled for your account, the list of skills includes the Level column. The level indicates how proficient the user is in a skill.
To set the skill level for the user for a skill, click the appropriate number on the slider. For an existing skill, a description of the change you make appears alongside the slider, for example 'Level 7 to 6'.
Groups
The groups that this agent is in. For information about groups, see User Admin.
To view the groups an agent is in, or add or remove the agent to or from groups, click Groups. A text field and a list of groups that the agent is currently in appear.
To add the agent to a group, click in the text field and, optionally, start typing the name of the group. A list of available groups, filtered by any text you have typed, appears. Click the group you want to add the agent to. The list remains visible so you can add the agent to multiple groups.
As an admin user you have Write access to all groups available in the VCC account you are logged in to. When editing an agent, you will be able to add this agent to any group.
As a supervisor user you have access to the set of groups for which you have Read or Write permissions. When editing an agent, you will be able to add this agent only to the groups for which you have Write permission.
To add the agent to all available groups, click Add All. To remove the agent from all groups they are currently in, click Clear All. To remove the agent from a group, click the – (minus) icon alongside the group. If the icon is not available, you do not have Write permissions for this group and cannot remove the agent from the group.
Interaction Capacity
The capacity percentage assigned to different types of interaction for this agent.
To change the interaction capacity settings for the agent and override the account settings in System Settings, click Interaction Capacity. A field for each interaction type appears.
Type the percentage capacity value for each interaction type and update your agent settings.
For more information, see How do I set interaction capacity for an agent? later in this page.
Feature permissions
Only for users with a Supervisor or Admin license. Feature permissions define the access a supervisor or admin user has to features within the VCC Admin Portal.
Only for users with a Supervisor or Wallboard license. Permission settings define which groups, queues and lines a supervisor or wallboard user can view or manage in the VCC Admin Portal.
The groups that the user can read or edit within Real Time, Team Monitoring, and User Admin.
To view, add or remove groups that the user can read or edit, click Group Permissions. A text field and current group permissions appear.
To add a group permission, click in the text field and, optionally, start typing the name of the group. A list of available groups, filtered by any text you have typed, appears. Click the group you want to add the agent to. The list remains visible so you can add the agent to multiple groups.
As an admin user you have Write access to all groups available in the VCC account you are logged in to. When editing a Supervisor or Wallboard user, you will be able to add this user to any group.
As a supervisor user you have access to the set of groups for which you have Read or Write permissions. When editing a supervisor or wallboard user, you will be able to add this user only to the groups for which you have Write permission.
To add all groups, click Add All. When you have finished adding a group or groups, click Read or Write alongside each group to assign read or write permission respectively. To give read permission to all groups, click All Read; to give write permission to all groups, click All Write. To change a user's existing group permission, click Read or Write as appropriate. To remove a user's existing group permission, click the – (minus) icon alongside the group. To remove all group permissions, click Clear All. If the icon is disabled, do not have Write permissions for this group and cannot remove the user from this group.
Queue Permissions
The queues that the user can read or edit within Real Time.
To view, add or remove queue that the user can read or edit, click Queue Permissions. A text field and current queue permissions appear.
To add a queue permission, click in the text field and, optionally, start typing the name of the queue. A list of available queues, filtered by any text you have typed, appears. Click the queue you want to add the agent to. The list remains visible so you can add the agent to multiple queues.
As an admin user you have Write access to all queues available in the VCC account you are logged in to. When editing a Supervisor or Wallboard user, you will be able to add this user to any queue.
As a supervisor user you have access to the set of queues for which you have Read or Write permissions. When editing a supervisor or wallboard user, you will be able to add this user only to the queues for which you have Write permission.
To add all queues, click Add All. When you have finished adding a queue or queues, click Read or Write alongside each queue to assign read or write permission respectively. To give read permission to all queues, click All Read; to give write permission to all queues, click All Write. To change a user's existing queue permission, click Read or Write as appropriate. To remove a user's existing queue permission, click the – (minus) icon alongside the queue. To remove all queue permissions, click Clear All. If the icon is disabled, it means that you do not have Write permissions for this queue and cannot remove user from this queue.
Line Permissions
The lines that the user can view data related to within Call Recordings (inbound call recordings only) and IVR Data Collector.
Outbound call recordings
Line Permissions affect only inbound call recordings; outbound call recordings are not associated with a line. If a user has access to view outbound call recordings, they can view all outbound call recordings, not just those associated with their permitted lines. For information about controlling user's access to outbound call recordings, see View outbound interaction content in Configuring Interaction Content.
To view, add or remove line that the user can read or edit, click Line Permissions. A text field and current line permissions appear.
To add a line permission, click in the text field and, optionally, start typing the name of the line. A list of available lines, filtered by any text you have typed, appears. Click the line you want to add the agent to. The list remains visible so you can add the agent to multiple lines.
As an admin user you have Write access to all lines available in the VCC account you are logged in to. When editing a supervisor or wallboard user, you will be able to add this user to any line.
As a supervisor user you have access to the set of lines for which you have Read or Write permissions. When editing a supervisor or wallboard user, you will be able to add this user only to the line for which you have Write permission.
To add all lines, click Add All. When you have finished adding a line or lines, click Read or Write alongside each line to assign read or write permission respectively. To give read permission to all lines, click All Read; to give write permission to all lines, click All Write. To change a user's existing line permission, click Read or Write as appropriate. To remove a user's existing line permission, click the – (minus) icon alongside the line. To remove all line permissions, click Clear All. If the icon is disabled, you do not have Write permissions to this line and cannot remove user from this line.
If you leave a mandatory field empty or enter a value that is not valid, an error message appears. The number of errors appears alongside Save. You cannot click Save until you have corrected all the errors.
When you have finished making changes, click Save. Your changes are saved. Alternatively click Cancel to undo all your changes.
Changing a user's license from Supervisor to Admin
You can only change user's license from Supervisor to Admin, if you are an admin user.
If you change a user's license from Supervisor to Admin, the permissions settings section disappears; permission settings are not relevant for admin users. However, Vonage Contact Center does not delete the actual permissions even when you save the license change. If you later change the user's license back from Admin to Supervisor, the permission settings section reappears. The previously saved permissions do not appear until you save the user again. If you add any permissions without saving the user first, when you do save the user, your new permissions overwrite the original permission settings.
The same applies when changing multiple users' licenses from Supervisor to Admin using bulk actions.
In the User Admin area of the Vonage Contact Center (VCC) Admin Portal, you can archive users, revert users to active, and delete archived users. You can filter archived and active users to improve performance, particularly in accounts with large number of users. For information about filtering users, see Accessing and finding your way around User Admin.
Supervisor and admin users can archive and reactivate other users; only admin users can delete archived users.
Archived and deleted users do not appear in Dashboards. To find out more about Dashboards, see Real-time Analytics.
Archived users can no longer log in to Vonage Contact Center (VCC) or ContactPad. Also, archived users can no longer use their user-level API credentials to request a bearer access token. For information, see How to authenticate with a Vonage Contact Center (VCC) API.
Archiving and reverting users to active
To archive a user, perform the following steps:
Go to User Admin.
Locate the user you want to archive. Limit the number of users displayed by selecting Active users in the Filter list. If you do not see the user, you do not have permission to view or edit this user. For information about supervisor user permissions, see Configuring admin and supervisor feature permissions.
When you find the user you want to edit, click Edit. The user's details appear.
Click Archived.
Click Save to save your settings.
The user is now archived and is not visible in the Active users view any longer. A red user icon appears next to the names of archived users.
When you archive a ContactPad user, they are automatically logged out of ContactPad. If the user is working with an interaction, they are logged out when the interaction finishes. A non-ContactPad user is not automatically logged out of VCC admin portal when you archive them. Next time they are prompted to authenticate—after logging themselves out for example—they will not be able to log in.
To revert an archived user back to active, perform the following steps:
Go to User Admin.
Locate the user you want to revert from archived to active. Limit the number of users displayed by selecting Archived users in the Filter list. If you do not see the user, you do not have permission to view or edit this user. For information about supervisor user permissions, see Configuring admin and supervisor feature permissions.
When you find the user you want to edit, click Edit. The user's details appear.
Click Active.
Click Save to save your settings.
The user is now active and is not visible in the Archived users view any longer.
Locate the user you want to delete. Limit the number of users displayed by selecting Archived users in the Filter list. If you want to delete an active user, you need to archive them first. For information about archiving users, see Archiving and reverting users to active earlier in this page. If you do not see the user, you do not have permission to view or edit this user. For information about supervisor user permissions, see Configuring admin and supervisor feature permissions.
When you find the user you want to edit, click Edit. The user's details appear.
Click Delete user. A dialog box appears.
ClickDelete to delete the user. Alternatively clickCancelto cancel deleting the user.
You can only delete users in the single user view. You cannot delete users using bulk actions.
You cannot delete a user that has any user-level API credentials in any account. To delete such a user, delete their API credentials first. For information, see Configuring API credentials.
Locate the user that you want to set or update the license or licenses for using search or scrolling list. If you do not see the user, you do not have permission to view or edit this user. For information about supervisor user permissions, see Supervisor permissions in User Admin.
When you find the user you want to edit, click Edit. The user's details appear.
Click License Status.
In License, select the required license for the user. For information about license types, see User Admin.
You can a change a user's license to one at or below your license level.
For example, as a user with a supervisor license you can change the user's license to Supervisor, Wallboard or Agent. You cannot change the license to Admin.
Optionally allow a user with a wallboard, a supervisor, or an admin license to act as an agent. For information, see How do I allow a user to act as agent to work with interactions? later in this page.
If available, in Products, select the applicable license or licenses for the available product or products.
If Global Voice Assurance is available in your account, to set the telephony region for an agent, perform the following steps:
Go to User Admin.
Locate the user that you want to set telephony region for using search or scrolling list. If you do not see the user, you do not have permission to view or edit this user. For information about supervisor user permissions, see Configuring admin and supervisor feature permissions.
When you find the user you want to edit, click Edit. The user's details appear.
Click Agent Settings.
Under Telephony Region, select the appropriate telephony region for the user. For the list of available values, see What telephony regions are available? later in this page.
Click Save to save your settings.
All agents must have a telephony region for Global Voice Assurance to work correctly.
Agents using WebRTC
After you have changed the telephony region of an agent who is using WebRTC, you must instruct that agent to log out of ContactPad. The agent must wait for 10 seconds before logging back in. This delay is required for the telephony region change to take effect.
What telephony regions are available?
VCC uses the value of Telephony Region to determine the location of the infrastructure to use to deliver outbound calls. For example, VCC uses infrastructure in the London region to deliver outbound calls from agents with a Telephony Region of London.
Telephony Region
London
Frankfurt
Richmond
Portland
Singapore
Sydney
How do I define callback numbers for an agent user?
When an agent makes an outbound call, the agent can select a number for Vonage Contact Center in ContactPad to present to the person they are calling. In Vonage Contact Center, these presented numbers are called outbound CLIDs, or callback numbers.For more information, see Callback numbers.
If enabled for your account, to restrict the callback numbers available to an agent to present from ContactPad, perform the following steps:
Go to User Admin.
Locate the user that you want to set the callback numbers for using search or by scrolling or filtering list. If you do not see the user, you do not have permission to view or edit this user. For information about supervisor user permissions, see Configuring admin and supervisor feature permissions.
When you find the user you want to edit, click Edit. The user's details appear.
Click Agent Settings.
Under Callback Numbers, select the numbers you wish the user to have access to. The dropdown list contains all outbound CLIDs available for the user.
Click All if you wish to add all numbers from the list or Clear to remove all numbers for the user.
Click Save to save your settings.
How do I enable an agent user to use ContactPad with WebRTC and, optionally enable auto-answer?
To enable ContactPad with WebRTC for an agent user and, optionally, enable auto-answer, you need the Edit user feature permission. For information about feature permissions, see Configuring admin and supervisor feature permissions.
We develop, test, and support using ContactPad with WebRTC in the most recent version of Chrome only.
Supervisor monitoring does not work with WebRTC (unless you are using the Team Dashboards (beta access)).
If WebRTC is available in the agent's account, perform the following steps:
Go to User Admin.
Locate the user that you want to set the callback numbers for using search or by scrolling or filtering list. If you do not see the user, you do not have permission to view or edit this user. For information about supervisor user permissions, see Configuring admin and supervisor feature permissions.
When you find the user you want to edit, click Edit. The user's details appear.
Click Agent Settings.
You can now enable WebRTC for the user in two ways:
To enable the user to use ContactPad with WebRTC, under WebRTC Enabled, click Yes.
To enable the user to control whether they use ContactPad with WebRTC, under Agent can enable WebRTC in ContactPad, click Yes. The Use Softphone check box will appear in the user's ContactPad.
If enabled for your account, you can also control auto-answer settings for inbound, outbound, or both calls.
To enable auto answer for outbound calls, under Automatically answer outbound calls, click Yes.
To enable auto answer for inbound calls, under Automatically answer inbound calls, click Yes.
Click Save to save your settings.
The user can now use WebRTC in ContactPad — although they may need to select Use Softphone in ContactPad first. For information about using ContactPad with WebRTC, see Using ContactPad with WebRTC.
You must also provide a valid phone number for the agent. If WebRTC is ever unavailable, Vonage Contact Center will use this number to route calls to your agent.
How do I enable enforced disposition codes feature for an agent user?
To enable an agent to use the enforced disposition codes feature, edit the agent in User Admin.
If the enforced disposition codes feature is available in the agent's account, and you are enabled to switch this feature on and off for individual agents, perform the following steps:
Go to User Admin.
Locate the user that you want to enable enforced disposition codes feature for using search or by scrolling or filtering list. If you do not see the user, you do not have permission to view or edit this user. For information about supervisor user permissions, see Configuring admin and supervisor feature permissions.
When you find the user you want to edit, click Edit. The user's details appear.
Click Agent Settings.
Under Enforced Disposition Codes Enabled, click Yes to activate the feature for the user.
Click Save to save your settings. Repeat for all users you want to use the enforced disposition codes feature.
How do I enable an agent user to control call recordings?
To enable an agent to stop (pause) and start (resume) call recordings in ContactPad, edit the agent in User Admin.
If call recording control is available in the agent's account, and you are enabled to switch this feature on and off for individual agents, perform the following steps:
Go to User Admin.
Locate the user that you want to enable to control call recordings using search or by scrolling or filtering list. If you do not see the user, you do not have permission to view or edit this user. For information about supervisor user permissions, see Configuring admin and supervisor feature permissions.
When you find the user you want to edit, click Edit. The user's details appear.
Click Agent Settings.
Under Agent can toggle call recordings in ContactPad, click Yes to activate the feature for the user.
Click Save to save your settings. Repeat for all agents you want to control call recordings.
For information about controlling call recording in ContactPad, see Call recording.
How do I enable an agent user to record their screen?
To enable an agent record their screen using the Vonage CC Screen Recording application, edit the agent in User Admin.
If screen recording is available in the agent's account, and you are enabled to switch this feature on and off for individual agents, perform the following steps:
Go to User Admin.
Locate the user that you want to enable screen recording for using search or by scrolling or filtering list. If you do not see the user, you do not have permission to view or edit this user. For information about supervisor user permissions, see Configuring admin and supervisor feature permissions.
When you find the user you want to edit, click Edit. The user's details appear.
Click Agent Settings.
Under Screen Recording Enabled, click Yes to activate the feature for the user.
Click Save to save your settings. Repeat for all agents you enable screen recording for.
You can define interaction capacity settings for individual agents. This setting takes precedence over the settings defined for an account in System Settings. For more information about setting account level interaction capacity, see Editing Configuration (Account Settings).
To set interaction capacity for an agent, edit the agent in User Admin. Perform the following steps:
Go to User Admin.
Locate the user that you want to set interaction capacity for using search or by scrolling or filtering list. If you do not see the user, you do not have permission to view or edit this user. For information about supervisor user permissions, see Configuring admin and supervisor feature permissions.
When you find the user you want to edit, click Edit. The user's details appear.
Click Routing Settings and then click Interaction Capacity.
Under Interaction Capacity, click Custom.
Set the percentage of capacity for each interaction type for the agent:
Live - eg. Phone (51-100)—the percentage for a live interaction, such as a phone call, between 51 and 100 percent.
Non-live - eg. Case (1-100)—the percentage for a non-live interaction, such as an email, between 1 and 100 percent.
Semi-live - eg. Chat (1-100)—the percentage for a semi-live interaction, such as chat, between 1 and 100 percent.
Click Save to save your settings.
To revert the settings to the interaction capacity settings defined for the account in System Settings, click Default and then click Save.
How do I define the proficiency of an agent user in a skill?
To define the proficiency of an agent user in a skill, you need the Manage Routing Settings feature permission. For information about feature permissions, see Configuring admin and supervisor feature permissions.
A skill level indicates how proficient an agent user is in the skill.
To set the level an agent has in a skill, perform the following steps:
Go to User Admin.
Locate the user you want to define the proficiency of using search or by scrolling or filtering the list of users. If you do not see the user, you do not have permission to view or edit this user. For information about supervisor user permissions, see Configuring admin and supervisor feature permissions.
When you find the user you want to edit, click Edit. The user's details appear.
Click Routing Settings and then click Skills.
Optionally add a new skill.
Alongside the applicable skill or skills, click the appropriate number on the slider or sliders. For an existing skill, a description of the change you make appear alongside the slider, for example 'Level 7 to 6'.
Click Save to save your settings.
The selected skill levels can now be used to determine which agent to route an interaction to. In a scenario where two agents, with otherwise identical characteristics, are available to handle an interaction at the same time, the agent with the highest level in a mandatory or unexpired skill will receive the interaction.
How do I allow a user to act as agent to work with interactions?
You can allow users such as supervisors, administrators, or wallboard users to act as agents and handle calls or other interactions. Agents have access and use enabled by default due to the nature of their work. You cannot revoke this access in VCC.
To allow user to act as agent, perform the following steps:
Go to User Admin.
Locate the non-agent user you want to allow or deny to act as agent. If you do not see the user, you do not have permission to view or edit this user. For information about supervisor user permissions, see Configuring admin and supervisor feature permissions.
When you find the user you want to edit, click Edit. The user's details appear.
Click License Status.
The field may appear:
If the non-agent user is not currently granted with agent access, Agent access granted appears. Click Yes to grant agent access.
If the non-agent user is already granted with agent access, Agent access granted does not appear.
The field Allow to act as agent appears. Click Yes to allow the user to act as agent.
Click Save to save your settings.
When you have granted agent access and saved this setting—by clicking Create or Save—you cannot revoke access for the user. You can allow or deny to act as agent for the user at any time. Granting agent access to the supervisor, wallboard, or admin users does not increase usage of contracted agents licenses.
How do I unlock a locked user account?
After five or more incorrect attempts to log in to VCC Portal or ContactPad, a user's account is locked.
Agents can unlock their own account using the Forgot your password? link on the Portal Login page. For more information, see Logging in to ContactPad.
To unlock user account, perform the following steps:
Go to User Admin.
Locate the user whose account you want to unlock. Users with locked account are indicated by lock icon next to their name. If you do not see the user, you do not have permission to view or edit this user. For information about supervisor user permissions, see Configuring admin and supervisor feature permissions.
When you find the user you want to edit, click Edit. The user's details appear.
Click Unlock user account. A dialog box appears. If the button is unavailable, you don't have Manage Routing Settings permission granted.
Click Confirm to unlock user account. Alternatively click Cancel to cancel unlocking user account.
To reset the user's password, perform the following steps:
Go to User Admin, Users tab.
Locate the user whose password you want to reset. If you do not see the user, you do not have permission to view or edit this user. For information about supervisor user permissions, see Configuring admin and supervisor feature permissions.
When you find the user you want to edit, click Edit. The user's details appear.
Click Reset password. A dialog box appears. If the button is disabled, it means you don't have Manage Routing Settings permission granted.
Click Send password reset link to reset user password. An email with reset password link will be send to the user. Alternatively click Cancel to cancel resetting user password.
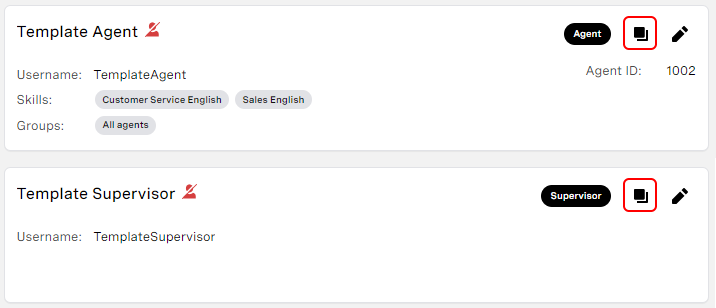
You can clone from any existing active user or from a template user. You can create template users with the most common settings. If you use such users, you should archive them so as not to use up an available license.
To clone an existing user, perform the following steps:
Go to User Admin.
Locate the user you want to clone. Click the Clone user icon. A clone dialog appears.
Provide the required Personal data and — if you are cloning an agent — Agent settings.
To create a new user with the values you provide and with settings from the original user, click Clone user.
Groups
If you are a supervisor user, your newly created user may not be in all the groups that the original user is in or have permissions to the same groups. This may be because you don't have write access to all of the groups that the original user is in or has permissions to.
If you are an admin user, you have full access to all groups. Cloning a user will, therefore, result in your new user being in exactly the same groups or having exactly the same group permissions as the original user.
Link the Vonage Contact Center users to your corresponding Salesforce users.
How do I set up a Vonage Contact Center agent in Salesforce?
For an agent to use Vonage Contact Center in Salesforce, you must perform the following tasks:
Link the agent to their Salesforce user record. For information about linking an agent to their Salesforce user record, see the Linking a Vonage Contact Center agent to their Salesforce user record section later in this page.
Add the agent as a Vonage Contact Center call center user. You can alternatively add a batch of agents as call center users. For information about adding an agent or agents as Vonage Contact Center call center users, see the Adding agents as call center users section later in this page.
Linking a Vonage Contact Center agent to their Salesforce user record
To use Vonage Contact Center in Salesforce an agent must be able to see and use ContactPad when they log in to Salesforce. You must add two settings to the agent's Salesforce user record:
The agent's ID. This links the Vonage Contact Center agent with their Salesforce user record.
The call center that the agent will use. This makes ContactPad appear in Salesforce and connects Salesforce to the required call center. For information about specifying the call center that the agent will use, see the Adding agents as call center users section later in this page.
How do I link the Vonage Contact Center agent to their Salesforce user record?
To enable agents to use Vonage Contact Center in Salesforce, perform the following steps:
Go to Users within Setup in Salesforce.
Alongside the user record for the agent you want to enable Vonage Contact Center for, click Edit. User Edit appears.
Scroll to the Additional Information section and type the user's agent ID in the NVM Agent Id field.
If you cannot see the NVM Agent Id field, you are either not using the correct page layout, or the page layout does not have this field. For information on assigning the required page layout or on adding the field to the page layout, see Assigning User page layout or Adding NVM Agent Id field to your User page layout later in this page.
Click Save.
Click Save.
Your Vonage Contact Center agent is now linked to their Salesforce user record.
Adding NVM Agent Id field to your User page layout
Click here to expand...
To use Vonage Contact Center in Salesforce, a Vonage Contact Center agent must have a corresponding Salesforce user record. This enables Vonage Contact Center to update Salesforce records with agent actions. To link the Vonage Contact Center agent with their Salesforce user record, add the agent's user ID to their user record in a field called NVM Agent Id. For information about adding an agent's ID to their user record, see Linking a Vonage Contact Center agent to their Salesforce user record.
To add the agent's ID, you must make the NVM Agent Id field available on their user record.
If you are using the NVM_User page layout—installed when you install Vonage Contact Center into Salesforce—you do not need to perform the following steps. If you want to use a different page layout, you must add the NVM Agent Id field to that page layout.
To add NVM Agent Id to your User page layout, perform the following steps.
Go to your User object's Page Layouts within Setup in Salesforce.
Locate the page layout that you want to add the NVM Agent Id field to and click Edit alongside. The page layout appears in edit mode.
In the top section, click Fields. The available fields to be added to the page appear. Drag the NVM Agent Id field down to the Additional Information area.
Click Save. The page layout is saved.
To use this field, you must now assign the page layout to different user profiles. For information on how to assign page layouts, see Assigning User page layout later in this page.
Assigning User page layout
Click here to expand...
A user's profile determines which page layout or layouts a Vonage Contact Center user sees in different areas of Salesforce. You can assign appropriate page layouts to profiles.
To assign page layouts to user profiles, perform the following steps.
You can assign any page layout or layouts to your user profiles. These steps assign the NVM_User page layout to all profiles as an example.
Users who are responsible for adding agents' IDs to their corresponding Salesforce records must use a page layout that contains the NVM Agent Id field. For more information about the NVM Agent Id field, see Adding NVM Agent Id field to your User page layout. This field is available by default in the NVM_User page layout.
Go to User Page Layouts within Setup in Salesforce.
Click the Page Layout column header. All available profiles are selected.
In the Page Layout To Use field, select the NVM_Users page layout.
If you select a different page layout, the layout must contain the NVM Agent Id field. You use this field to set up agents to use Vonage Contact Center. For information on adding this field and where this field is used, see Adding NVM Agent Id field to your User page layout.
Click Save. All user profiles now see the NVM_Users page layout when they create or edit user records.
Adding agents as call center users
To use Vonage Contact Center in Salesforce an agent must be able to see and use ContactPad when they log in to Salesforce. You must add two settings to the agent's Salesforce user record:
The agent's ID. This links the Vonage Contact Center agent with their Salesforce user record. For information about linking the Vonage Contact Center agent to their Salesforce user record, see the Linking a Vonage Contact Center agent to their Salesforce user record section later in this page.
The call center that the agent will use. This makes ContactPad appear in Salesforce and connects Salesforce to the required call center.
How do I add a single agent as a Vonage Contact Center call center user?
To add an agent as a Vonage Contact Center call center user, perform the following steps:
Go to Users within Setup in Salesforce.
Alongside the user record for the agent you want to enable Vonage Contact Center for, click Edit. User Edit appears.
Scroll to the Call Center field and click the search icon next to the field.
If you have already added this agent as a call center user, skip to step 5.
Lookup appears in a new browser window.
Click Vonage Contact Center For Salesforce to set the call center for this user to Vonage Contact Center.
Click Save.
The agent is now added as a call center user.
How do I add multiple agents as Vonage Contact Center call center users?
To add call center users, perform the following steps:
Go to Call Centers in Setup in Salesforce.
In the list of call centers, click Vonage Contact Center for Salesforce. The call center record appears.
In the Call Center Users section, click Manage Call Center Users. Vonage Contact Center for Salesforce: Manage Users appears.
Click Add More Users. Vonage Contact Center For Salesforce: Search for New Users appears.
Using the search form, select search criteria to locate the agents you want to add. Alternatively leave all filters blank to find all agents, other than any who are already listed as call center users. Click Find. The search results appear below the search form.
Select all agents in the search results that you want to add, and click Add to Call Center.
For help using this documentation, please send an email to docs_feedback@vonage.com. We're happy to hear from you. Your contribution helps everyone at Vonage! Please include the name of the page in your email.