How to register a provider and route interactions using the Interactions API
Overview
The Interactions API provides two actions: Invoke and Register. In this example, we will use both.
The Register action enables you to register a provider. Registering a provider serves two functions:
- To enable VCC to call an endpoint at various points in the lifecycle of an associated interaction or interactions, routed using the Invoke action
To permit or restrict agent actions on an associated interaction or interactions, routed using the Invoke action
When you have registered this provider, you do not need to register it again unless you need to change any of the settings. If you do need to change any settings (the endpoint, headers, permitted agent actions, and so on), use the Register action again with the new settings. The new settings overwrite the old.
The Invoke action enables you to invoke interaction flows through one or more named routes within VCC. You can invoke an interaction flow through any interaction plan that you have configured in VCC’s Interaction Architect. Depending on the configuration of your interaction plan, you can perform a wide variety of tasks, such as:
- Deliver the interaction to an agent
- Send an SMS message using parameters passed within the request body
- Send an email using data within VCC
- Update a record in a third-party system
You can route an interaction without registering a provider first. For information about routing an interaction without registering a provider first, see see How to route an interaction using the Interactions API (without registering a provider).
Setting up your named route and applet in the VCC Admin Portal
Without a named route, you’ve got nothing to invoke, so your first task is to set up a named route, interaction plan and one or more applets using Interaction Architect in the VCC Admin Portal. For information about using Interaction Architect to create named routes and interaction plans, see Interaction Plans Architect.
What is a named route/interaction plan/applet?
You can think of a named route as the address of an interaction plan. Without an address, your request wouldn’t know where to go.
An interaction plan is a collection of one of more applets that contain the description of what to do with your request. When your request reaches the target named route, it goes to the plan’s initial applet.
The applet or applets in your interaction plan determine what happens when your request travels through the interaction plan. In this example, the applet in your interaction plan routes interactions to agents.
Example named route
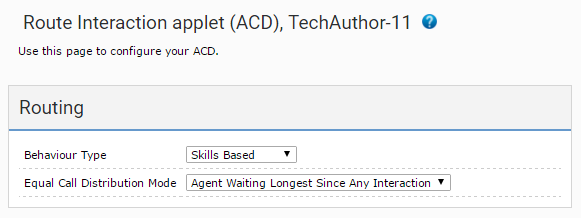
In the following example, there is just one named route Route Interaction NR. The Route Interaction NR named route has one applet, Route Interaction applet, which is an Automatic Call Distributor (ACD) applet in skills based routing (or UCD) mode. The Route Interaction applet is set as the initial applet.

Example applet
In the following example, the Route Interaction applet routes interactions to agents who have been waiting longest. In a more complex interaction plan, configured skills and service level agreements, and other settings in the ACD applet, would also affect the routing.
For more information about the ACD applet, see Automatic Call Distributor (ACD) or Universal Contact Distributor (UCD) applet.
Preparing your requests
Right, so you know how to use VCC APIs, and you’ve got your interaction plan set up in VCC… Finally you can get started with using the Interactions API.
In your first request, you will register a provider using the Register action. In the second request you use the Invoke action’s endpoint—POST /Invoke—to invoke an interaction plan, located using the named route you specify.
Registering your provider
Register request URL
The format for the POST /Register request URL is:
https://***.api.newvoicemedia.com/interactions/Register
Register request parameters
The POST /Register request requires the following parameters:
accept. Theacceptheader parameter must contain a string that represents the version of the API you want to call and the content-type of the response. The content-type of the Interactions API’s responses is always JSON.
Exampleapplication/vnd.newvoicemedia.v1+jsonauthorization. Theauthorizationheader parameter must contain your bearer access token. Your bearer access token is a string that identifies you to the API and proves that you are allowed to submit the request. You can obtain a bearer access token from the Authentication API. For information about getting and using your bearer access token, see How to authenticate with a Vonage Contact Center (VCC) API.
ExampleBearer 24d80e703a037349cb4818cf7ec695cccontent-type. Thecontent-typeheader parameter must contain a string that represents type of the content you are sending in the body of the request.
Exampleapplication/jsonProviderSettings. TheProviderSettingsbody parameter must contain the properties necessary to describe the provider. These properties are contained within anProviderSettingsobject.
ProviderSettings object
The ProviderSettings is a JSON object that contains the following properties:
provider. Required The name of the provider that you are registering. After registering a provider, you can use the name of that provider in the body of aPOST /Invokerequest (in theproviderproperty) to restrict or allow agent actions on the associated interactions, and, optionally, make requests to the endpoint.endpoint. Optional An https endpoint that will receive notifications made by VCC. VCC sends notifications after assigning associated interactions to agents, and when those agents release the interactions.
In this example we want VCC to send requests back to the provider so must provide an endpoint.headers. Optional Array of key-value pairs. Each pair contains a header name and a header value. This set of headers is included in anyPOSTrequest from VCC to the provider endpoint.
In our example, because we want to send requests back to the provider, we need to specify headers required by that endpoint.agentactionspermitted. Required Array of key-value pairs. Each pair contains an operation name (key) and a 0 or 1 (value). 0 indicates that the operation is not allowed and 1 indicates that the operation is allowed.
agentactionspermitted
Currently the only supported operations are release, hold, transferToAgent and transferToRoute. Agents can only perform the allowed operations on interactions associated with the provider.
- The release operation enables an agent to end an interaction.
- The hold operation enables an agent to put a caller on hold (in the case of a live interaction) or park a nonlive interaction.
The hold operation enables the retrieve operation by inference. - The transferToAgent and transferToRoute operations enable an agent to transfer the interaction to an agent or route respectively.
Unless specified, all operations—other than the release operation—are not allowed.
In our example, we allow agents to perform the release operation on interactions associated with this provider so we specify 1 along with the release operation. We also allow agents to put a call on hold, or park a non-live interaction specifying the hold operation with a 1. (Allowing the hold operation also enables the retrieve operation.) We do not allow agents to transfer interactions, so we specify 0 along with the transferToAgent and transferToRoute operations.
For this example, provide the following information in your ProviderSettings object:
| Property | Value |
|---|---|
provider | ProviderA |
endpoint | https://endpoint.example.com/routingendpoint |
headers | {“x-header1”: “value1”, x-header2": “value2”} |
agentactionspermitted | {“release” : 1, “hold” : 1, “transferToAgent” : 0, “transferToRoute” : 0} |
Example ProviderSettings object
{
  "provider": "ProviderA",
  "endpoint": "https://endpoint.example.com/routingendpoint",
  "headers":
  {
    "x-header1": "value1",
    "x-header2": "value2"
  },
  "agentactionspermitted":
  {
    "release" : 1,
    "hold" : 1,
    "transferToAgent": 0,
    "transferToRoute": 0
  }
}
Invoking the interaction flow
Invoke request URL
The format for the POST /Invoke request URL is:
https://***.api.newvoicemedia.com/interactions/Invoke
Invoke request parameters
The POST /Invoke endpoint requires the following parameters:
accept. Theacceptheader parameter must contain a string that represents the version of the API you want to call and the content-type of the response. The content-type of the Interactions API’s responses is always JSON.
Exampleapplication/vnd.newvoicemedia.v1+jsonauthorization. Theauthorizationheader parameter must contain your bearer access token. Your bearer access token is a string that identifies you to the API and proves that you are allowed to submit the request. You can obtain a bearer access token from the Authentication API. For information about getting and using your bearer access token, see How to authenticate with a Vonage Contact Center (VCC) API.
ExampleBearer 24d80e703a037349cb4818cf7ec695cccontent-type. Thecontent-typeheader parameter must contain a string that represents type of the content you are sending in the body of the request.
Exampleapplication/jsonInvocation. TheInvocationbody parameter must contain the properties necessary to invoke a named route and provide everything the interaction plan needs to execute. These properties are contained within an Invocation object.
Invocation object
The Invocation is a JSON object that contains two properties:
provider. The name of the provider that will be used for all requests. The provider must already have been registered using thePOST /Registerendpoint.
In our example, we specify a provider so that the interactions routed using thePOST /Invokeendpoint use the provider’s settings.requests. Required Therequestsproperty contains one or moreInteractionobjects which, in turn, contain further properties.
In the example, we send twoInteractionobjects within theInvocation. The example uses the following properties to route the interactions:action. The action you want to perform with the request. Allowed values are dispatch and release.
In the example, we want to route rather than release an interaction so we set the action to dispatch.requestid. Unique identifier of a request.externalid. Unique identifier of the interaction. Theexternalidmight be the same as a record ID in the source system. Without anexternalidyou will not be able to identify and perform any future actions, such as release, on this interaction.route. The named route you wish to invoke. Specify the target named route. VCC uses the value to locate the named route.routingdata. Useroutingdatato provide any data useful for routing an interaction to an agent.interactiontype.interactiontypelabels the interaction as a live (call, for example), nonlive (email, for example), or chat (web chat, for example) type interaction.
Using the example above, provide the following information in your Interaction objects:
Object 1
| Property | Value |
|---|---|
action | dispatch |
route | Route Interaction NR |
requestid | uniqueRequestId1 |
externalid | sourceObjectName1 |
interactiontype (within routingdata) | nonlive |
Object 2
| Property | Value |
|---|---|
action | dispatch |
route | Route Interaction NR |
requestid | uniqueRequestId2 |
externalid | sourceObjectName2 |
interactiontype (within routingdata) | live |
Example Invocation object
{
  "provider": "ProviderA",
  "requests":
  [
  	{
    "action": "dispatch",
  	"requestid": "uniqueRequestId1",
  	"externalid": "sourceObjectName1",
  	"route": "Route Interaction NR",
  	"routingdata":
  		{
  		  "interactiontype" : "nonlive"
  		}
  	},
    {
    "action": "dispatch",
    "requestid": "uniqueRequestId2",
    "externalid": "sourceObjectName2",
    "route": "Route Interaction NR",
    "routingdata":
      {
        "interactiontype" : "live"
      }
    }
  ]
}
Putting it all together
Using a tool for making API requests, send the required parameters in your requests. To be able to use your provider in the Invoke request, you must run the Register request first.
Example Register request
The bearer access token has been replaced with <access_token>.
curl
  -X POST
  -H "accept: application/vnd.newvoicemedia.v1+json"
  -H "authorization: Bearer <access_token>"
  -H "content-type: application/json"
  -d '{
    "provider": "ProviderA",
    "endpoint": "https://endpoint.example.com/routingendpoint",
    "headers":
    {
        "x-header1": "value1",
        "x-header2": "value2"
    },
    "agentactionspermitted":
    {
        "release" : 1,
        "hold" : 1,
        "transferToAgent": 0,
        "transferToRoute": 0
    }
}' "https://***.api.newvoicemedia.com/interactions/register"
This example registers a provider named ProviderA. The provider has an endpoint which requires two headers. Agents are permitted to perform the release and hold actions on any associated interactions but not cannot transfer the interactions to other agents or routes.
If your request is successful, you will receive a 200 Success response.
Example Invoke request
The bearer access token has been replaced with <access_token>.
curl
  -X POST
  -H "accept: application/vnd.newvoicemedia.v1+json"
  -H "authorization: Bearer <access_token>"
  -H "content-type: application/json"
  -d '{
    "provider": "ProviderA",
    "requests":
    [
    	{
      "action": "dispatch",
    	"requestid": "uniqueRequestId1",
    	"externalid": "sourceObjectName1",
    	"route": "Route Interaction NR",
    	"routingdata":
    		{
    		  "interactiontype" : "nonlive"
    		}
    	},
      {
      "action": "dispatch",
      "requestid": "uniqueRequestId2",
      "externalid": "sourceObjectName2",
      "route": "Route Interaction NR",
      "routingdata":
        {
          "interactiontype" : "live"
        }
      }
    ]
  }'
  "https://***.api.newvoicemedia.com/interactions/Invoke"
This example sends a request to the /Invoke end point, passing in the required headers and the Invocation object. The object contains two Interaction objects. The settings for provider ProviderA apply to these interactions. Agents are permitted release the interactions and put live interactions on hold and park nonlive interactions. Agents cannot transfer the interactions to other agents or routes.
The request invokes the interaction plan that contains just the Route Interaction applet applet. If our request is successful, we will receive a 200 Success response.
The Route Interaction applet assigns one live and one nonlive interaction defined in the Interaction object to the longest waiting agents. When the interactions are assigned to agents, VCC sends a POST request to the associated https://endpoint.example.com/routingendpoint endpoint with headers set to “x-header1”: “value1” and “x-header2”: “value2”.
Because we provided values in externalid, we can later additional POST /Invoke requests to release the interactions. See How to release an existing interaction using the Interactions API to find out how to release the interaction.