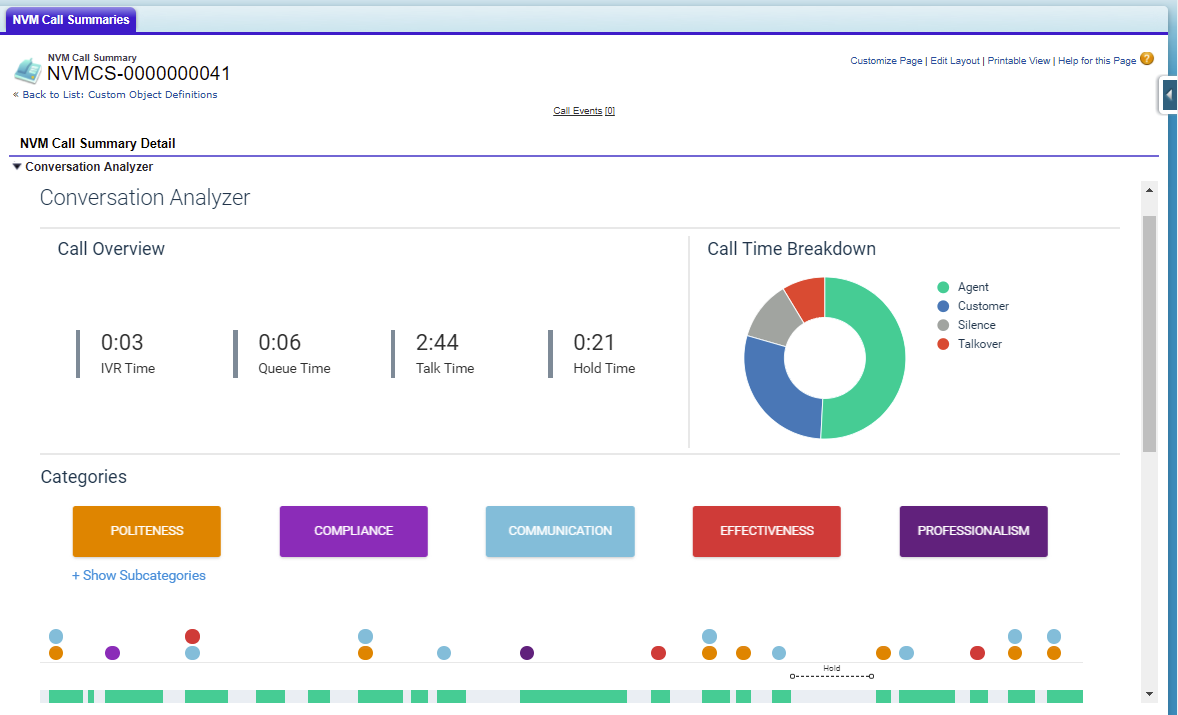
If Advanced Reports and Statistics is enabled and configured for your account, you can use Conversation Analyzer in Salesforce.
Conversation Analyzer adds the following features to your Salesforce org:
If Conversation Analyzer is not enabled for your account, you can use call recording annotation. For information about configuring call recording annotation, see Configuring call recording annotation in Salesforce. |
If enabled for your account, to use Conversation Analyzer in Salesforce, you must perform various configuration tasks.
Before you can configure Conversation Analyzer in Salesforce, you must install and configure Advanced Reports and Statistics. For information about Advanced Reports and Statistics, see Advanced Reporting and Statistics in Salesforce.
To see Conversation Analyzer components in NVM Call Summary records, change the page layout that the NVM Call Summary object uses:
The top section of the page layouts embeds Vonage Contact Center's Conversation Analyzer into an NVM Call Summary record. For information about the contents of Conversation Analyzer, see Conversation Analyzer.
Other sections on the page layouts are customized for the call type, containing only the fields that are relevant to those calls.
When you or an agent views a NVM Call Summary record, Conversation Analyzer for the related call appears. You can see Conversation Analyzer in the Conversation Analyzer section of the record.

As well as retrieving call summary and agent state statistics, Advanced Reporting and Statistics can retrieve call recording analytics data from Vonage Contact Center. Advanced Reporting and Statistics can also retrieve call recording transcripts. Advanced Reporting and Statistics stores the additional data in fields on the NVM Call Summary object.
To retrieve call recording analytics data or transcripts, or both, perform the following steps:
Locate and click NVM Advanced Reporting. NVM Advanced Reporting (Managed) appears.
Alongside Post Install Instructions, click View.
In the Global Settings and Mappings section, in Flags, type 'SPEECH'.
| You can add optional flags CAROWS and CA(0). For information about these flags, see Configuring when Vonage Call Summary records are created and Configuring Conversation Analyzer Insights records later in this page. |
Click Save All. Fetch Analytics and Fetch Transcript check boxes appear in the Channels section.
Fetch Analytics. Select the Fetch Analytics check box to retrieve and store the following data:
| Data to retrieve | Fields to store data in | Notes | |
|---|---|---|---|
| Category and subcategory data | Custom category and subcategory fields. Because you can customize categories and subcategories, you must create the fields yourself. For information, see Creating custom fields for categories and subcategories later in this page.
| If you do not provide all related category and subcategory fields, Advanced Reporting and Statistics reports an error and does not retrieve applicable category and subcategory data. | |
| Percentage of agent talk time | Agent Percent (NVMStatsSF__Agent_Percent__c) | Fields appear in the Caller and Agent Related section. If the field do not appear, add them to the relevant NVM Call Summary page layouts. | |
| Percentage of talkover time | Crosstalk Percent (NVMStatsSF__Crosstalk_Percent__c) | ||
| Percentage of customer talk time | Customer Percent (NVMStatsSF__Customer_Percent__c) | ||
| Percentage of silence time | Silence Percent (NVMStatsSF__Silence__c) | ||
| Level of confidence | Confidence (NVMStatsSFConfidence__c) | ||
| Language of call | Language (NVMStatsSFlanguage__c) | ||
| Sentiment summary and scores | Sentiment (NVMStatsSF__Sentiment__c) | Field appears in the Information section in the Vonage Call Summary object if sentiment analysis is enabled for your account. If the sentiment field does not appear, add it to the relevant NVM Call Summary page layouts. |
From Advanced Reporting and Statistics version 2.84 onwards, you can add the CA(0) flag. This flag determines how quickly the package should get data for Vonage Call Summary records. By default, the package waits 3600 seconds between Vonage Call Transcription, Categorization, and pulling the resultant data into Salesforce. CA(0) instructs the package to override the default wait of 3600 seconds with 0 seconds. Because Conversation Analyzer data is checked every 15 minutes, this will typically load the analytics data into your org 1–16 minutes after the data analysis is completed. You may use other values but 0 is recommended.
From Advanced Reporting and Statistics version 2.84 onwards, you can add the CAROWS flag. This flag instructs the package to create child Conversation Analyzer Insights records under a Vonage Call Summary record. A Conversation Analyzer Insights record is created for each combination of category or subcategory matches for each call. This avoids the need to create custom fields for categories and subcategories.
| 2 kB of Salesforce data storage is consumed by each row. |
The maximum number of rows created for each call — if all your defined Conversation Analyzer categories are matched at least once — is number of categories x number of subcategories.
If you choose to retrieve call recording analytics data from Vonage Contact Center, you can create custom category and subcategory fields on the Vonage Call Summary in which to store that data. (The Advanced Reporting and Statistics managed package provides custom fields to store other analytics data.) Each category and subcategory can have a corresponding field.
We recommend that you create a custom checkbox field for each category and a number field for each subcategory that you have configured for the Conversation Analyzer feature. Set Field Name—as referenced by APIs—for the fields using the following format:
Set Default Value for the field to Unchecked for the category check boxes and 0 for the subcategory number fields. The values you specify in Field Name fields are case-insensitive. Field Name values must be a case-insensitive match for the category and subcategory names as configured in Vonage Contact Center. Where spaces and other nonalphanumeric characters appear in the names used in Vonage Contact Center, replace such characters with an underscore (_) character. Advanced Reporting and Statistics do not support names with two consecutive underscores, and names are subject to the length limit for Field Name values in Salesforce. For information about field names in Salesforce, see Salesforce help. Salesforce appends the __c to Field Name indicating that this is a custom field. Field Label values, which appear in records and on reports, do not need to match a specified format, but we recommend that you align them to the Field Name values. |
For example, if you have a Communication category and an Active listening subcategory, create fields with the following types, labels, names, and default values:
| Category/subcategory | Type | Field type | Field Label | Field Name | Default Value |
|---|---|---|---|---|---|
| Communication | Category | Checkbox | Communication | Communication__c | Unchecked |
| Active listening | Subcategory | Number | Active listening | Communication_Active_listening__c | 0 |
Optionally, create a section on the summary page layouts and add the category and subcategory custom fields.
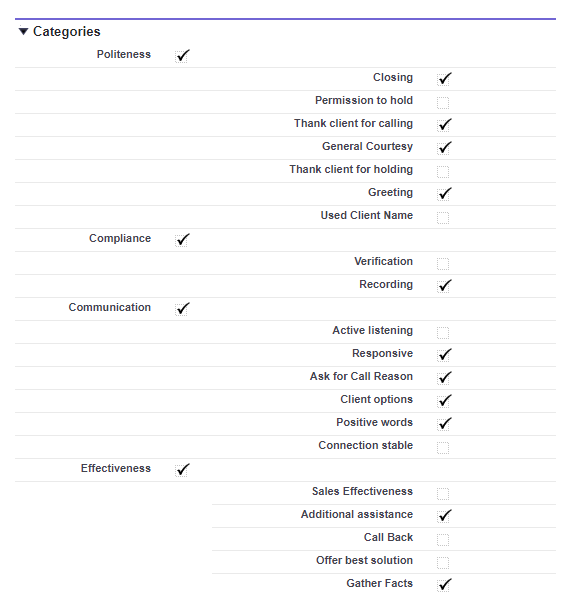
Next time a transaction runs, Advanced Reporting and Statistics retrieves category and subcategory data and populates custom fields as appropriate. A checked field indicates that the transcript of the call recording matched the category or subcategory.

If sentiment analysis is enabled for your account, you can configure Advanced Reporting and Statistics to retrieve sentiment summaries and scores along with call recording analytics data or transcripts, or both. For information about retrieving sentiment data, see the Fetch Analytics table earlier in this page. If you retrieve this data, the Sentiment field will contain a string of concatenated sentiment data. For information about this data, see Analyzing a call recording in Conversation Analyzer in Salesforce.
To make this data easier to read, or to report on it, you can separate the data into multiple fields. The following code samples extract data from a Sentiment field, for example:
Overall:+0.65, VeryNegative:5, Negative:25, Neutral:40, Positive:20, VeryPositive:10, |
To extract the overall score from Sentiment and put it into a separate custom field, you must create a formula-type custom field that uses the provided formula. Set the Field Name for this custom fields to OverallSentimentScore__c and Field Label to Overall Sentiment Score. Use the following formula. The formula returns a number value.
VALUE(
  TRIM(
    LEFT(
      SUBSTITUTE(
        SUBSTITUTE(NVMStatsSF__Sentiment__c, "Overall:", ""),
      ",",
      " "),
    6)
  )
) |
To put percentages of incidences of very negative, negative, neutral, and so on, sentiments into individual fields, firstly, create custom fields. You'll need a formula-type custom field for each of the percentages you want to save. Set Field Names for these custom fields to VeryNegativeSentiment__c, NegativeSentiment__c, NeutralSentiment__c, and so on, and Field Labels to Very Negative Sentiment, Negative Sentiment, Neutral Sentiment, and so on.
The following formulas return number values.
Use the following formula for the VeryNegativeSentiment__c field:
VALUE(
  TRIM(
    LEFT (
      SUBSTITUTE (
        MID(NVMStatsSF__Sentiment__c,
        FIND("VeryNegative:", NVMStatsSF__Sentiment__c)+13,
        6),
      ",", "      "),
    6)
  )
) |
Use the following formula for the NegativeSentiment__c field:
VALUE(
  TRIM(
    LEFT(
      SUBSTITUTE(
        MID(NVMStatsSF__Sentiment__c,
        FIND(", Negative:", NVMStatsSF__Sentiment__c)+11,
        6),
      ",", "      "),
    6)
  )
) |
Use the following formula in the NeutralSentiment__c field:
VALUE(
  TRIM(
    LEFT (
      SUBSTITUTE (
        MID(NVMStatsSF__Sentiment__c,
        FIND("Neutral:", NVMStatsSF__Sentiment__c)+8,
        6),
      ",", "      "),
    6)
  )
) |
Use the following formula in the PositiveSentiment__c field:
VALUE(
  TRIM(
    LEFT(
      SUBSTITUTE(
        MID(NVMStatsSF__Sentiment__c,
        FIND(", Positive:", NVMStatsSF__Sentiment__c)+11,
        6),
      ",", "      "),
    6)
  )
) |
Use the following formula for the VeryPositiveSentiment__c field:
VALUE(
  TRIM(
    LEFT (
      SUBSTITUTE (
        MID(NVMStatsSF__Sentiment__c,
        FIND("VeryPositive:", NVMStatsSF__Sentiment__c)+13,
        6),
      ",", "      "),
    6)
  )
) |
To extract each of the individual scores from Sentiment and put them into separate custom fields, you must create ten formula-type custom fields. Set Field Names for these custom fields to SentimentScore0__c, SentimentScore1__c, SentimentScore2__c, and so on, and Field Labels to Sentiment Score 0, Sentiment Score 1, and Sentiment Score 2. Use the following formula in the individual sentiment fields, replacing n with the specific sentiment score position. The formula returns a number value.
VALUE( MID(RIGHT(NVMStatsSF__Sentiment__c,59) , 1+6*n, 5) ) |
For Sentiment Score 0 field, use the following formula:
VALUE( MID(RIGHT(NVMStatsSF__Sentiment__c,59) , 1+6*0, 5) ) |
For Sentiment Score 9 field, use the following formula:
VALUE( MID(RIGHT(NVMStatsSF__Sentiment__c,59) , 1+6*9, 5) ) |
Individual sentiment examples
This example uses the following value in the Sentiment field:
Overall:+0.65, VeryNegative:5, Negative:25, Neutral:40, Positive:20, VeryPositive:10, |
Using the formula above in the Sentiment Score 0 field would result in the following value:
+0.00 |
Using the formula above in the Sentiment Score 9 field would result in the following value:
+0.77 |