
Sending Slack notifications from Vonage Contact Center
Using Vonage Contact Center (VCC) you can send real-time notifications from an interaction plan to a Slack app or an individual Slack user. You can configure the notifications to be triggered by important events in the interaction plan or in post-interaction processing. Events might include a VIP customer abandoning in a queue, or an agent missing a personal queue call.
To send Slack notifications from VCC, you must firstly create and configure a Slack app in Slack. Then you must configure a Data Connector in VCC to send notifications to that app. You can use a template within the Web Service Data Connector applet. The template will help you configure sending messages to Slack channels.
In this page |
|---|
Create a Slack app for VCC to send notifications to
Make sure you are logged in to the Slack workspace you want to send Slack notifications to. Go to https://api.slack.com/apps.
Click Create an App then From an app manifest.
Choose the workspace you want to send Slack notifications to. Click Next.
Switch to the JSON tab and enter the app manifest provided below. For information about the app manifest, see Create and configure apps with manifests (Slack help).
Click Next and then Create. You will be prompted to install and authorize the app. Click Install to Workspace and then click Allow to give the app permission to access your workspace.
In the left hand menu, click OAuth & Permissions. Copy and save the value in Bot User OAuth Token in the OAuth Tokens for Your Workspace section. You'll need this for the next stage of configuration.
Create a Data Connector that sends notifications to your Slack app
Next you need to create a Data Connector applet in Interaction Plans Architect. For information about creating and configuration the applet to send notifications to your Slack app, perform the following steps:
- Create a Data Connector applet. For information about creating an applet, see Creating an applet. Your new Data Connect applet appears.
In Interface in the Interface section, click Web Service. The Action section appears.
Optionally select the applet that the call is routed to if the interface fails in the Interface Failure list.
An interface failure occurs when the request does not receive a response from the web service. A timeout or a DNS lookup failure, for example, might cause an interface failure. Do not confuse an interface failure with a response with a HTTP error status code. For more information about status codes, see Successful action.In the Action list in the Action section select Post a message.
The Request/Response Definition section appears.In Message Body, paste in the message you'd like to send. Slack provides a tool to help you build your messages—see Block Kit Builder.
You must add the channel ID to the beginning of the message body, after the first brace (
{).For example:
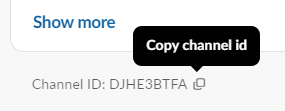
{"channel":"A1B2C3D4E",...}To find channel IDs for channels and individual users, click the name of the channel or user in Slack to open the channel or user details. The channel ID appears at the bottom of the details pop-up window. Click the copy icon.
Alternatively, get the IDs using the Slack API. For information, see https://api.slack.com/types/channel or https://api.slack.com/types/user.
You can replace hardcoded values in the message body with data sources to customize messages. For example, you can include individual interaction IDs, account names, dialled numbers, and so on. For example message bodies, see Example messages later in this page.
- In OAuth Token, paste the value of Bot User OAuth Token you copied when you created your Slack app in the Create a Slack app for VCC to send notifications to section earlier in this page.
- In the Routing section, click the applet that Vonage Contact Center routes the interaction to after the Data Connector applet.
- Click Update. Configure the rest of your call plan as required.
Example messages
Data Connector failure

Queue breakout

Abandoned in queue

For general assistance, please contact Customer Support.
For help using this documentation, please send an email to docs_feedback@vonage.com. We're happy to hear from you. Your contribution helps everyone at Vonage! Please include the name of the page in your email.