
Configuring skills
Skills are attributes, such as a language, specific product knowledge and so on, assigned to voice-function-enabled users and required by interactions for skills-based routing decisions. Along with a name, skills also have levels. Levels indicate a user's proficiency in a skill. For more information about skills, see User Admin.
In the User Admin area of the VCC Admin Portal, you can configure skills in the account you are logged in to.
How do I navigate skills?
The skills tab in User Admin supports URL navigation. You can directly navigate to the skills tab or bookmark your most frequently changing skill.
To open skills tab, use following pattern: https://***.newvoicemedia.com/CallCentre/portal/useradmin/skills, where *** represents the subdomain for the region of your VCC account.
To open a specific skill, add the skill's ID at the end of the url. For example, https://***.newvoicemedia.com/CallCentre/portal/useradmin/skills/###, where *** represents the subdomain for the region of your VCC account, and ### represents the ID of the skill you want to open.
How do I create a new skill?
To create a skill, you need the Manage Routing Settings permission. For information about feature permissions, see Configuring admin and supervisor feature permissions.
To create a new skill in the account you are logged in to, perform the following steps:
- Go to User Admin, Skills tab. For information about accessing User Admin, see Accessing and finding your way around User Admin.
- To create new skill, click Create Skill in the top right corner. If the button is disabled, you don't have enough permissions to create new group.
- A new skill appears. Provide the following information:
Section
Field Description
Details
Name The name of the skill. This name appears everywhere the skill is used.
Type a name that describes the skill.
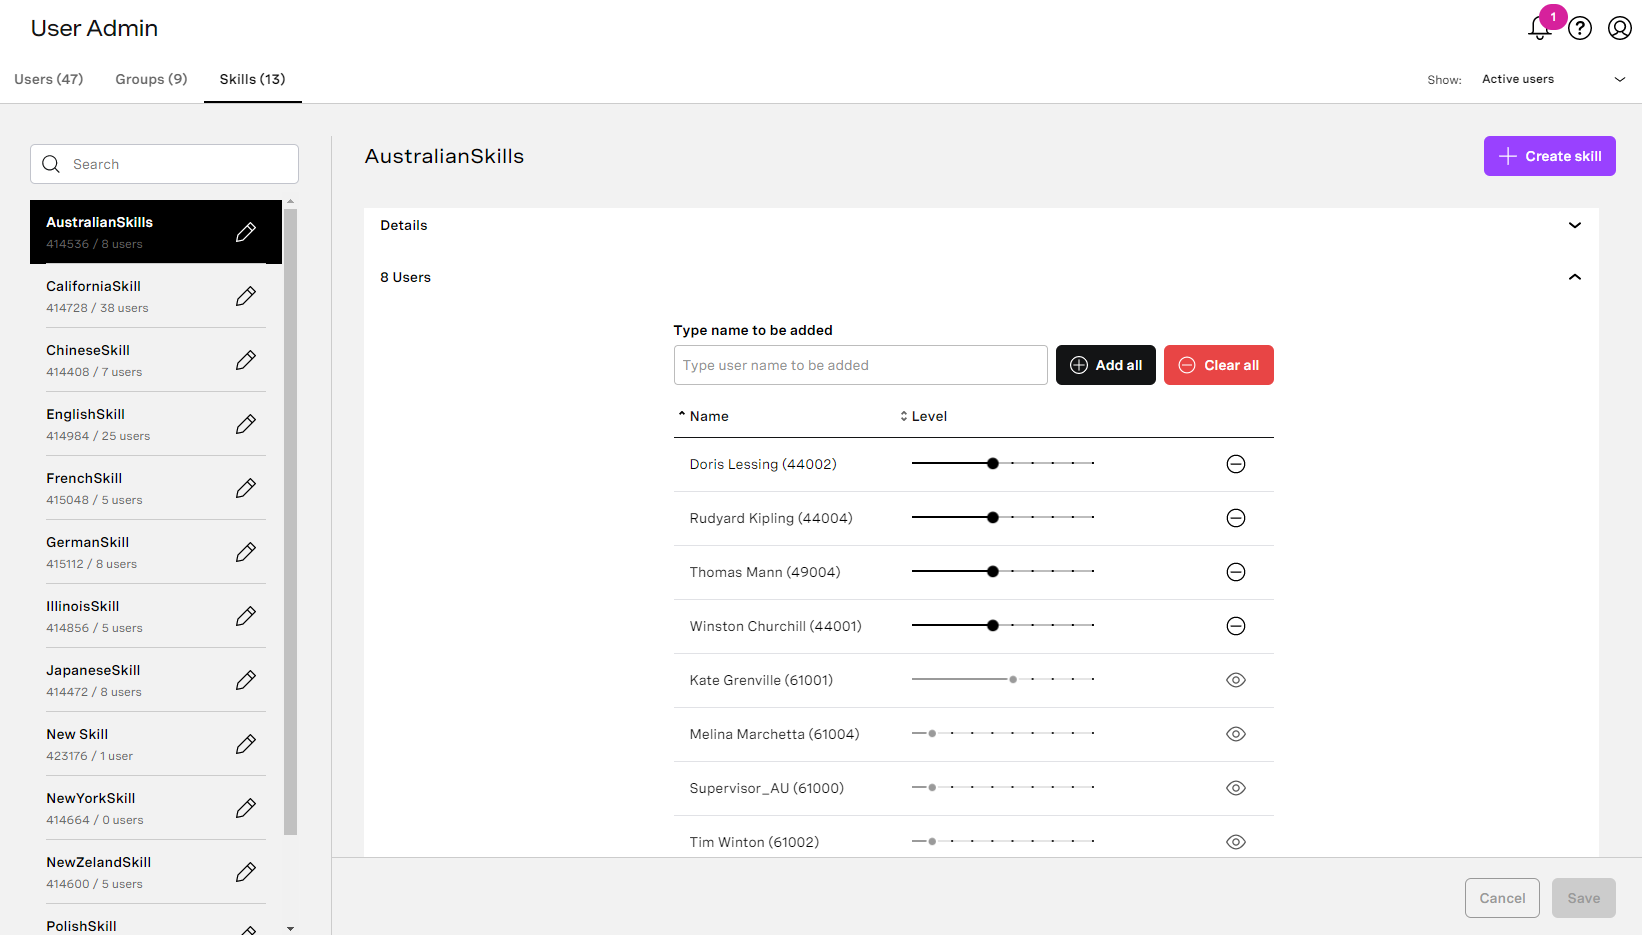
Users The users section shows the number of users and a list of the users that this skill is assigned to.
- To assign the skill to a single user or a selection of users, click Select users to add to skill and, optionally, start typing. A list of available users, filtered by any text you have typed, appears. Click the user or users you want to assign the skill to. Click Apply.
- To assign the skill to all available users, click Add all.
- To remove all users that the skill is currently assigned to, click Remove all.
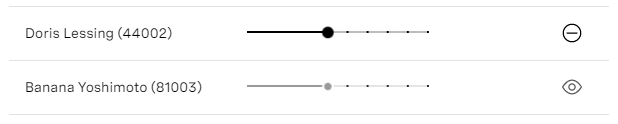
- To remove an existing user, click the – (minus) icon alongside the existing user's name in the list.
The user or users appear in the list along with their skill level. The level indicates how proficient a user is in the skill; the default skill level for newly added users is 5. Skill levels are used to determine which agent to route an interaction to. In a scenario where two agents, with otherwise identical characteristics, are available to handle an interaction at the same time, the agent with the highest level in a mandatory or unexpired skill will receive the interaction.
To set the skill level for a user for the skill, click the appropriate number on the slider.
If you leave a mandatory field empty or enter a value that is not valid, an error message appears. The number of errors appears alongside Create. You cannot click Create until you have corrected all the errors.
Change the data accordingly. You cannot save the skill until you provide a valid name. When you have provided valid information in all mandatory fields, click Create. Your new skill is created. Alternatively click Cancel to cancel creating this new skill.
How do I view an existing skill's details?
Go to Skills tab in User Admin area to see a list of skills in the account you are logged in to. From this list you can see each skill's name and ID—which is automatically generated when the skill was created. The number of users in the skill also appears. To edit the skill you need to have Manage Routing Setting permission. The icon on the right indicates whether you can edit (pencil icon) or view (eye icon) listed skill.
When skill details displayed, in the users section you will see users with skill assigned. The users list contains all users that you can access in the account you are logged in to. If you have only view access to some users, you will see them listed, however you cannot remove/assign the skill to this user. Those users are marked with eye icon.
How do I edit an existing skill?
To edit a skill, you need the Manage Routing Settings permission. For information about feature permissions, see Configuring admin and supervisor feature permissions.
To edit an existing skill in the account you are logged in to, perform the following steps:
- Go to User Admin, Skills tab. For information about accessing User Admin, see Accessing and finding your way around User Admin.
- Locate the skill you want to edit using search or by scrolling the list.
- Click the skill you want to edit. The skill's details appear.
- Update the information in the fields as required.
Section
Field Description
Details
Name The name of the skill. This name appears everywhere the skill is used.
Type a name that describes the skill.
Users The users section shows the number of users and a list of the users that this skill is assigned to.
- To assign the skill to a single user or a selection of users, click Select users to add to skill and, optionally, start typing. A list of available users, filtered by any text you have typed, appears. Click the user or users you want to assign the skill to. Click Apply.
- To assign the skill to all available users, click Add all.
- To remove all users that the skill is currently assigned to, click Remove all.
- To remove an existing user, click the – (minus) icon alongside the existing user's name in the list.
The user or users appear in the list along with their skill level. The level indicates how proficient a user is in the skill; the default skill level for newly added users is 5. Skill levels are used to determine which agent to route an interaction to. In a scenario where two agents, with otherwise identical characteristics, are available to handle an interaction at the same time, the agent with the highest level in a mandatory or unexpired skill will receive the interaction.
To set the skill level for a user for the skill, click the appropriate number on the slider.
If you leave a mandatory field empty or enter a value that is not valid, an error message appears. The number of errors appears alongside Save. You cannot click Save until you have corrected all the errors. - When you have finished making your changes, click Save. Your changes are saved. Alternatively click Cancel to undo your changes.
How do I assign a skill to a user?
You can assign a skill to one or more users while creating or editing the skill as described above. You can also assign the skill to users in the following ways:
- To add an individual user to a skill in the account you are logged in to, edit the user and add them to a skill in the Skills section in Routing Settings. For information about editing a user, see Configuring individual users.
- To add multiple users to a skill, use bulk actions. For information about adding skills to multiple users, see Configuring multiple users (using bulk actions).
How do I remove a skill from user?
To remove a skill from a user, you need the Manage Routing Settings permission. For information about feature permissions, see Configuring admin and supervisor feature permissions.
To remove a skill from one or more users, perform the following steps:
- Go to User Admin, Skills tab. For information about accessing User Admin, see Accessing and finding your way around User Admin.
- Locate the skill you want to edit using search or by scrolling the list.
- Click on the skill you want to edit. The skill's details appear.
- In the Users section, click the minus icon (-) next to the name of the user you wish to remove from the skill. Click Clear all to remove all users from the skill.
- Click Save to save your changes.
How do I delete an existing skill?
To delete a skill, you need the Manage Routing Settings permission. For information about account permissions, see Configuring admin and supervisor feature permissions.
Only admin users can delete skills.
To delete a skill in the account you are logged in to, perform the following steps:
- Go to User Admin, Skills tab. For information about accessing User Admin, see Accessing and finding your way around User Admin.
- Locate the skill you want to delete using search or by scrolling the list.
- Click the skill you want to delete. The skill's details appear.
Click Delete skill. A dialog box appears.
Click Delete to delete the skill. Alternatively click Cancel to cancel deleting the skill.
You cannot delete a skill in the following circumstances:
- If any users in your account are assigned the skill (including users that are archived)
- If any Skill Tagger applet in your account references the skill
- If the skill is added to any virtual queues in your account
If you cannot delete a skill, a message appears to inform you that you cannot delete the skill. If you still wish to delete the skill, remove the skill from the Skill Tagger applet, virtual queue, or agent as directed in the message.
The message remains visible until you click to close it, or you leave User Admin.
For general assistance, please contact Customer Support.
For help using this documentation, please send an email to docs_feedback@vonage.com. We're happy to hear from you. Your contribution helps everyone at Vonage! Please include the name of the page in your email.