Creating a Dial List from a report
This feature is available only in the Premium edition of ContactWorld for Sales & Marketing; contact your account manager to enable it if you think you should be able to use it.
You can create a Dial List in various ways, one of which is using an existing Salesforce report. To generate a Dial List from a Salesforce report, the report must be in tabular format and contain the following columns:
- The unique ID of the Salesforce object, for example, Contact ID, Account ID, or Lead ID.
- At least one telephone number for each object.
- A description.
If you put any of these values into the wrong column, Connect creates the Dial List but the list might not be usable.
For information about creating Salesforce reports, see Salesforce help.
By default you can create Dial Lists of Contact, Lead, Case, Campaign Member, and Task types.
When you create a Dial List from a report, the Dial List is static and Connect does not update the list if the report changes. For information about static and dynamic Dial Lists, see Dynamic Dial Lists. For Connect to update the list when the report changes, making the list dynamic, you must subscribe to the report. For information about subscribing to a report, see How do I make a Dial List dynamic?.
How do I create a Dial List from a report?
To create a Dial List from a report follow these steps:
- Click the Dial Lists tab. The Recent Dial Lists or Recently Viewed list view appears.
Select an appropriate list view and click Go! if the selected list view does not automatically appear. The list view appears.
Click Create From Report.
If Create From Report is not visible, you may need to add the button to the Dial List List View. For information about adding a button to a list view, see Adding a custom button to a Dial List list view.Create From Report in Salesforce Classic
Create From Report in Salesforce Lightning Experience
Create Dial List From A Report appears.
Provide the following information:
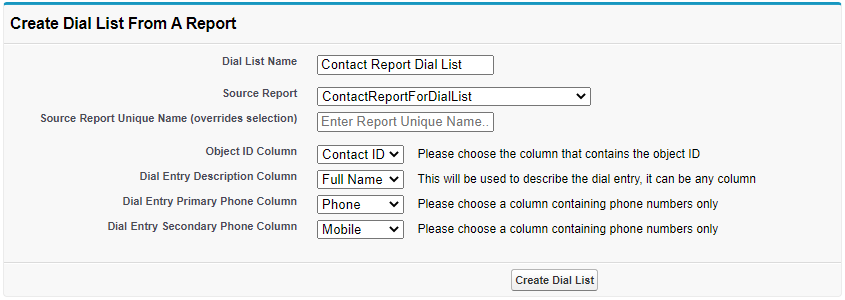
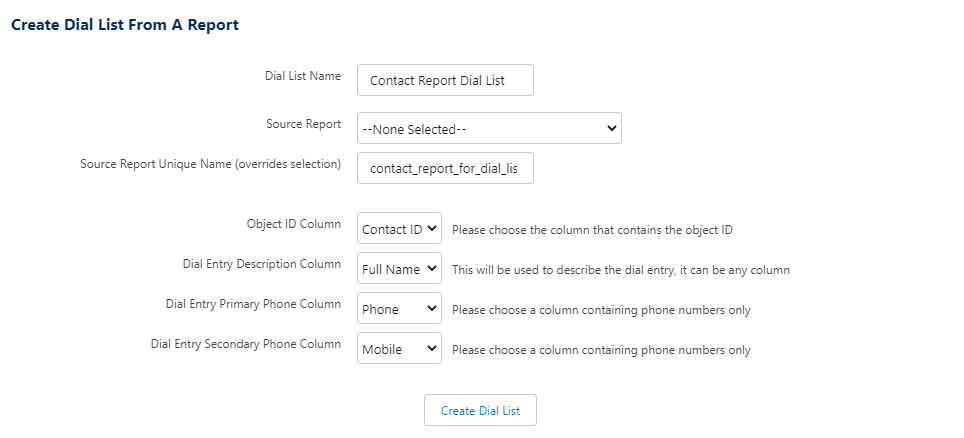
Field Description Dial List Name The name of the Dial List. Type the name for the Dial List you are creating. Source Report A list of tabular reports on which you can base your new Dial List. Click the name of the report you want to use. Source Report Unique Name (optional) Allows you to specify the report you want to use by entering its Report Unique Name. To locate the Report Unique Name for the report, view the report's properties in Salesforce Report Builder. If you specify a valid Report Unique Name in this field, then it will take precedence over any value selected in Source Report.
Object ID Column A list of columns in the report you specify in Source Report. Click the name of the column that contains the ID of the object in the report. Connect uses the Object ID to generate a URL in the call record to the original Salesforce object. Dial Entry Description Column A list of columns in the report you specify in Source Report. Click the name of the column that contains a suitable description for the object in the report. The description appears in the individual call records. Dial Entry Primary Phone Column A list of columns in the report you specify in Source Report. Click the name of the column that contains the primary telephone number for the object. This telephone number is the first number used to connect an agent to a customer when the agent uses Connect to make a call. Dial Entry Secondary Phone Column A list of columns in the report you specify in Source Report. Click the name of the column that contains the secondary telephone number for the object. This telephone number is used if the primary telephone number fails to connect an agent to a customer when the agent uses Connect to make a call. Click Create Dial List.
Example using Source Report
Example using Source Report Unique NameConnect creates the Dial List. The Dial List appears on screen, and contains one or more call records. Each call record corresponds to a row in the report on which the list is based.
The order of the calls in the Dial List reflects the sort order in the report.964px
If you create a Dial List from a report with more than 2000 entries, Connect creates only 2000 call records. For more information about Dial List limits, see Dial List limits.
Before you or any assigned agents can use your Dial List, you must complete the following tasks: You can also edit filters (where applicable), change the priority of a Dial List, set permissible call times, and edit custom fields. For information about these tasks, see Editing a Dial List.
How do I make a Dial List dynamic?
You can automatically update a Dial List that was created from a report by subscribing to that report. When you subscribe to the report you can trigger Connect to update the Dial List when the report meets defined conditions. For more information about report subscriptions, see Salesforce help.
You can only refresh a Dial List that was created after the upgrade to version 17.115.
You must use Salesforce Classic to configure a dynamic Dial List. If you are using Salesforce Lightning Experience, switch to Salesforce Classic to configure and then switch back.
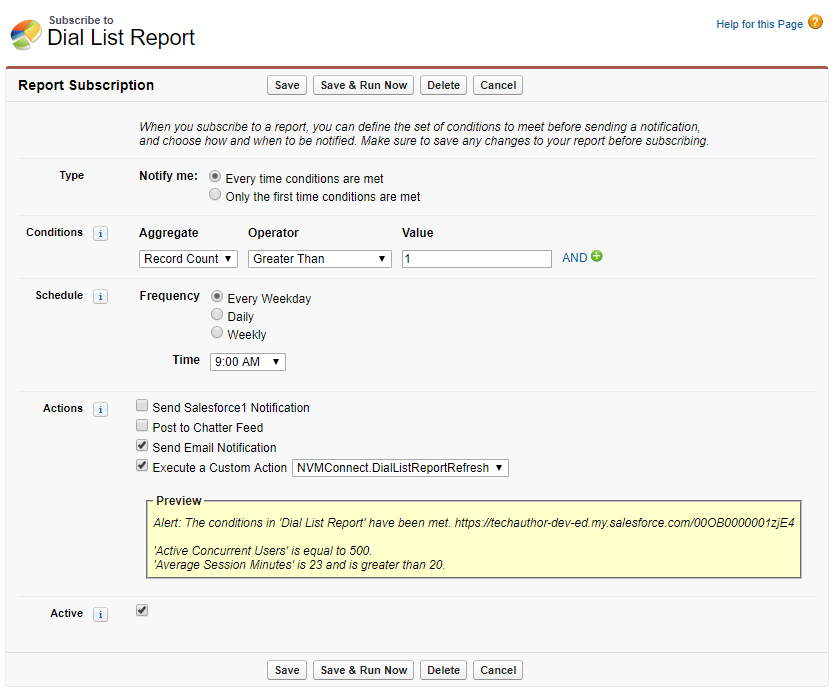
To subscribe to the report that the Dial List was created from, perform the following steps:
- Open the report.
- Click Subscribe, or—if you are already subscribed to this report—Edit Subscription.
- In the Type section, click the appropriate option.
In the Conditions section, define one or more conditions that will trigger Connect to update the Dial List. For information about conditions, see Salesforce help.
- In the Schedule section, specify when you want Salesforce to check the conditions.
- In the Actions section, select the Execute a Custom Action check box and click VCCConnect.DialListReportRefresh in the adjacent list. Optionally select any of the other actions.
- Select the Active check box.
- To save the subscription and wait for the next schedule, click Save, or—if you want a refresh to run immediately—click Save & Run Now.
When the subscription runs, Salesforce checks the defined conditions and executes the VCCConnect.DialListReportRefresh action if the condition or conditions are met. The action triggers Connect to update the Dial List created from the report.
If you created multiple Dial Lists based on the same report, Connect updates only the most recently modified Dial List.
When Connect updates an existing Dial List, the same limits apply as when the list was created. For information about Dial List limits, see Dial List limits.
For general assistance, please contact Customer Support.
For help using this documentation, please send an email to docs_feedback@vonage.com. We're happy to hear from you. Your contribution helps everyone at Vonage! Please include the name of the page in your email.


