For more information about users, see User Admin.Insert excerpt _ExcerptWhatAreUsers _ExcerptWhatAreUsers nopanel true
In the User Admin area of the VCC Admin Portal, you can make multiple changes to one or more users in the account you are logged in to by adding them to the bulk actions box.
| Panel | ||||||||||||||
|---|---|---|---|---|---|---|---|---|---|---|---|---|---|---|
| ||||||||||||||
|
...
Who can I add
...
to
...
bulk actions
...
?
You can perform bulk actions on the following types of users:
- ContactPad users. ContactPad users comprise all agent users, plus supervisors and admins users with access to ContacPad. For information about access to ContactPad, see User Admin. All users with access to ContactPad have an agent ID. You can enable access to ContacPad for an individual user in the user's License Status section. For information about configuring individual users, see Configuring individual users.
- Wallboard users
- Supervisor users
- Admin users
on all types of users.
| Insert excerpt | ||||||
|---|---|---|---|---|---|---|
|
| Info | ||||||||
|---|---|---|---|---|---|---|---|---|
|
...
How do I add an existing user or users to bulk actions?
To start adding users to bulk actions, you need to enable bulk actions mode. To the right of every user is a + icon to add the user to the bulk actionsdo that, click Bulk actions at the top of the page. After enabling bulk actions mode, the top bulk actions section appears. This section contains the number of users added to bulk actions, a pencil icon, and a Close button. Click the pencil icon to open the bulk actions side panel in which you can edit users. Click Close to close the bulk actions top section. Clicking Yes, close in that dialog box removes users from bulk actions and closes the top bulk actions section.
Adding a single existing user
After enabling bulk actions mode, a plus sign (+) appears to the right of every user. If the icon is inactiveunavailable, you do not have permission to edit this user. For information about setting supervisor permissions, see Supervisor permissions in User Admin. To add a single user to the bulk actions box, click the plus sign (+ icon). The user appears in the bulk actions box.is added to bulk actions and the information about the number of users in bulk actions increases.
Adding all users assigned to a group
To add all users in an existing group to bulk actions, go to the bulk action box, click the Groups tabGroups tab. After enabling bulk actions mode, a plus sign (+) appears to the right of every group. Use search, or scroll through the list of groups, to find the group of users you want to add to Bulk bulk actions. You can add all users assigned to this group to the bulk actions box in the following ways:
...
Click the plus sign (+) to add users. If the plus sign (+) is unavailable, you do not have permission to edit this group and manage users assigned to this group; you cannot add the users from this group to bulk actions. For information about setting supervisor permissions, see Supervisor permissions in User Admin.
...
After adding users to bulk actions, the number of users added to bulk actions in the top bulk actions section increases.
Adding all users with a skill
To add all users with an existing skill to Bulk actions, click the Skills tabbulk actions, go to the Skills tab. After enabling bulk actions mode, a plus sign (+) appears to the right of every skill. Use search, or scroll through the list of skills, to find the skill that is assigned to the users users with a skill you want to add to Bulk bulk actions. You can add all users assigned to this skill to the bulk actions box in the following ways:
- Click + icon on the right of the skill, next to the Edit icon. The users appear in the bulk actions box.
- Click Edit to open the skill in edit mode. Expand the list of the skill's users and click Add all users to Bulk Actions. The users appear in the bulk actions box.
Adding all users assigned to a schedule
To add all users assigned to an existing schedule to Bulk actions, click the Schedules tab. Use search, or scroll through the list of schedules, to find the schedule that the Click the plus sign (+) to add users. Only users you can edit will be added to bulk actions. For information about setting supervisor permissions, see Supervisor permissions in User Admin. After adding users to bulk actions, the number of users added to bulk actions in the top bulk actions section increases.
Adding users from bulk actions edit side panel
After clicking the pencil icon to open the bulk actions side panel, you can add additional users to bulk actions. Click Select users. All the users you can edit appear in the dropdown list. Select the checkbox to the left of any users you want to add to the bulk actions box are assigned to. Click Edit to open the schedule in edit mode. Expand the list of the schedule's users and click Add all users to Bulk Actions. The users appear in the bulk actions box. Click Apply.
Removing a user or users from
...
bulk actions
Bulk actions contains The bulk actions side panel shows all added users in the top section. To remove a user from the list, click X alongside the minus sign (–) alongside the user's name. To remove all users from the list click Clear list. Alternatively click Select users. Clear the checkbox to the left of any users you want to remove from bulk actions. Click Apply.
How do I change one or more settings for more than one existing user at a time?
...
Bulk actions side panel and available sections
To open the bulk actions box, click <. You can then click > to collapse the box.side panel and start editing users, click the pencil icon in the top bulk actions section.
With the bulk actions the expandedside panel, you can make changes to the users in each of the following sections:
- User status (Active/ArchivedLicense Status)
- Agent Settings
- Routing Settings (Skills and Groups)
- Permission Settings
| Note |
|---|
Agent Settings and Routing Settings only appear if at least one of the users in the bulk actions box is a ContactPad is acting as an agent user. Permission Settings only appears if at least one of the users in the bulk actions box is a supervisor or wallboard user. |
...
| Info | ||
|---|---|---|
| ||
You can edit sections in the bulk actions box side panel according to your permissions. For information about permissions in User Admin, see Accessing and finding your way around User Admin. The Edit User permission allows you to edit following sections: the User status (Active/Archive, License Status, ) and Agent Settings and Permission Settings sections. The Manage Routing Settings permission allows you to edit the Routing Settings section.For sections (Skills and Groups) . If any of the sections are not available, you do not have permissions to edit them. For information about editing linked account permissions, see Editing linked account permissions. |
For information about the fields in any of these sections, see Configuring individual users.
User filtering
When you expand the sectionsopen a particular section in the bulk actions side panel, any users that the settings cannot be applied to , are filtered from the bulk action boxout. For example, expanding Permission Settings filters non-supervisor and non-wallboard users from the boxopening Agent settings filters users who do not act as agents, as you can only apply permission agent settings to supervisors and wallboard users.
...
agents, and supervisors, or admins, who also act as agents. The number of users that the settings will be applied to is shown in the badge next to the section title.
Navigating through the bulk actions side panel
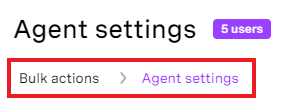
When you open bulk actions, the bulk actions side panel appears in front of the main screen. When you open specific sections (such as Agent settings or Skills), the new sections appear in the side panel. At the top of each screen, under the title, breadcrumbs appear, showing your location within the bulk actions side panel. You can move to previous screens or to the main bulk actions screen by clicking the breadcrumbs. Your current location is marked in purple.
Changing settings
When you expand the sections, any open the bulk actions side panel, all available settings are, by default, empty or not selected. No shared settings are highlighted or are selected in lists. In the following example, all users share a Physical Location and a Virtual Location of the United Kingdom so United Kingdom is selected in both lists. The users have a mixture of National and International settings so the In Country Display setting is not highlighted, and a mixture of telephony regions so no value is selected in the Telephony Region list. All users have the enforced disposition codes feature enabled, but none have WebRTC enabled so these settings are highlighted. All users use the default Outbound Wrap Timeout; a custom, but different, value for Agent No Answer Timeout; a custom and the same value (30 seconds) for Agent Line Busy Timeout; and a mixture of default and custom values for Agent Invalid Number Timeout and Agent Network Issue Timeout. Finally, all have the Sales English skill.
Changing settings
As you change the information in the fields, undo icons appear alongside those fields. The number of performed changes appears in the Apply button at the bottom of the bulk actions box.listed. Only settings that you change or add will be applied to users in bulk actions.
For example, if all users—either agent users or users who are acting as agents—added to bulk actions have a different value set in Location, in the Agent settings section, value of Location will be 'Not selected'. Setting Location to 'United Kingdom +44' in bulk actions will update the value of Location for all users.
| User | Original Location | Updated Location |
|---|---|---|
| 1 | United Kingdom +44 | United Kingdom +44 |
| 2 | United Kingdom +44 | United Kingdom +44 |
| 3 | Poland +48 | United Kingdom +44 |
| 4 | Poland +48 | United Kingdom +44 |
| 5 | Italy +39 | United Kingdom +44 |
If these same users have a mixture of assigned skills and levels, in the Skills section, Add skills and Remove skills will be empty.
Selecting 'English' in Add skills and setting the level of that skill to '8' (if enabled for your account) will add the English skill at level 8. If a user already had that skill at level 8, no changes would be applied. If they had that skill at a different level, their level would be changed to level 8. If the user didn't have the skill, they would be given it at level 8.
Selecting 'French' in Remove skills would remove the French skill from any user who had it.
| User | Original skills and levels | Updated skills and level |
|---|---|---|
| 1 | English—8 | English—8 |
| 2 | English—5 | English—8 (increased level) |
| 3 | Polish—7 | Polish—7 English—8 (added) |
| 4 | French—2 |
|
| 5 | Italian—4 French—3 Polish—7 | Italian—4 |
User status
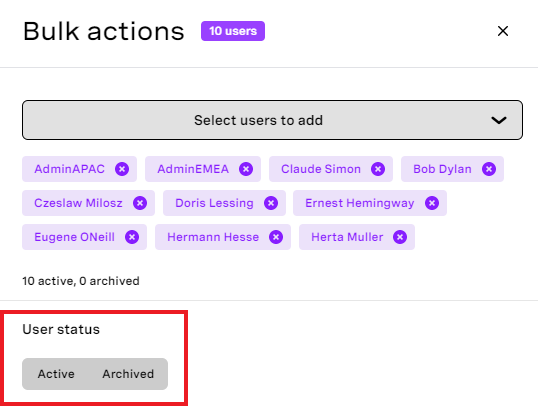
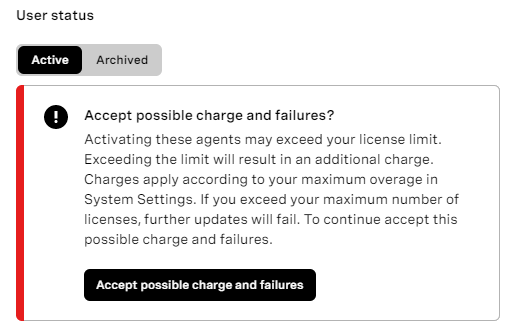
The User status section contains configuration for all users added to bulk actions. By default, fields have no value selected. You can set the users' status to archived or active. The image above shows the current status of the users in bulk actions. If you click to activate the agent users a warning message about possible additional charges or failures after activating those agents may appear. This warning message appears according to your license configuration. For information about license configuring, see Configuring licenses. Either accept these possible charges and failures or discard user status changes to continue making changes in bulk actions side panel.
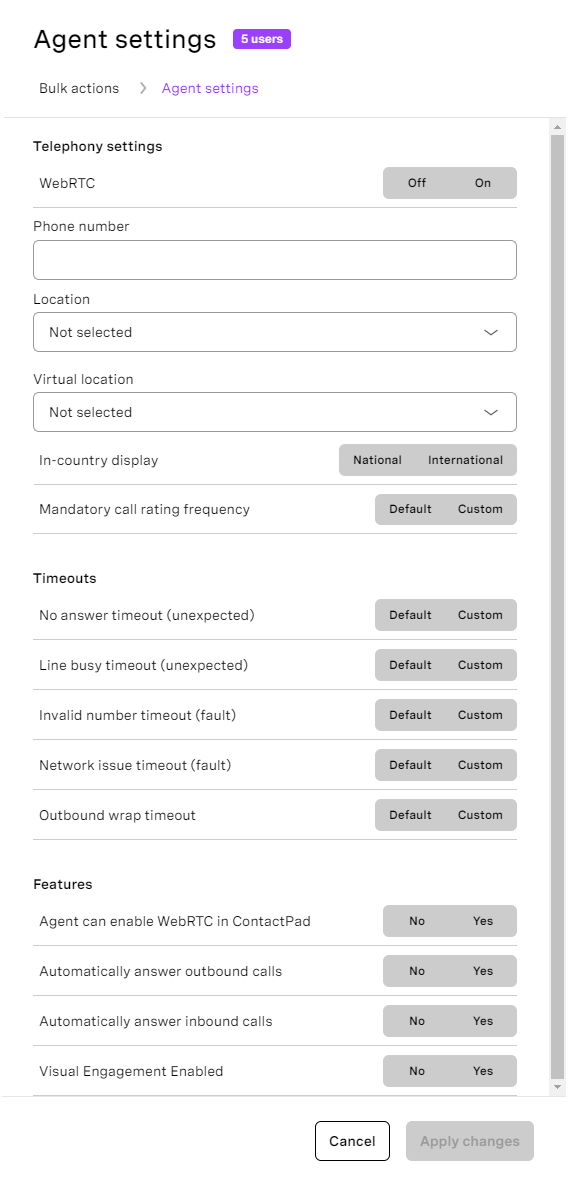
Agent settings
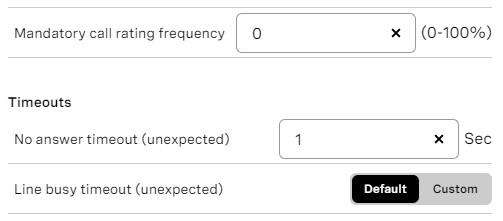
The Agent settings section contains all available configuration for users who act like agents. By default, all fields are empty or have no value selected and you start with an empty form. You can specify the users' location, set the same phone number for all users, enable user-level features, or configure users' timeouts. To the right of specific timeout, the Default | Custom toggle appears. If you select Default, all users are updated with the default value specified for the account. If you select Custom, the new field appears in which you can specify a customer value. If you provide a value, this value will be applied as a custom configuration for all users added to bulk actions. If you don't want to provide custom value, click X to go back to the original state.
Routing settings—Skills
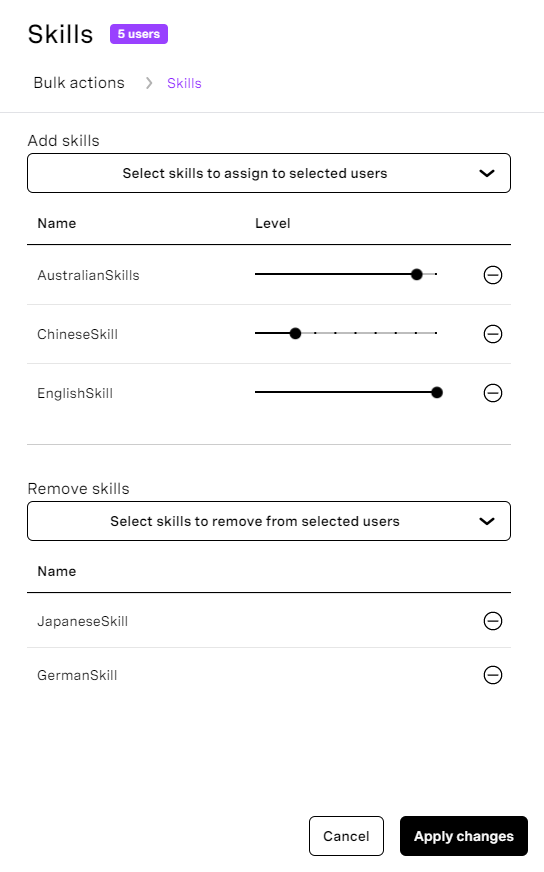
The Skills section contains Add skills and Remove skills. In Add skills, you can specify which skills you want to assign to users added to bulk actions. If Skill Proficiency is enabled for your account, you can also provide specific levels for added skills. In Remove skills, you can choose skills you want to remove from users.
In the following example, after applying changes, the five users added to bulk actions will have AustralianSkills (level 9), ChineseSkill (level 3) and EnglishSkill (level 10). JapaneseSkill and GermanSkill will be removed if any of the users from bulk actions had those skills. All other skills configuration for users added to bulk actions stays the same.
Routing settings - Groups
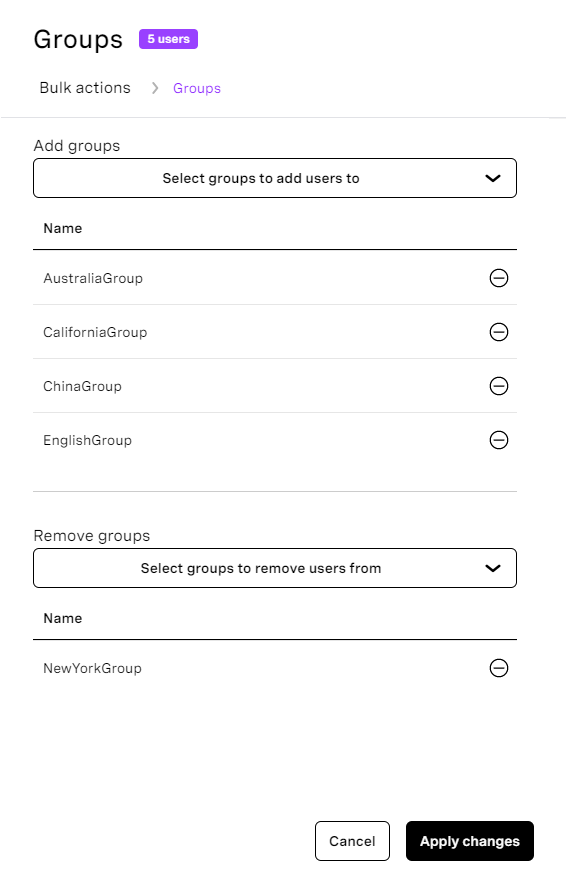
Groups section contains Add groups and Remove groups. In Add groups, you can specify which groups you want to add users from bulk actions to. In Remove groups, you can select groups to remove users from.
In the following example, after applying changes, five users will be added to AustraliaGroup, CaliforniaGroup, ChinaGroup, EnglishGroup, and will be removed from NewYorkGroup. All other groups configuration for users added to bulk actions stays the same.
Saving changes
To save your changes, click Apply changes.
Undoing changes
To cancel your changes in a single field, click the undo icon alongside the field to revert the contents of the field to the saved version.
Bulk actions progress
When you apply changes, the Bulk actions progress screen appears. At the top of the side panel, a progress bar indicates the progress of updating users. Below the progress bar, user update statuses appear dynamically in the table. All users with successful updates appear in the Passed section with a result of OK. If any of the updates fail, the users appear in the Failed section and appropriate result messages are displayed.
After updating all users, you can make one of the following choices:
- Continue: go back to main bulk actions screen and continue making bulk changes.
- Exit bulk actions: stop making changes in bulk actions. This closes both the bulk actions side panel and the bulk actions top section.
Cancelling changes
To cancel all your changes, click Cancel. Insert excerpt


