| Insert excerpt | ||||||
|---|---|---|---|---|---|---|
|
In the User Admin area of the VCC Admin Portal, you can configure your users in the account you are logged in to.
| Insert excerpt | ||||||
|---|---|---|---|---|---|---|
|
| Insert excerpt | ||||||
|---|---|---|---|---|---|---|
|
| Panel | ||||||||||||||
|---|---|---|---|---|---|---|---|---|---|---|---|---|---|---|
| ||||||||||||||
|
How do I create a new user?
To create a user, you need the Create Useruser and Edit Useruser permissions. For information about account feature permissions, see Editing linked account see Configuring admin and supervisor feature permissions.
To create a new user in the account you are logged in to, perform the following steps:
- Go to User Admin. For information about accessing User Admin, see Accessing and finding your way around User Admin. User Admin appears.
- Open Users tab. To add a new user, click Create user in the top-right corner. If the button is unavailable, you don't have enough permissions to create new user.
A new user appears. Provide the following information:
Expand title Click here to see all user details Insert excerpt _ExcerptCreateEditUser _ExcerptCreateEditUser nopanel true If you leave a mandatory field empty or enter a value that is not valid, an error message appears. The number of errors appears alongside Create. You cannot click Create until you have corrected all the errors.
- When you have provided valid information in all mandatory fields, click Create. Your new user is created. Alternatively click Cancel to cancel creating this new user.
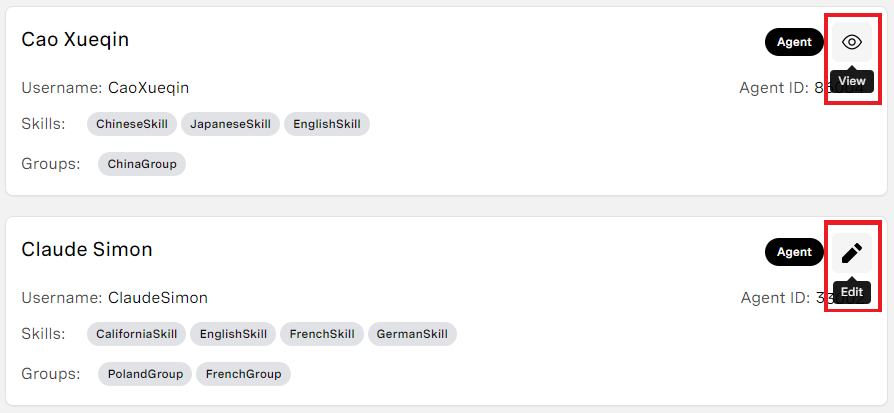
How do I view an existing user's details?
When you first access User Admin, a list of users you can access in the account you are logged in to appears. From this list you can see each user's name, username and license. If the user has agent access granted, the user's ID, assigned skills, and groups to which they belong also appear.
...
| Insert excerpt | ||||||
|---|---|---|---|---|---|---|
|

How do I edit an existing user's details?
To edit a user, you need the Edit Useruser feature permission. For information about account feature permissions, see Editing linked account see Configuring admin and supervisor feature permissions.
To edit an existing user in the account you are logged in to, perform the following steps:
- Go to User Admin. For information about accessing User Admin, see Accessing and finding your way around User Admin. User Admin appears.
- Locate the user you want to edit using search or by scrolling or filtering list.
Insert excerpt _ExcerptUserAdminViewEditUserPermission _ExcerptUserAdminViewEditUserPermission nopanel true - When you find the user you want to edit, click Edit. The user's details appear.
Update the information in the fields as required.
Expand title Click here to see all user details Insert excerpt _ExcerptCreateEditUser _ExcerptCreateEditUser nopanel true If you leave a mandatory field empty or enter a value that is not valid, an error message appears. The number of errors appears alongside Save. You cannot click Save until you have corrected all the errors.
- When you have finished making changes, click Save. Your changes are saved. Alternatively click Cancel to undo all your changes.
Insert excerpt _ExcerptLicenseAndPermissions _ExcerptLicenseAndPermissions nopanel true
How do I archive and delete users?
To archive or delete a user, you need the Edit Useruser feature permission. For information about account feature permissions, see Editing linked account see Configuring admin and supervisor feature permissions.
In the User Admin area of the Vonage Contact Center (VCC) Admin Portal, you can archive users, revert users to active, and delete archived users. You can filter archived and active users to improve performance, particularly in accounts with large number of users. For information about filtering users, see Accessing and finding your way around User Admin.
| Info |
|---|
Supervisor and admin users can archive and reactivate other users; only admin users can delete archived users. Archived and deleted users do not appear in Dashboards. To find out more about Dashboards, see Dashboards Real-time Analytics. Archived users can no longer log in to Vonage Contact Center (VCC) or ContactPad. Also, archived users can no longer use their user-level API credentials to request a bearer access token. For information, see How to authenticate with a Vonage Contact Center (VCC) API. |
Archiving and reverting users to active
To archive a user, perform the following steps:
...
| Info |
|---|
| You can also archive and revert users to active using bulk actions. For more information, see Configuring multiple users (using bulk actions). |
Deleting users
To delete a user, perform the following steps:
...
| Info |
|---|
You can only delete users in the single user view. You cannot delete users using bulk actions. You cannot delete a user that has any user-level API credentials in any account. To delete such a user, delete their API credentials first. For information, see Configuring API credentials. |
How do I set
...
or update a user's licenses?
To set the telephony region for an agent useror update a user's licenses, you need the the Edit Useruser feature permission. For information about account feature permissions, see Editing linked account permissions.
If Global Voice Assurance is available in your account, to set the telephony region for an agent, perform the following steps:
...
see Configuring admin and supervisor feature permissions.
Perform the following steps:
- Go to User Admin.
- Locate the user that you want to set telephony region or update the license or licenses for using search or scrolling list.
Insert excerpt _ExcerptUserAdminViewEditUserPermission _ExcerptUserAdminViewEditUserPermission nopanel true - When you find the user you want to edit, click Edit. The user's details appear.
- Click Agent SettingsClick License Status.
- Under Telephony Region
In License, select the
appropriate telephony regionrequired license for the user. For
the list of available values, see What telephony regions are available? later in this page. - Click Save to save your settings.
All agents must have a telephony region for Global Voice Assurance to work correctly.
| Note | ||
|---|---|---|
| ||
After you have changed the telephony region of an agent who is using WebRTC, you must instruct that agent to log out of ContactPad. The agent must wait for 10 seconds before logging back in. This delay is required for the telephony region change to take effect. |
What telephony regions are available?
...
The VCC Admin Portal uses Vonage Contact Center infrastructure in the NAM EAST region to deliver outbound calls from agents with a Telephony Region of NAM EAST (Default).
| Info | ||
|---|---|---|
| ||
"Default" indicates that NAM EAST is the default telephony region for agents in North America (NAM). NAM EAST (Default) is not the default telephony region for all agents in all regions. |
...
How do I define callback numbers for an agent user?
To define callback numbers for an agent user, you need the Edit User permission. For information about account permissions, see Editing linked account permissions.
When an agent makes an outbound call, the agent can select a number for Vonage Contact Center to present to the person they are calling. In Vonage Contact Center, these presented numbers are called outbound CLIDs, or callback numbers. For more information, see Callback numbers.
If enabled for your account, to restrict the callback numbers available to an agent to present, perform the following steps:
- Go
information about license types, see User Admin.
Info You can a change a user's license to one at or below your license level.
For example, as a user with a supervisor license you can change the user's license to Supervisor, Wallboard or Agent. You cannot change the license to Admin.
Optionally allow a user with a wallboard, a supervisor, or an admin license to act as an agent. For information, see How do I allow a user to act as agent to work with interactions? later in this page.
- If available, in Products, select the applicable license or licenses for the available product or products.
- Click Save to save your settings.
How do I set telephony regions for agent users?
To set the telephony region for an agent user, you need the Edit user feature permission. For information about feature permissions, see Configuring admin and supervisor feature permissions.
If Global Voice Assurance is available in your account, to set the telephony region for an agent, perform the following steps:
- Go to User Admin.
- Locate the user that you want to set telephony region for using search or scrolling list.
Insert excerpt _ExcerptUserAdminViewEditUserPermission _ExcerptUserAdminViewEditUserPermission nopanel true - When you find the user you want to edit, click Edit. The user's details appear.
- Click Agent Settings.
- Under Telephony Region, select the appropriate telephony region for the user. For the list of available values, see What telephony regions are available? later in this page.
- Click Save to save your settings.
All agents must have a telephony region for Global Voice Assurance to work correctly.
| Note | ||
|---|---|---|
| ||
After you have changed the telephony region of an agent who is using WebRTC, you must instruct that agent to log out of ContactPad. The agent must wait for 10 seconds before logging back in. This delay is required for the telephony region change to take effect. |
What telephony regions are available?
VCC uses the value of Telephony Region to determine the location of the infrastructure to use to deliver outbound calls. For example, VCC uses infrastructure in the London region to deliver outbound calls from agents with a Telephony Region of London.
| Telephony Region |
|---|
| London |
| Frankfurt |
| Richmond |
| Portland |
| Singapore |
| Sydney |
How do I define callback numbers for an agent user?
To define callback numbers for an agent user, you need the Edit user feature permission. For information about feature permissions, see Configuring admin and supervisor feature permissions.
When an agent makes an outbound call, the agent can select a number for Vonage Contact Center in ContactPad to present to the person they are calling. In Vonage Contact Center, these presented numbers are called outbound CLIDs, or callback numbers. For more information, see Callback numbers.
If enabled for your account, to restrict the callback numbers available to an agent to present from ContactPad, perform the following steps:
- Go to User Admin.
- Locate the user that you want to set the callback numbers for using search or by scrolling or filtering list.
Insert excerpt _ExcerptUserAdminViewEditUserPermission _ExcerptUserAdminViewEditUserPermission nopanel true - When you find the user you want to edit, click Edit. The user's details appear.
- Click Agent Settings.
- Under Callback Numbers, select the numbers you wish the user to have access to. The dropdown list contains all outbound CLIDs available for the user.
- Click All if you wish to add all numbers from the list or Clear to remove all numbers for the user.
- Click Save to save your settings.
How do I enable an agent user to use ContactPad with WebRTC and, optionally enable auto-answer?
To enable ContactPad with WebRTC for an agent user and, optionally, enable auto-answer, you need the Edit user feature permission. For information about feature permissions, see Configuring admin and supervisor feature permissions.
For information about using ContactPad with WebRTC, see ContactPad with WebRTC.
| Info | ||||||||
|---|---|---|---|---|---|---|---|---|
|
If WebRTC is available in the agent's account, perform the following steps:
- Go to User Admin.
- Locate the user that you want to set the callback numbers for using search or by scrolling or filtering list.
Insert excerpt _ExcerptUserAdminViewEditUserPermission _ExcerptUserAdminViewEditUserPermission nopanel true - When you find the user you want to edit, click Edit. The user's details appear.
- Click Agent Settings.
- You can now enable WebRTC for the user in two ways:
- To enable the user to use ContactPad with WebRTC, under WebRTC Enabled, click Yes.
To enable the user to control whether they use ContactPad with WebRTC, under Agent can enable WebRTC in ContactPad, click Yes. The Use Softphone check box will appear in the user's ContactPad.
- If enabled for your account, you can also control auto-answer settings for inbound, outbound, or both calls.
- To enable auto answer for outbound calls, under Automatically answer outbound calls, click Yes.
- To enable auto answer for inbound calls, under Automatically answer inbound calls, click Yes.
- To enable auto answer for outbound calls, under Automatically answer outbound calls, click Yes.
- Click Save to save your settings.
The user can now use WebRTC in ContactPad — although they may need to select Use Softphone in ContactPad first. For information about using ContactPad with WebRTC, see Using ContactPad with WebRTC.
| Note |
|---|
You must also provide a valid phone number for the agent. If WebRTC is ever unavailable, Vonage Contact Center will use this number to route calls to your agent. |
How do I enable enforced disposition codes feature for an agent user?
To enable enforced disposition codes feature for an agent user, you need the Edit user feature permission. For information about feature permissions, see Configuring admin and supervisor feature permissions.
To enable an agent to use the enforced disposition codes feature, edit the agent in User Admin.
If the enforced disposition codes feature is available in the agent's account, and you are enabled to switch this feature on and off for individual agents, perform the following steps:
- Go to User Admin.
- Locate the user that you want to set the callback numbers enable enforced disposition codes feature for using search or by scrolling or filtering list.
Insert excerpt _ExcerptUserAdminViewEditUserPermission _ExcerptUserAdminViewEditUserPermission nopanel true - When you find the user you want to edit, click Edit. The user's details appear.
- Click Agent Settings.
- Under Callback Numbers, select the numbers you wish the user to have access to. The dropdown list contains all outbound CLIDs available for the user.
- Click All if you wish to add all numbers from the list or Clear to remove all numbers Under Enforced Disposition Codes Enabled, click Yes to activate the feature for the user.
- Click Save to save your settings. Repeat for all users you want to use the enforced disposition codes feature.
How do I enable an agent user to
...
control call recordings?
To enable ContactPad with WebRTC an agent user to control call recordings, you need the Edit Useruser feature permission. For information about account permissions, see Editing linked account permissions.
For information about using ContactPad with WebRTC, see ContactPad with WebRTC.
...
If WebRTC is available in the agent's accountfeature permissions, see Configuring admin and supervisor feature permissions.
To enable an agent to stop (pause) and start (resume) call recordings in ContactPad, edit the agent in User Admin.
If call recording control is available in the agent's account, and you are enabled to switch this feature on and off for individual agents, perform the following steps:
- Go to User Admin.
- Locate the user that you want to set the callback numbers for to enable to control call recordings using search or by scrolling or filtering list.
Insert excerpt _ExcerptUserAdminViewEditUserPermission _ExcerptUserAdminViewEditUserPermission nopanel true - When you find the user you want to edit, click Edit. The user's details appear.
- Click Agent Settings.
- You can now enable WebRTC for the user in two ways:
- To enable the user to use ContactPad with WebRTC, under WebRTC Enabled, click Yes.
To enable the user to control whether they use ContactPad with WebRTC, under Agent can enable WebRTC in ContactPad, click Yes. The Use Softphone check box will appear in the user's ContactPad.
- Click Save to save your settings.
The user can now use WebRTC in ContactPad after installing the WebRTC extension and, optionally, clicking Use Softphone in ContactPad. For information about using ContactPad with WebRTC, see Using ContactPad with WebRTC.
...
You must also provide a valid phone number for the agent. If WebRTC is ever unavailable, Vonage Contact Center will use this number to route calls to your agent. The agent's telephone number must be unique in your account.
...
- to edit, click Edit. The user's details appear.
- Click Agent Settings.
- Under Agent can toggle call recordings in ContactPad, click Yes to activate the feature for the user.
- Click Save to save your settings. Repeat for all agents you want to control call recordings.
For information about controlling call recording in ContactPad, see Call recording.
How do I enable
...
an agent user to record their screen?
To enable enforced disposition codes feature for enable an agent useruser to record their screen, you need the Edit Useruser feature permission. For information about account feature permissions, see Editing linked account see Configuring admin and supervisor feature permissions.
To enable an agent to use the enforced disposition codes featurerecord their screen using the Vonage CC Screen Recording application, edit the agent in User Admin.
If the enforced disposition codes feature If screen recording is available in the agent's account, and you are enabled to switch this feature on and off for individual agents, perform the following steps:
- Go to User Admin.
- Locate the user that you want to enable enforced disposition codes feature screen recording for using search or by scrolling or filtering list.
Insert excerpt _ExcerptUserAdminViewEditUserPermission _ExcerptUserAdminViewEditUserPermission nopanel true - When you find the user you want to edit, click Edit. The user's details appear.
- Click Agent Settings.Under
- Enforced Disposition Codes Under Screen Recording Enabled, click Yes to activate the feature for the user.
- Click Save to save your settings. Repeat for all users you want to use the enforced disposition codes featureagents you enable screen recording for.
For information about screen recording in ContactPad, see Screen Recording in Vonage Contact Center.
How do I
...
set interaction capacity for an agent user
...
?
To enable set interaction capacity for an agent user to control call recordings, you need the Edit User permission. For information about account permissions, see Editing linked account permissions.
To enable an agent to stop (pause) and start (resume) call recordings in ContactPad, edit the agent in User Admin.
If call recording control is available in the agent's account, and you are enabled to switch this feature on and off for individual agents, perform the following steps:
...
the Manage Routing Settings feature permission. For information about feature permissions, see Configuring admin and supervisor feature permissions.
You can define interaction capacity settings for individual agents. This setting takes precedence over the settings defined for an account in System Settings. For more information about setting account level interaction capacity, see Editing Configuration (Account Settings).
To set interaction capacity for an agent, edit the agent in User Admin. Perform the following steps:
- Go to User Admin.
- Locate the user that you want to enable enforced disposition codes feature set interaction capacity for using search or by or by scrolling or filtering list.
Insert excerpt _ExcerptUserAdminViewEditUserPermission _ExcerptUserAdminViewEditUserPermission nopanel true - When you find the user you want to edit, click Edit. The user's details appear.
- Click Agent Settings.
- Under Agent can toggle call recordings in ContactPad, click Yes to activate the feature for the user.
- Click Save to save your settings. Repeat for all agents you want to control call recordings.
For information about controlling call recording in ContactPad, see Call recording.
How do I set interaction capacity for an agent user?
To set interaction capacity for an agent user, you need the Manage Routing Settings permission. For information about account permissions, see Editing linked account permissions.
You can define interaction capacity settings for individual agents. This setting takes precedence over the settings defined for an account in System Settings. For more information about setting account level interaction capacity, see Editing System Settings.
To set interaction capacity for an agent, edit the agent in User Admin. Perform the following steps:
- Go to User Admin. Locate the user that you want to set interaction capacity for using search or by scrolling or filtering list.
- When you find the user you want to edit, click Edit. The user's details appear.
- Click Routing Settings and then click Interaction Capacity.
- Under Interaction Capacity, click Custom.
- Set the percentage of capacity for each interaction type for the agent:
- Live - eg. Phone (51-100)—the percentage for a live interaction, such as a phone call, between 51 and 100 percent.
- Non-live - eg. Case (1-100)—the percentage for a non-live interaction, such as an email, between 1 and 100 percent. Semi-live - eg. Chat (1-100)—the percentage for a semi-live interaction, such as chat, between 1 and 100 percent
- Click Routing Settings and then click Interaction Capacity.
- Under Interaction Capacity, click Custom.
- Set the percentage of capacity for each interaction type for the agent:
- Live - eg. Phone (51-100)—the percentage for a live interaction, such as a phone call, between 51 and 100 percent.
- Non-live - eg. Case (1-100)—the percentage for a non-live interaction, such as an email, between 1 and 100 percent.
- Semi-live - eg. Chat (1-100)—the percentage for a semi-live interaction, such as chat, between 1 and 100 percent.
- Click Save to save your settings.
To revert the settings to the interaction capacity settings defined for the account in System Settings, click Default and then click Save.
How do I define the proficiency of an agent user in a skill?
To define the proficiency of an agent user in a skill, you need the Manage Routing Settings feature permission. For information about feature permissions, see Configuring admin and supervisor feature permissions.
A skill level indicates how proficient an agent user is in the skill.
To set the level an agent has in a skill, perform the following steps:
- Go to User Admin.
- Locate the user you want to define the proficiency of using search or by scrolling or filtering the list of users.
Insert excerpt _ExcerptUserAdminViewEditUserPermission _ExcerptUserAdminViewEditUserPermission nopanel true - When you find the user you want to edit, click Edit. The user's details appear.
- Click Routing Settings and then click Skills.
- Optionally add a new skill.
- Alongside the applicable skill or skills, click the appropriate number on the slider or sliders. For an existing skill, a description of the change you make appear alongside the slider, for example 'Level 7 to 6'.
- Click Save to save your settings.
To revert the settings to the interaction capacity settings defined for the account in System Settings, click Default and then click Save.
How do I define the proficiency of an agent user in a skill?
To define the proficient of an agent user in a skill, you need the Manage Routing Settings permission. For information about account permissions, see Editing linked account permissions.
A skill level indicates how proficient an agent user is in the skill.
To set the level an agent has in a skill, perform the following steps:
...
The selected skill levels can now be used to determine which agent to route an interaction to. In a scenario where two agents, with otherwise identical characteristics, are available to handle an interaction at the same time, the agent with the highest level in a mandatory or unexpired skill will receive the interaction.
How do I allow user to act as agent to work with interactions?
To grant access to and allow user to act as agent, you need the Edit User permission. For information about account permissions, see Editing linked account permissions.
You can allow users such as supervisors, administrators, or wallboard users to act as agents and handle calls or other interactions. Agents have access and use enabled by default due to the nature of their work. You cannot revoke this access in VCC.
To allow user to act as agent, perform the following steps:
...
- If the non-agent user is not currently granted with agent access, Agent access granted appears. Click Yes to grant agent access.
- If the non-agent user is already granted with agent access, Agent access granted does not appear.
...
When you have granted agent access and saved this setting—by clicking Create or Save—you cannot revoke access for the user. You can allow or deny to act as agent for the user at any time. Granting agent access to the supervisor, wallboard, or admin users does not increase usage of contracted agents licenses.
How do I unlock a locked user account?
After five or more incorrect attempts to log in to VCC Portal or ContactPad, a user's account is locked.
To unlock a locked user account, you need the Edit User permission. For information about account permissions, see Editing linked account permissions.
| Info |
|---|
Agents can unlock their own account using the Forgot your password? link on the Portal Login page. For more information, see Logging in to ContactPad. |
To unlock user accountThe selected skill levels can now be used to determine which agent to route an interaction to. In a scenario where two agents, with otherwise identical characteristics, are available to handle an interaction at the same time, the agent with the highest level in a mandatory or unexpired skill will receive the interaction.
How do I allow a user to act as agent to work with interactions?
To grant access to and allow a user to act as agent, you need the Edit user feature permission. For information about feature permissions, see Configuring admin and supervisor feature permissions.
You can allow users such as supervisors, administrators, or wallboard users to act as agents and handle calls or other interactions. Agents have access and use enabled by default due to the nature of their work. You cannot revoke this access in VCC.
To allow user to act as agent, perform the following steps:
- Go to User Admin.
- Locate the non-agent user you want to allow or deny to act as agent.
Insert excerpt _ExcerptUserAdminViewEditUserPermission _ExcerptUserAdminViewEditUserPermission nopanel true - When you find the user you want to edit, click Edit. The user's details appear.
- Click License Status.
- The field may appear:
- If the non-agent user is not currently granted with agent access, Agent access granted appears. Click Yes to grant agent access.
- If the non-agent user is already granted with agent access, Agent access granted does not appear.
- The field Allow to act as agent appears. Click Yes to allow the user to act as agent.
- Click Save to save your settings.
When you have granted agent access and saved this setting—by clicking Create or Save—you cannot revoke access for the user. You can allow or deny to act as agent for the user at any time. Granting agent access to the supervisor, wallboard, or admin users does not increase usage of contracted agents licenses.
How do I unlock a locked user account?
After five or more incorrect attempts to log in to VCC Portal or ContactPad, a user's account is locked.
To unlock a locked user account, you need the Edit user feature permission. For information about feature permissions, see Configuring admin and supervisor feature permissions.
| Info |
|---|
Agents can unlock their own account using the Forgot your password? link on the Portal Login page. For more information, see Logging in to ContactPad. |
To unlock user account, perform the following steps:
- Go to User Admin.
- Locate the user whose account you want to unlock. Users with locked account are indicated by lock icon next to their name.
Insert excerpt _ExcerptUserAdminViewEditUserPermission _ExcerptUserAdminViewEditUserPermission nopanel true - When you find the user you want to edit, click Edit. The user's details appear.
- Click Unlock user account. A dialog box appears. If the button is unavailable, you don't have Manage Routing Settings permission granted.
- Click Confirm to unlock user account. Alternatively click Cancel to cancel unlocking user account.
How do I reset a user's password?
To reset a user's password, you need the Edit user feature permission. For information about feature permissions, see Configuring admin and supervisor feature permissions.
To reset the user's password, perform the following steps:
- Go to User Admin, Users tab.
- Locate the user whose account password you want to unlock. Users with locked account are indicated by lock icon next to their name. reset.
Insert excerpt _ExcerptUserAdminViewEditUserPermission _ExcerptUserAdminViewEditUserPermission nopanel true - When you find the user you want to edit, click Edit. The user's details appear.
- Click Unlock user account Reset password. A dialog box appears. If If the button is unavailabledisabled, it means you don't have Manage Routing Settings permission granted.
- Click Confirm to unlock user accountSend password reset link to reset user password. An email with reset password link will be send to the user. Alternatively click Cancel to cancel unlocking resetting user accountpassword.
How do I
...
clone an existing user?
To reset a user's passwordclone an existing user, you need the Edit User Create user feature permission. For information about account permissions, see Editing linked account permissions. To reset the user's passwordabout feature permissions, see Configuring admin and supervisor feature permissions.
| Tip | ||
|---|---|---|
| ||
| You can clone from any existing active user or from a template user. You can create template users with the most common settings. If you use such users, you should archive them so as not to use up an available license. |
To clone an existing user, perform the following steps:
- Go to User Admin, Users tab.Locate the user whose password you want to reset.
Insert excerpt _ExcerptUserAdminViewEditUserPermission _ExcerptUserAdminViewEditUserPermission nopanel true - When you find the user you want to edit, click Edit. The user's details appear.
- Click Reset password. A dialog box appears. If the button is disabled, it means you don't have Manage Routing Settings permission granted.
- Click Send password reset link to reset user password. An email with reset password link will be send to the user. Alternatively click Cancel to cancel resetting user password. to User Admin.
- Locate the user you want to clone. Click the Clone user icon. A clone dialog appears.
- Provide the required Personal data and — if you are cloning an agent — Agent settings.
- To create a new user with the values you provide and with settings from the original user, click Clone user.
| Note | ||
|---|---|---|
| ||
If you are a supervisor user, your newly created user may not be in all the groups that the original user is in or have permissions to the same groups. This may be because you don't have write access to all of the groups that the original user is in or has permissions to. If you are an admin user, you have full access to all groups. Cloning a user will, therefore, result in your new user being in exactly the same groups or having exactly the same group permissions as the original user. |