Configuring Salesforce external routing for Vonage Contact Center
Salesforce external routing is a routing model within Salesforce Omni-Channel that notifies a third party that an interaction needs routing. If external routing is enabled in your Salesforce org, you can configure Salesforce to delegate routing decisions for supported interactions to Vonage Contact Center. Using your configured interaction plans, Vonage Contact Center routes the interaction to an agent according to the configuration in your chosen interaction plan in Interaction Plan Architect.
For more information about Salesforce external routing for Vonage Contact Center (VCC), see Vonage Contact Center omni-channel solution.
Prerequisites
- VCC must be integrated with Salesforce. Your integration includes the ability for agents to use ContactPad within Salesforce, and may include the popping of related Salesforce records when a call is assigned to an agent in VCC or automating the recording of calls. For information about configuring VCC in Salesforce, see Configuring Vonage Contact Center in Salesforce.
- Salesforce Omni-Channel must be configured in your Salesforce org. For information about configuring Salesforce Omni-Channel, see Salesforce help.
- External Routing is enabled by default in your Salesforce org. If it is not enabled, you must enable it in the Salesforce org that contains the user that you link to VCC. For information about linking VCC to a Salesforce user account, see Linking Vonage Contact Center to a Salesforce account.
VCC must be configured to assign interactions that arrive from Salesforce to agents. The configuration is contained within an interaction plan in Interaction Plans Architect. The interaction plan must route interactions to an ACD applet in skills-based mode, that is, a UCD applet. For information about creating an interaction plan, see Creating an interaction plan. If you're using Interaction Plans Manager with Interaction Plans Architect, you need to create an API destination and map that to the interaction plan. For information about using Interaction Plans Manager to create an API destination, see Using Interaction Plans Manager.
No answer timeout
The No answer timeout setting in a UCD applet is not compatible with using Salesforce external routing.
Limitations
Salesforce external routing is not compatible with integration with Salesforce Omni-Channel presence. For information about integration with Salesforce Omni-Channel, see Vonage Contact Center omni-channel solution. Ask your account manager to disable this feature.
Enhanced Omni-Channel routing is not currently supported in VCC.
To use external routing for work items other than Live Agent chats (now simply called Chat in Salesforce), you must change the owner of the item to a queue that you create for external routing. For information about creating queues for external routing, see Create queue later in this page.
In the Omni-Channel widget in Salesforce, agents remain active regardless of their ContactPad status. This will impact the Live Agent chat button. For information about working around agents' active status, see Agent Availability API.
In order to capture user-related information for a chat like a username, email address, and so on, use a Salesforce pre-chat form. For information about configuring pre-chat forms, see Salesforce help.
Vonage recommends limiting the number of simultaneous chats to ten per agent.
Frequent queue switching might cause routing issues.
Salesforce external routing supports versions of ContactPad that can handle multiple interactions; you cannot use single-interaction ContactPad.
Integration with Salesforce external routing does not currently support the following features:
- Manual wrap up
- Configuring multiple Contact Center accounts
- Enforced disposition codes
- Manual parking—this functionality is replaced by the interrupt feature
- Status-based capacity model for External Routing
Preparing your org
Before you can configure which interactions—or work items—you want to route and how, you must configure a few settings in VCC and Salesforce.
- Enabling Salesforce external routing in VCC. For information, see the Enabling Salesforce external routing in VCC section later in this page.
- Enabling Salesforce external routing in Salesforce. For information, see the Enabling Salesforce external routing in Salesforce section later in this page.
- Enable Salesforce Omni-Channel. For information, see the Enable Salesforce Omni-Channel section later in this page.
- Enable CTI adapter. For information, see the Enable CTI adapter section later in this page.
Enabling Salesforce external routing in VCC
In VCC, define where Salesforce will route interactions. Salesforce must route interactions to the interaction plans configured to handle such interactions.
In addition to defining the default interaction plan for your routed interactions, you can also define alternative plans for different queues. For example, you might want to define different routing scenarios for chats in different languages considering the agents' skills.
VCC currently supports external routing for Salesforce case, chat, messaging, and custom objects only.
To define where Salesforce will route interactions, perform the following steps:
Log in to the VCC Admin Portal. For information about logging in to the VCC Admin Portal, see Logging in to the Vonage Contact Center Admin Portal.
From the VCC homepage, move your mouse pointer over the menu icons on the left of the page.
In the menu that appears, click Salesforce or CRM Admin (within Business Apps), depending on which appears. If you cannot see Salesforce or CRM Admin and think you should be able to, contact support. Salesforce or CRM Administration appears.- In the External Routing Configuration section, click External Routing Configuration. External Routing Configuration appears.
Configure interaction plans within the Interaction plans section.
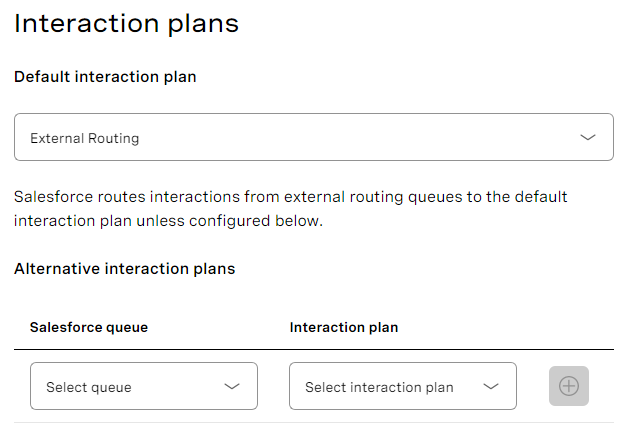
- In Default interaction plan, select the default interaction plan or API destination. Salesforce will route external routing interactions to this interaction plan or API destination by default.
To route interactions from specific external routing queues to alternative interaction plans or API destinations, map the queues to different interaction plans in Alternative interaction plans.
Select a queue in the Salesforce queue list, and then select an interaction plan in the Interaction plan list. The available queues are the queues set up for the Salesforce org linked with your VCC account. The available interaction plans are in the Interaction Architect area of VCC for an account.You can assign a queue to only one interaction plan. However, you can assign the same interaction plan to multiple queues.Click the plus button to add your configuration.
Configure Salesforce case statuses in the Salesforce case statuses section.
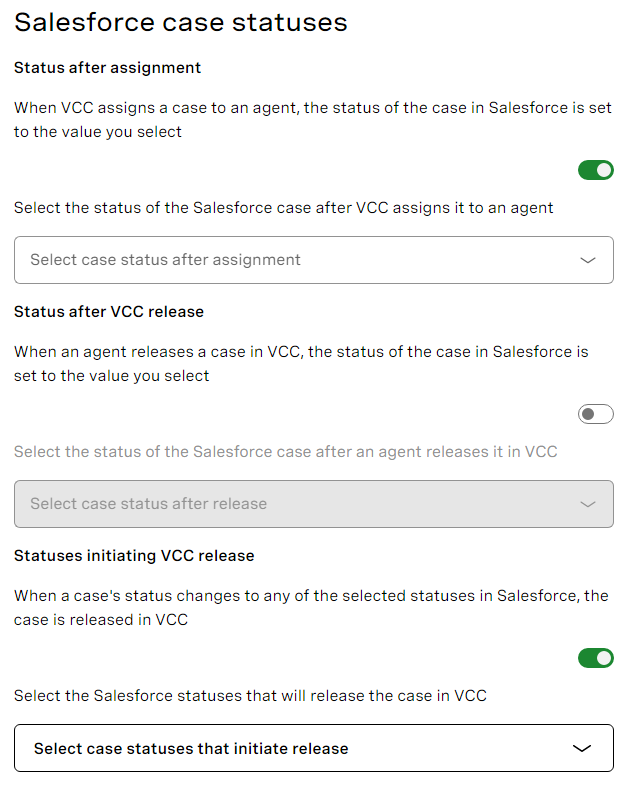
Setting Details Status after assignment When VCC assigns a case to an agent, the status of the case in Salesforce is set to the value you select.
You can turn this setting on or off. If you turn it off, the status of the case in Salesforce does not change when VCC assigns a case to an agent.
If you turn the setting on, you must select the status of the Salesforce case after VCC assigns it to an agent.
You can't reuse this status in Status after VCC release or Statuses initiating VCC release. Statuses can only be used once.
Status after VCC release When an agent releases a case in VCC, the status of the case in Salesforce is set to the value you select.
You can turn this setting on or off. If you turn it off, the status of the case in Salesforce does not change when the agent releases the case in VCC.
If you turn the setting on, you must select the status of the Salesforce case after the agent releases the case in VCC. If there are no case statuses, an error will appear. You need to create one or more case statuses before you can select one.
Statuses initiating VCC release When a case's status changes to any of the selected statuses in Salesforce, the case is released in VCC.
You can turn this setting on or off. If you turn it off, the interaction is not released in VCC when the status of the case changes.
If you turn it on, you must select one or more Salesforce statuses that will cause the case to be released in VCC. If there are no case statuses, an error will appear. You need to create one or more case statuses before you can select one.
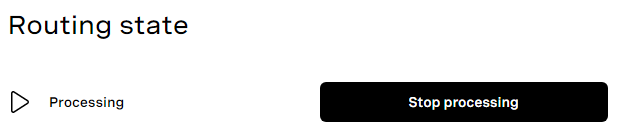
In Routing state, click Start processing or Stop processing. VCC indicates the current routing state with Processing and Stopped icons. Click Save configuration to apply the changes.
When finished, click Save configuration. You can delete your configuration at any point by clicking the delete button (bin icon).
A message appears to indicate that you have saved your configuration.If a queue or interaction plan that a configuration uses is removed, an error appears in the Configured interaction plans section. You cannot add or update configurations until you remove the underlying issue.
Refreshing a Salesforce sandbox connected to a VCC sandbox
If you are refreshing a Salesforce sandbox that is connected to a VCC Sandbox, you may need to complete the following steps. These are required to ensure that chats are routed correctly.
- In Interaction Plans Manager (Manager within Interaction Plans) in the VCC Admin Portal, create a new API destination. For information about creating a destination, see the How do I create a new API destination? section in Using Interaction Plans Manager.
- Also in Interaction Plans Manager, create a new mapping. For information about creating a mapping, see the How do I create a new mapping? section in Using Interaction Plans Manager. Map your new destination to the applicable interaction plan.
- In Salesforce or CRM Admin (within Business Apps), go External Routing Configuration. Click Stop processing.
- In Default interaction plan, select the destination you have just created. Salesforce will route all external routing interactions to this destination and subsequently to the mapped interaction plan unless you configure alternative interaction plans.
- Continue to configure external routing as described in the Enabling Salesforce external routing in VCC section earlier in this page. Make sure that you click Start processing and Save configuration when you have finished configuration.
Enabling Salesforce external routing in Salesforce
To perform the following tasks you must sign in to Salesforce as an administrator. The description below assumes you use Salesforce Classic, but you can also complete the tasks in Salesforce Lightning. We recommend that you perform the tasks in order, open Setup and use the Quick Find box on the Salesforce Setup menu to access the options required at each step.
Enable Salesforce Omni-Channel
To use Salesforce external routing, you must firstly enable Omni-Channel. Then you must add the Omni-Channel widget to one or more console apps, such as Service Cloud or Sample Console.
Agents use the Omni-Channel widget to log in to and out of Omni-Channel. If an agent is logged in to ContactPad, VCC automatically sets their presence status in their Omni-Channel widget to Online, Available, or Ready, depending on the name of online presence status in your org. For information about setting up presence statuses in Salesforce, see the Create presence statuses section later in this page. When a new Salesforce work item is assigned to an agent, the item appears in their omni-channel widget. Depending on your configuration, an agent might be able to accept or decline or reject work items in the widget.
If you have already configured Salesforce Omni-Channel, you will have already enabled Omni-Channel and added the Omni-Channel widget to one or more console apps. At this point, verify that the following tasks have been performed.
To enable Omni-Channel, go to Omni-Channel Settings and select the Enable Omni-Channel check box.
To add the widget to one or more console apps, perform the following steps:
- Go to Apps.
- Alongside the console app to which you want to add the widget, click Edit.
- In Choose Console Components, add Omni-Channel to Selected Items.
- Click Save. Your console app is saved and the Omni-Channel will now appear. Add the widget to as many console apps as required.
Enable CTI adapter
To synchronize ContactPad with Salesforce Lightning you must modify the CTI integration settings. Synchronizing ContactPad and Salesforce Lightning means releasing an interaction by clicking Release in ContactPad ends the corresponding work item in the Omni-Channel widget. To synchronize ContactPad with Salesforce Lightning, perform the following steps:
- Go to Call Centers.
- Alongside your VCC call center, click Edit.
- In CTI Adapter URL, append &crm=salesforce&topdomain=https://salesforce_instance.my.salesforce.com to the existing URL. Replace salesforce_instance with your Salesforce org's subdomain.
- Click Save. VCC can now inform Salesforce when an agent releases an interaction in ContactPad.
Configuring your VCC and Salesforce external routing integration
When you've prepared your org for external routing, you can customize the feature's integration with VCC for your needs. The following instructions describe a basic integration, using Salesforce case objects as the example interaction type.
To perform the following tasks you must sign in to Salesforce as an administrator, use Salesforce Classic and open Setup. We recommend that you perform the tasks in order and use the Quick Find box on the Salesforce Setup menu to access the options required at each step.
- Create service channels. For information, see the Create service channels section later in this page.
- Update routing configuration to use external routing for routing work items. For information, see the Update routing configuration to use external routing for routing work items section later in this page.
- Create queue. For information, see the Create queue section later in this page.
- Create presence statuses. For information, see the Create presence statuses section later in this page.
- Enable presence statuses for user profiles. For information, see the Enable presence statuses for user profiles section later in this page.
Create service channels
Service channels describe the Salesforce objects that Salesforce can route to agents—or, in this case, VCC. If you use Chat (formerly Live Agent) for chats, or SOS for video calls, Salesforce will already have created channels for these objects.
To create channels for additional objects, perform the following steps:
- Go to Service Channels.
- To create a new service channel, click New to create a new service channel.
- Provide a meaningful name for the channel and select the Salesforce Object that Salesforce will route to VCC.
- Click Save. Your service channel is saved. Repeat for any additional Salesforce objects you want to route.
In this example, saving these settings creates a new service channel for cases called Case Channel. The service channel enables Salesforce to route case records.

Update routing configuration to use external routing for routing work items
Routing configurations describe how Salesforce routes work items to agents—or, in this case, VCC.
To create a routing configuration, perform the following steps:
- Go to Routing Configurations.
- To create a new routing configuration, click New.
Provide a meaningful name for the configuration, and in the Routing Model list, click External Routing. Setting the routing model to External Routing indicates that Salesforce must route interactions to a third party—in this case, VCC.
If External Routing is not available, contact Salesforce support to enable external routing for your org.
Provide values for any other fields as required.
Routing Priority and Work Item Size
VCC does not use the value that you provide in Routing Priority and the Work Item Size fields for determining work item priority and size (capacity). For information about capacity, see Vonage Contact Center omni-channel solution.
- Click Save. Your routing configuration is saved. Repeat for any additional configurations you require.
In this example, saving these settings creates a new routing configuration called External Routing Configuration. If any queues use External Routing Configuration, Salesforce will route work items using external routing. Currently the Routing Priority and Work Item Size fields are not used.

Create queue
When a work item of a configured type arrives in Salesforce, the work item enters a queue according to the record's service channel.
To create a queue, perform the following steps:
- Go to Queues.
- To create a new queue, click New.
Provide the following information:
Section Field Descripton Queue Name and Email Address Label The name of the queue. Used to identify the queue in future steps. Configuration with Omni-Channel Routing Routing Configuration The routing configuration used to route interactions the enter this queue.
Select one of the routing configurations created for external routing.
Supported Objects The Salesforce objects that can enter this queue.
Add one or more of the objects that correspond to the service channels that you have created for external routing to Selected Objects.
If you want to use VCC to route Salesforce Chat (formerly Live Agent) chats, add Live Chat Transcript objects.Queue Members The agents who can handle interactions that enter this queue.
Add one or more agents to Selected Members.
For information about any other fields, see Salesforce help.
- Click Save. Your queue is saved and is associated with the selected routing configuration.
In this example, saving these settings creates a queue for case records called Case Queue. Salesforce uses the settings in External Routing Configuration when routing case records in Case Queue. Case Queue has three members. To use the same queue for records of other object types, including custom object records, you'd need to add those objects to supported objects.

Create presence statuses
Presence statuses indicate your agents' availability to handle interactions in Omni-Channel. To use Salesforce external routing with VCC, you will need two presence statuses: one online status and one busy status. For an online status, you must include all the service channels from which Salesforce can route interactions to agents in that status.
To create presence statuses, perform the following steps:
- Go to Presence Statuses.
To create a new presence status, click New.
Provide a name for the presence status and, in Status Options, click Online or Busy.
Online status
Currently only one online status is supported for Salesforce external routing. You must name your online status "Online", "Available", or "Ready".
If you click Online, in Service Channels, add all the service channels from which you want online agents to receive interactions.
- Click Save. Your presence status is saved. Repeat steps so that you have one online status and one busy status.
In this example, saving these settings creates an online presence status called Available. Agents with this status can receive interactions from the Case Channel.

Enable presence statuses for user profiles
To enable agents to use the presence statuses you create, you must enable the status for them. You can do this through profiles or permission sets depending on how you configure permissions in your org.
- In Setup, go to Profiles.
- Edit the required user profile.
- Hover over the Enabled Service Presence Status Access link.
In this example, agents with the Standard User profile assigned to their user record can use the Available and Busy presence statuses.

Configuring case routing
To route cases using external routing, you must configure a way of setting the OwnerId field on each case record to the name of one of the new queues created for this purpose. This will add cases to the queues. The way recommended by Salesforce is using flows. For information about flows and using them to add cases to queues, see Flow Builder (Salesforce help).
When you have configured case routing using your preferred method, create a case to check that it is added to the required queue and routed to an agent.
Routing custom and messaging objects
You can use the same method to route custom and messaging objects. Set the OwnerId field on these records to the queue you want to use for external routing.
Configuring webchat routing
Update webchats to use VCC for routing
The instructions below describe how to update a chat button. For information about creating a chat button, see Salesforce help.
If you are using Chat (formerly Live Agent) for webchats, you will need to update the routing information for the chat button.
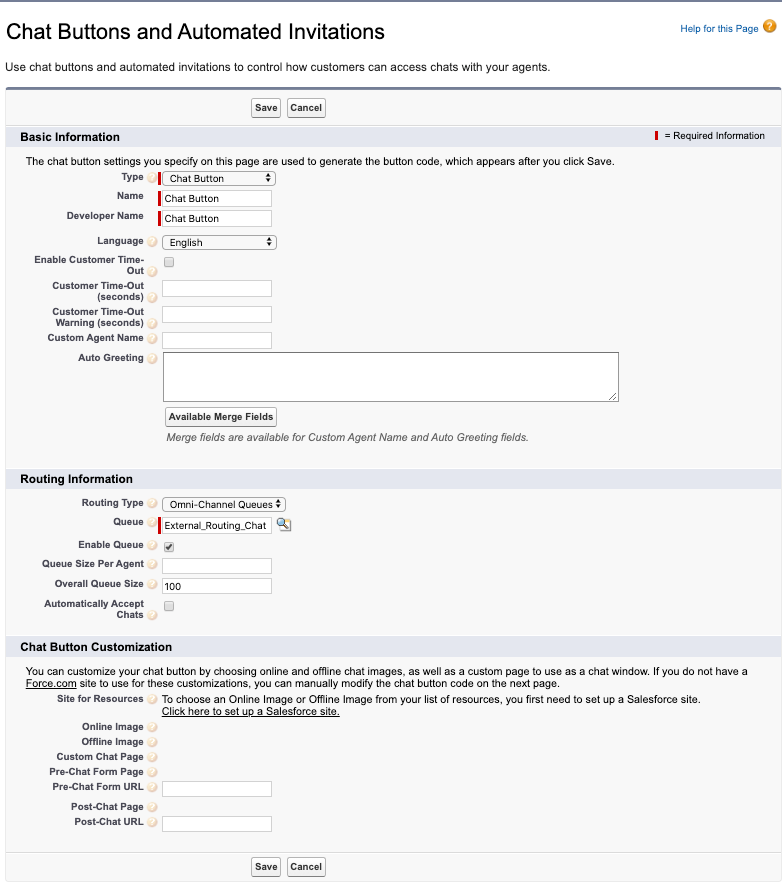
To update your chat button to route webchats using VCC, perform the following steps:
- Go to Chat Buttons & Invitations.
- Alongside your chat button, click Edit.
- In the Routing Information section, in the Routing Type list, select Omni-Channel.
In Queue, locate and select the queue that you have created for externally routing webchats. - Click Save. Salesforce will now route Chat (formerly Live Agent) webchats using external routing.
In this example, Chat (formerly Live Agent) webchats initiated using this button will now be routed to the External Routing Queue.
Enable chat users
For the chat service to work as intended, make sure you enable it for your user and all other users you wish to handle chats.
- Go to Users.
- Edit the required user.
- Make sure the Chat User check box is selected for that user.
- Click Save, if you applied any changes.
Configuring optional features
When you have configured external routing, you can choose to configure the following optional features:
- Automatically accepting or manually declining semi-live interactions. For information about enabling agents to automatically accept or manually decline interactions, see Presence Configuration Settings (Salesforce help).
- Timeout for automatically declining semi-live interactions in Omni-Channel widget. For information about configuring a timeout for declining semi-live interactions, see Push Time-Out (seconds) in Routing Configuration Settings (Salesforce help).
For general assistance, please contact Customer Support.
For help using this documentation, please send an email to docs_feedback@vonage.com. We're happy to hear from you. Your contribution helps everyone at Vonage! Please include the name of the page in your email.